🧢 Beautiful ✨ Detailed πŸ’ Adorable

T-Rex Amigurumi Pattern

T-Rex Amigurumi Pattern
4.2β˜… Rating
5-7 Hours Time Needed
2.3K Made This
βœ‚οΈ

Intermediate Level

Ideal for those with basic crochet experience, featuring slightly more advanced stitches and techniques to expand your skills.

⏱️

Weekend Treat

Takes 5-7 hours, making it an enjoyable project to finish over a couple of days.

🧸

Cute Companion

An adorable friend to cherish, handcrafted with love to bring comfort and joy for years to come.

About This T-Rex Amigurumi Pattern

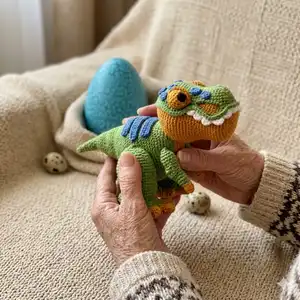
This pattern creates a delightful T-Rex amigurumi with a textured head cover, sculpted eyes, and decorative spots. Youll work in continuous spiral rounds and use back-loop and front-loop techniques for shaping and decorative edges. Photo step references are provided to help with tricky shaping and assembly.

T-Rex Amigurumi Pattern crochet pattern - detailed view of completed project

The pattern is written with clear round-by-round instructions and image references for placement and finishing. Perfect for makers who want a charming, poseable toy with personality.

Why You'll Love This T-Rex Amigurumi Pattern

I absolutely love this pattern because it combines playful design with clear, photographed steps that make shaping enjoyable. I enjoy the character that the sculpted eyes and decorative spots bring to the T-Rex, they really bring the face to life. The head overlay and edging are fun little details that add professional polish and texture. I also appreciate that the pattern uses simple increases and decreases to create expressive curves without relying on complicated stitches.

T-Rex Amigurumi Pattern step 1 - construction progress T-Rex Amigurumi Pattern step 2 - assembly progress T-Rex Amigurumi Pattern step 3 - details and accessories T-Rex Amigurumi Pattern step 4 - final assembly and finishing

Switch Things Up

I love how easy it is to customize this T-Rex by changing colors; try pastel greens and yellows for a softer look or high-contrast colors for a playful character.

I often make a miniature keychain version by using thinner yarn and a 1.25 mm hook to create a tiny portable pal.

For a chunkier friend, use bulky cotton yarn and a larger hook β€” the shaping stays consistent and you get a squishier toy.

I sometimes add embroidery details like tiny eyebrows or spots to vary expressions and give each T-Rex a unique personality.

Want posable limbs? Insert thin wire into the limbs before stuffing and bend them gently to pose your dinosaur.

Try different eye placements and sizes to change expressions β€” higher-set eyes make a cuter look, lower-set eyes give a more serious face.

Mix textures by using boucle or chenille yarn for the back spikes to add a tactile contrast to the smooth body.

Add tiny accessories like a scarf, felt teeth, or a little hat to create themed versions for holidays or gifts.

I sometimes make a set of dinosaurs in a family with graduated sizes and colors to display together or gift as a collection.

Don't be afraid to experiment with stitch variations such as using HDC instead of SC in some rounds for a slightly taller texture β€” it can subtly change the profile and give more room for decorative edges.

Common Mistakes & How to Fix Them

βœ— Skipping the stitch marker for the beginning of rounds can make your shaping shift unexpectedly; use a marker and adjust with a shifting stitch when necessary. βœ— Forgetting to stuff as you go leads to lumps and uneven shaping; stuff gradually and firmly where needed to keep smooth contours. βœ— Not counting stitches after increases or decreases will cause sizing errors later in the pattern; count at the end of each round to confirm the stitch total. βœ— Pulling color-change loops too tight will distort the edge work and make it difficult to crochet in the next round; use the invisible color change method and gently wrap the new color for neat joins.

T-Rex Amigurumi Pattern

Create a playful T-Rex amigurumi with this detailed crochet pattern designed to guide you step-by-step. Youll make a textured head, articulated body pieces, and charming details like eyes and spots. The pattern uses fine cotton yarn and clear photo references to help you every stitch of the way.

Intermediate 5-7 Hours

Materials Needed for T-Rex Amigurumi Pattern

β€” Main Fabric

  • 01
    YarnArt Jeans size 2 (fine): 55% cotton, 45% PAC (50 g / 150 m)
  • 02
    Mustard - color 84 (used for head and details)
  • 03
    Green - color 69 (used for head overlay and body pieces)
  • 04
    Blue - color 16 (spots and details)
  • 05
    Yellow - color 35 (eye outer pieces)
  • 06
    White - color 03 (edge scallop)
  • 07
    Black - color 53 (eye pupils)
  • 08
    Light brown - color 71 (alternative color option)
  • 09
    Brown - color 70 (alternative color option)
  • 10
    Orange - color 77 (alternative accent color)

β€” Tools Required

  • 01
    Crochet hook size 1.75 mm (Crochet Soft Touch recommended)
  • 02
    Scissors
  • 03
    Stitch markers
  • 04
    Sintepuh / polyester stuffing
  • 05
    Tapestry / yarn needle for sewing and finishing
  • 06
    Pins for assembly and placement
  • 07
    Thin cotton thread for row marker (optional)

Progress Tracker

0% Complete

β€” Head :

Info :

Mustard yarn color 84:

Round 1 :

8 sc into MR [8]

Round 2 :

8 inc [16]

Round 3 :

(1 sc, inc)*8 [24]

Round 4 :

1 sc, inc, (2 sc, inc)*7, 1 sc [32]

Round 5 :

(3 sc, inc)*8 [40]

Round 6 :

2 sc, inc, (4 sc, inc)*7, 2 sc [48]

Round 7-9 :

48 sc [48] {3 rounds}

Round 10 :

10 sc, 4 inc - hdc, 12 sc, dec, (4 sc, dec)*3 {img 1}, 2 sc [48]

Round 11-15 :

48 sc [48] {5 rounds}

Round 16 :

10 sc, 4 dec - hdc {img 1-9}, 12 sc, inc, (4 sc, inc)*3, 2 sc {img 10} [48]

Round 17-18 :

48 sc [48] {2 rounds}

Round 19 :

(5 sc, inc)*8 [56]

Round 20-21 :

56 sc [56] {2 rounds}

Round 22 :

3 sc, inc, (6 sc, inc)*7, 3 sc [64]

Round 23-26 :

64 sc [64] {4 rounds}

Round 27 :

3 sc, dec, (6 sc, dec)*7, 3 sc [56]

Round 28 :

28 sc, (5 sc, dec)*4 [52]

Round 29 :

30 sc, dec, (4 sc, dec)*3, 2 sc [48]

Round 30-31 :

48 sc [48] {2 rounds}

Round 32 :

2 sc, dec, (4 sc, dec)*7, 2 sc [40]

Round 33 :

40 sc [40]

Round 34 :

(3 sc, dec)*8 [32]

Round 35 :

1 sc, dec, (2 sc, dec)*7, 1 sc [24]

Round 36 :

(1 sc, dec)*8 [16]

Round 37 :

8 dec [8]

Info :

Stuff with sintepuh. Fasten off leaving a tail about 15 cm long and cut the yarn. Using a tapestry needle, weave the yarn tail through the front loop of each stitch and pull tight to close {img 11}.

β€” Head overlay (green) :

Info :

Green yarn color 69 - top overlay/face cover piece

Round 1 :

14 ch [14] {img 12}

Round 2 :

from the 2nd stitch from the hook 2 inc, 9 sc, inc, 3 sc in the 1 stitch, inc on the other side of the chain, 9 sc, inc, sc [32] {img 13}

Round 3 :

3 inc, 11 sc, 5 inc, 11 sc, 2 inc [42] {img 14}

Round 4 :

(sc, inc)*3, 9 sc, 2 hdc, (dc, inc - dc)*5, 2 hdc, 9 sc, (sc, inc)*2 [52] {img 15}

Round 5 :

18 sc, 2 hdc, (2 dc, inc - dc)*5, 2 hdc, 15 sc [57] {img 16}

Round 6 :

(2 sc, inc)*3, 42 sc, (2 sc, inc)*2 [62]

Round 7 :

2 sc, dec, 19 sc, (3 sc, inc)*5, 19 sc [66] {img 17}

Round 8 :

5 sc, 5 hdc, 51 sc, 5 hdc [66] {img 18}

Round 9 :

5 sc, 4 hdc, 5 sc, 4 hdc, 3 sc, 3 hdc in the 1 stitch, 2 sc, inc, (4 sc, inc)*4, 2 sc, 3 hdc in the 1 stitch, 3 sc, 4 hdc, 5 sc, 4 hdc, 2 sc [75] {img 19}

Round 10 :

8 sc {img 20}, 13 ch {img 21}, from the 9nd stitch from the hook sc {img 22-23}, 4 sc, 3 inc - hdc, 30 sc, 3 inc - hdc, 5 sc {img 24}, 13 ch {img 25}, from the 9nd stitch from the hook sc {img 26-27}, 4 sc {img 28} [91]

Round 11 :

14 sc, 3 sc in the 1 stitch, 11 sc, 6 hdc, 30 sc, 6 hdc, 11 sc, 3 sc in the 1 stitch, 11 sc [95] {img 29}

Round 12 :

FLO: 95 sc [95] {img 30}

Info :

Fasten off. White yarn color 03: Go back 11 row. To the beginning of the row {img 31}. Back loops only {img 32 - 33}.

Round 13 (BLO edge and scallop) :

BLO: 2 sl st {img 34}, ch {img 35}, 3 dc in the 1 stitch {img 36}, ch {img 37}, 3 sl st {img 38}, (ch, 3 dc in the 1 stitch, ch, 3 sl st)*5 {img 39}, 47 sl st {img 40}, (ch, 3 dc in the 1 stitch, ch, 3 sl st)*5, ch, 3 dc in the 1 stitch, ch, sl st {img 41}. Fasten off.

β€” Decoration & Assembly :

Info :

Fasten 2 pieces with pins {img 42 - 45}. Sew on a piece of green {img 46 - 45}.

Info :

Make a marking with pins {img 47 - 49}. Make a needle sculpting: insert the needle at point 1, exit through point 2 [img 50], insert the needle at point 3, exit through point 4 [img 51]. Similarly, make a tightening for the second eye (points 1-5-6-4) [img 52 - 53]. Fix the thread and hide inside {img 54}.

β€” Eyes (make 2) :

Item Name (Black pupil) :

Black yarn color 53: 1 r: 6 sc into MR [6]. Fasten off {img 55}.

Item Name (Yellow eye) :

Yellow yarn color 35: 1 r: 6 sc into MR [6]. 2 r: 6 inc [12]. 3 r: 3 sc, 3 inc, 3 sc, 3 inc [18]. 4 r - 5 r: 18 sc [18] {2 rounds}. 6 r: 3 sc, 3 dec, 3 sc, 3 dec [12]. 7 r: 6 dec [6] {img 56}. Fasten off leaving a tail about 15 cm long and cut the yarn. Using a tapestry needle, weave the yarn tail through the front loop of each stitch and pull tight to close.

β€” Spots (make 3) :

Round 1 :

Blue yarn color 16: 1 r: 8 sc into MR [8]. Fasten off {img 65}.

Info :

Sew patches to the head {img 62 - 67, 68 - 67} and arrange as shown in images. Sew the yellow piece to the mustard piece for eye assembly {img 59} and sew eyes to head {img 60 - 61}.

Assembly Instructions

  • Pin the green head overlay to the mustard head using pins as shown (align the scalloped white edge to the mouth line), then sew the overlay securely through the base layer following the pinned placement {img 42 - 45}.
  • Sew the yellow eye pieces together with the small black pupils centered, then attach each completed eye to the head at the positions indicated (about 11 rows down from the top and 5 rows from the side) and secure with needle sculpting for depth {img 59 - 61, 47 - 54}.
  • Place and sew the three blue spot patches onto the head in the positions indicated in the photos, securing each with small whipstitches so they cant shift {img 62 - 68}.
  • Attach the scalloped white edging by sewing in the back loops only as instructed, then join overlay to the mustard head and weave in all tails invisibly inside the toy.

Important Notes

  • πŸ’‘The toy is crocheted in a spiral without slip stitches and turning chains, so use a marker to track the beginning of rounds for correct shaping.
  • πŸ’‘Use a thin cotton thread as a temporary marker between the last stitch of one round and the first stitch of the next to notice when a shifting stitch is needed.
  • πŸ’‘Work invisible color changes by wrapping the new color around your hook and pulling it through the remaining loops to avoid tight final loops and allow easy stitching in the next round.

This T-Rex amigurumi is a playful, detailed toy that brings big personality in a small package. Make it in bright colors for a lively friend or in muted tones for a classic look. Enjoy the sculpting and tiny details that make this dinosaur extra lovable. πŸ§ΆπŸ¦–

You ask,

we answer.

FAQs

What size will the finished piece be?

The finished amigurumi measures approximately 12-18 cm tall depending on yarn tension and exact hook size when using the recommended fine cotton yarn and 1.75 mm hook.

Can I use different yarn weights for this pattern?

Yes, you can use different yarn weights but the final size will change; if using heavier yarn choose a larger hook and expect a chunkier toy, and adjust stuffing and placement accordingly.

Do I need prior crochet experience for this pattern?

This pattern is rated intermediate; basic knowledge of single crochet, increases, decreases, working in continuous rounds, and reading stitch counts is recommended.

How long does this project typically take to complete?

Most crocheters complete this project in 5-7 hours, though total time can vary depending on experience, attention to assembly, and decorative details.