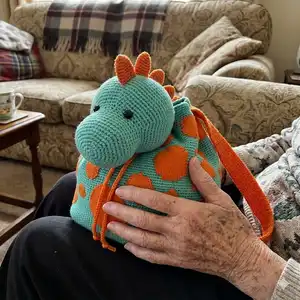
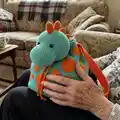
Make a playful dino backpack that doubles as a toy and a functional bag. This pattern uses tapestry crochet for the bold spots and includes a removable amigurumi head that works as the bag lid. Youll get full stitch charts, color-change tips and clear assembly steps so you can make a high-quality, wearable toy your child will love.
Progress Tracker
0% Complete
— Stitch Guide :
Info :
ch: chain. st(s): stitch(es). sc: single crochet. sl st: slip stitch. rep: repeat. Rnd: round. MC: main color. SC: second color. dec: decrease.
Info :
Special techniques: Tapestry crochet. In this technique you crochet with one thread while one or more threads are carried and wrapped in between the stitches. Colors are switched throughout rounds to make a drawing.
Info :
Notes: Pattern is written in 4 parts 1. Bag, worked in the round 2. Straps, worked in the round 3. Head, worked in the round 4. Plates, worked in the round. The pattern includes tapestry crochet with single crochet wrapping one additional color. SC is carried from rnd 2 of the bag and the straps for extra strength.
— Color changes :
Info :
To switch from one color to the other, finish the last st before the switch with the new color. Continue working tapestry crochet wrapping MC or SC according to the dino pattern. To avoid threads from tangling when alternating, follow the steps shown: From MC to SC: Lift SC strand in front of MC, yarn over with SC and finish the st. Sc the necessary sts with SC wrapping MC. From SC to MC: Put MC strand behind SC, yarn over with MC and finish the st. Sc the necessary sts with MC wrapping SC.
— Bag :
Info :
Crocheted in the round, in a spiral way, starting from the base (see chart in pages 7-8). With MC ch 35.
Round 1 :
2 sc in 2nd ch from hook (place a color A and a color B marker in 1st st), sc 32, 4 sc in next ch (place a color B marker in 2nd and 3rd st), continue on the other side of the foundation ch, sc 32, 2 sc in the last ch (place a color B marker in last st)=72 sts
Round 2 :
From this round on carry and wrap SC yarn. Take it leaving a 4"/10 cm strand, don't make knots. Continue crocheting with MC wrapping SC in between the sts. For more details on tapestry crochet follow this link: https://www.youtube.com/watch?v=JxZF88F24sM Relocate A marker in the 1st st of every rnd and B markers in the middle st every time you make 3 sc in one st. This will make counting sts and rounds easier. 3 sc in 1st st, sc 34, 3 sc in next st, 3 sc in next st, sc 34, 3 sc in next st=80 sts
Round 3 :
Sc 1, 3 sc in next st, sc 36, 3 sc in next st, sc 2, 3 sc in next st, sc 36, 3 sc in next st, sc 1=88 sts
Round 4 :
Sc 2, 3 sc in next st, sc 38, 3 sc in next st, sc 4, 3 sc in next st, sc 38, 3 sc in next st, sc 2=96 sts
Round 5 :
Sc 3, 3 sc in next st, sc 40, 3 sc in next st, sc 6, 3 sc in next st, sc 40, 3 sc in next st, sc 3=104 sts
Round 6 :
Sc 4, 3 sc in next st, sc 42, 3 sc in next st, sc 8, 3 sc in next st, sc 42, 3 sc in next st, sc 4=112 sts
Round 7 :
Sc 5, 3 sc in next st, sc 44, 3 sc in next st, sc 10, 3 sc in next st, sc 44, 3 sc in next st, sc 5=120 sts
Round 8 :
Sc 6, 3 sc in next st, sc 46, 3 sc in next st, sc 12, 3 sc in next st, sc 46, 3 sc in next st, sc 6=128 sts
Round 9-55 :
Continue crocheting over 128 sts by following the dino pattern chart and/or stitch count in pages 7-9. Switch colors to make the drawing. Remove B markers and relocate A marker in the 1st st of every round.
Round 56 :
Sc 12 following the charts to reach the fold of the bag=12 sts. Close last st with MC.
Round 57 (with MC wrapping SC) :
Sc 6 (relocate A marker in the 1st st, this will be the new beginning of rounds), 3 sc over SC only, skip 3 sts, (sc 13, 3 sc over SC only, skip 3 sts) rep ( ) 7 times, sc 7=128 sts
Round 58-59 (with MC wrapping SC) :
Sc 128=128 sts. Sl st in the next st. Fasten off. Cut SC leaving a 4"/10 cm strand. Weave in all ends.
— Backpack Straps (Make 2) :
Info :
Sizes: 3, 4, 5, 6 years old (straps in the images were made for 3 year old size). Crocheted in the round, in a spiral way, starting from one end. With SC ch (97, 104, 111, 118) leaving a long strand in the beginning to sew afterwards.
Round 1 :
2 sc in 2nd ch from hook (place an A and a B marker in 1st st), sc (94, 101, 108, 115), 4 sc in next ch (place a B marker in 2nd and 3rd st), continue on the other side of the foundation ch, sc (94, 101, 108, 115), 2 sc in last ch (place a B marker in last st) = (196, 210, 224, 238) sts
Round 2 :
From this round on carry and wrap MC yarn. Continue crocheting with SC wrapping MC in between the sts. Relocate A marker in the 1st st of every rnd and B markers in the middle st every time you make 3 sc in one st. 3 sc in 1st st, sc (96, 103, 110, 117), 3 sc in next st, 3 sc in next st, sc (96, 103, 110, 117), 3 sc in next st = (204, 218, 232, 246) sts
Round 3 :
Sc 1, 3 sc in next st, sc (98, 105, 112, 119), 3 sc in next st, sc 2, 3 sc in next st, sc (98, 105, 112, 119), 3 sc in next st, sc 1 = (212, 226, 240, 254) sts. Sl st in the next st. Fasten off leaving a long strand of SC for sewing. Cut MC leaving a 4"/10 cm strand. Weave in MC strands only.
— Dino - Head :
Info :
Crocheted in the round, in a spiral way, starting from the front. With MC ch 2. Place a marker in the first stitch and relocate as instructed.
Round 1 :
6 sc in 2nd ch from hook (place a marker in 1st st)=6 sts
Round 2 :
Sc 2 in each sc around=12 sts (relocate marker in the 1st st of this and the following rounds)
Round 3 :
(Sc 1, 2 sc in next st) rep () 6 times=18 sts
Round 4 :
(Sc 2, 2 sc in next st) rep () 6 times=24 sts
Round 5 :
(Sc 3, 2 sc in next st) rep () 6 times=30 sts
Round 6 :
(Sc 4, 2 sc in next st) rep () 6 times=36 sts
Round 7 :
(Sc 5, 2 sc in next st) rep () 6 times=42 sts
Round 8 :
(Sc 6, 2 sc in next st) rep () 6 times=48 sts
Round 15 :
(Sc 6, dec 1) rep () 6 times=42 sts
Round 16 :
(Sc 5, dec 1) rep () 6 times=36 sts
Round 17 :
(Sc 5, 2 sc in next st) rep () 6 times=42 sts
Round 18 :
(Sc 6, 2 sc in next st) rep () 6 times=48 sts
Round 19 :
(Sc 7, 2 sc in next st) rep () 6 times=54 sts
Info :
Place the eyes between rounds 16 and 17 with an interspace of 7 sts.
Round 20 :
(Sc 8, 2 sc in next st) rep () 6 times=60 sts
Round 21 :
(Sc 9, 2 sc in next st) rep () 6 times=66 sts
Round 22 :
(Sc 10, 2 sc in next st) rep () 6 times=72 sts
Round 23-30 :
Sc 72=72 sts
Round 31 :
(Sc 10, dec 1) rep () 6 times=66 sts
Round 32 :
(Sc 9, dec 1) rep () 6 times=60 sts
Round 33 :
(Sc 8, dec 1) rep () 6 times=54 sts
Round 34 :
(Sc 7, dec 1) rep () 6 times=48 sts
Round 35 :
(Sc 6, dec 1) rep () 6 times=42 sts
Round 36 :
(Sc 5, dec 1) rep () 6 times=36 sts
Info :
Start filling in with stuffing.
Round 37 :
(Sc 4, dec 1) rep () 6 times=30 sts
Round 38 :
(Sc 3, dec 1) rep () 6 times=24 sts
Round 39 :
(Sc 2, dec 1) rep () 6 times=18 sts. Fill in the rest of the head.
Round 40 :
(Sc 1, dec 1) rep () 6 times=12 sts
Round 41 :
(Dec 1) rep () 6 times=6 sts
Round 42 :
(Sc 1, skip 1 st) rep () 3 times=3 sts. Sl st in the next st. Fasten off leaving a long strand for sewing.
— Plates (Make 3) :
Info :
Crocheted in the round, in a spiral way, starting from the top. With SC ch 2.
Round 1 :
6 sc in 2nd ch from hook (place a marker in 1st st)=6 sts
Round 2 :
(Sc 1, 2 sc in next st) rep () 3 times=9 sts (relocate marker in the 1st st of this and the following rounds)
Round 4 :
(Sc 2, 2 sc in next st) rep () 3 times=12 sts
Round 7 :
(Sc 3, 2 sc in next st) rep () 3 times=15 sts
Round 8 :
Sc 15=15 sts. Sl st in the next st. Fasten off leaving a long strand for sewing.
— Dino's Head Assembly :
Info :
Fill in each plate with stuffing. Sew the plates right to the top center part of the head. Start from the ending of the head to the front.
— Backpack Assembly :
Info :
Choose front and back side of the bag. Sew 0.8"/2 cm of one strap end one round below one back center eyelet. Sew 0.8"/2 cm of the other end to rnd 9 of the bag, from the base corners to the inside. Repeat for the other strap.
Info :
Join the dino's head to the backpack, by sewing the back of the head at the height of the ending to the back of the bag on the inside (for better precision pin it first to make sure position is correct, the head should lay in between the two center back eyelets and fall down centered to the front).
Info :
Pull the cord through the eyelets, starting from one front center eyelet, until it comes out from the other front center hole. Pull the tips of the cord through the stopper. Make a knot on both ends.
Info :
The backpack is ready.
— Charts and Stitch Count :
Info :
Support charts are provided for rounds 1-8 for the base and rows 9-56 for the bag colorwork (right and left handed charts included). Consult the stitch-count table for exact numbers of sts made with each color in rounds 9-56. Each round completes 128 sts except R56 which is a short round.
This Dino Backpack pattern blends playful amigurumi charm with practical design — a backpack that doubles as a cuddly toy. Create a handmade companion that kids will carry and treasure every day. Enjoy the tapestry crochet colorwork and the satisfying assembly of the removable dino head. 🧶🧵✨