🧢 Beautiful ✨ Detailed πŸ’ Adorable

Small Pumpkin Pattern

Small Pumpkin Pattern
4.2β˜… Rating
2-3 Hours Time Needed
1.2K Made This
βœ‚οΈ

Beginner Friendly Level

Perfect for those just starting their crochet journey, with clear instructions and simple techniques

⏱️

Bite-Sized Project

Finishes in 2-4 hoursβ€”perfect for an afternoon of creative relaxation.

πŸ‚

Autumn Vibes

Earthy tones with cozy textures inspired by falling leaves and the rich, warm colors of harvest season.

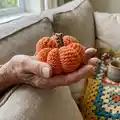
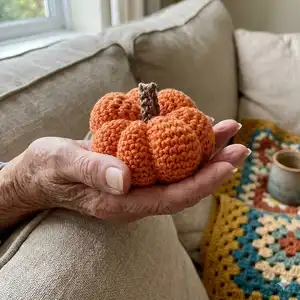
About This Small Pumpkin Pattern

This pattern creates a small, decorative crochet pumpkin ideal for seasonal displays, table settings, or as a small handmade gift. It uses basic amigurumi shaping to form the pumpkin segments and a simple stem for a finished look. The PDF image directs you to the Peach Unicorn Designs blog where the full free pattern and photos are available.

Small Pumpkin Pattern crochet pattern - detailed view of completed project

Quick and satisfying to crochet, this small pumpkin is great for using scrap yarn and practicing consistent tension. Make several in different shades for a charming autumn arrangement.

Why You'll Love This Small Pumpkin Pattern

I absolutely love this pattern because it is simple, versatile, and finishes quickly, making it a perfect quick craft for the season. I enjoy how a few basic rounds of crochet can be shaped into a delightful autumn decoration with so little effort. The texture and plump segments give the pumpkin real character and make it truly gift-worthy. Crocheting a set in mixed colors always brings a cozy feeling to my home and sparks compliments from friends.

Small Pumpkin Pattern step 1 - construction progress Small Pumpkin Pattern step 2 - assembly progress Small Pumpkin Pattern step 3 - details and accessories Small Pumpkin Pattern step 4 - final assembly and finishing

Switch Things Up

I love customizing this small pumpkin by changing colors; try pale creams, deep greens, or spotted yarn for a unique look.

I often make a trio of pumpkins in graduated sizes to display as a centerpiece instead of a single one.

I enjoy adding a tiny crocheted leaf or a bit of embroidery around the stem to personalize each pumpkin.

To make a keychain version, I use a lighter weight yarn and a smaller hook, then add a keyring before closing the final stitches.

For a rustic touch, I sometimes wrap twine or jute around the stem after stitching it in place for texture contrast.

If you want a plumper pumpkin, add more stuffing and tighten the center gathering securely to accentuate the ribs.

I also experiment with different stitch patterns for the segments, like alternating BLO and FLO rows to create subtle ridges.

To make a set for gifts, use coordinated yarn colors and stitch a small label or tag to identify each recipient.

I recommend trying wool blends for a cozier, more textured finish, or cotton yarn for a crisp, clean look that holds shape well.

Finally, I sometimes attach a small felt leaf for a mixed-media look that is quick to add and gives lovely contrast.

Common Mistakes & How to Fix Them

βœ— Not counting stitches after increases can lead to uneven pumpkin segments; always count your stitches at the end of each round to ensure consistency. βœ— Overstuffing the pumpkin will distort the shape and flatten the segments; stuff gradually and check the shape frequently as you go. βœ— Skipping stitch markers during round work causes lost round starts and miscounted rounds; place a marker at the first stitch of every round to stay aligned. βœ— Using inconsistent tension results in mismatched segment sizes; maintain steady tension and practice on a swatch if needed before starting.

Small Pumpkin Pattern

Make a charming little crochet pumpkin perfect for autumn decor, keychains, or gift toppers. This small pattern is quick to work up and uses simple amigurumi techniques so you can finish it in an afternoon. The PDF provided directs you to the full free pattern on the Peach Unicorn Designs blog where photos and the complete written pattern are available. Create a set in different sizes and colors to brighten your home this season.

Beginner Friendly 2-3 Hours

Materials Needed for Small Pumpkin Pattern

β€” Main Fabric

  • 01
    Worsted weight yarn (#4) Orange - approximately 25-50g for one small pumpkin
  • 02
    Worsted weight yarn (#4) Brown - small amount (5-10g) for the stem
  • 03
    Optional: Green scrap for leaf (5g)

β€” Tools Required

  • 01
    Crochet hook size 3.5mm (E) recommended
  • 02
    Tapestry/yarn needle for sewing segments and weaving ends
  • 03
    Scissors
  • 04
    Stitch marker
  • 05
    Polyester stuffing (small amount)
  • 06
    Optional: Stitch holder or scrap yarn for holding sections

Progress Tracker

0% Complete

β€” Pattern Access :

Info :

Free Small Pumpkin is available on my Blog

Info :

Click here

Info :

Or visit www.PeachUnicornDesigns.com and go to Crochet Blog

Info :

Photo reference of finished pumpkin is shown in the PDF

Assembly Instructions

  • After completing the pumpkin segments, thread yarn through the center of the pumpkin and pull tight to create the classic pumpkin indentations, tying securely on the bottom.
  • Sew the stem into the center top of the pumpkin using a yarn needle and securing with several stitches to hold it firmly in place.
  • If you crocheted separate leaf or vine pieces, position them around the stem and sew them in place with small, neat stitches.
  • Weave in all loose ends on the inside or underside of the pumpkin so they are hidden and trim any excess yarn.
  • Adjust stuffing as needed after assembly to ensure a smooth, even pumpkin shape and that segments are well-defined.

Important Notes

  • πŸ’‘Use a stitch marker to mark the first stitch of each round for accurate stitch counts and consistent shaping.
  • πŸ’‘Stuff the pumpkin gradually, checking the shape often to avoid overstuffing and to maintain rounded segments.
  • πŸ’‘Weave in ends as you work when possible to keep the finishing neat and reduce final sewing time.

This cute small pumpkin is the perfect autumn accent to brighten any room and use up stash yarn. Make a cluster of pumpkins in varying sizes for a festive tablescape or give them as handmade gifts. Follow the Peach Unicorn Designs blog link in the PDF for the full free pattern and photos. πŸŽƒπŸ

You ask,

we answer.

FAQs

What size will the finished piece be?

The finished small pumpkin measures approximately 6-8 cm (2.5-3 inches) wide when using worsted weight yarn and a 3.5mm hook.

Can I use different yarn weights for this pattern?

Yes, you can use different yarn weights; thicker yarn with a larger hook will produce a bigger pumpkin, while thinner yarn and a smaller hook will make a mini pumpkin.

Do I need prior crochet experience for this pattern?

This pattern is beginner friendly and only requires basic stitches like single crochet, increases, and decreases, making it suitable for those with basic crochet knowledge.

How long does this project typically take to complete?

Most crocheters finish a small pumpkin in about 2-3 hours, depending on experience and how many pumpkins you make in a session.