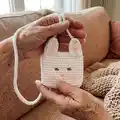
About This Bunny Bag Amigurumi Pattern
This pattern makes a small, charming Bunny Bag with cute ears, embroidered face, and a cord strap. You will crochet a flat body, two ears, tiny closure piece, eyes, nose, and a strap, then sew everything together. The pattern uses half double crochet stitches and simple increases to shape each piece.

Includes full materials, abbreviations and step-by-step rounds for every part of the bag. Photos and a video link are provided to support the cord strap technique and assembly.
Why You'll Love This Bunny Bag Amigurumi Pattern
I absolutely love this pattern because it turns simple stitches into a delightful little bag that feels handmade and personal. I enjoy how quickly the body pieces come together, and the tiny details like embroidered nose and powdered cheeks make a big difference. The cord technique for the strap creates a neat, durable finish that I use often. Making this bag always brings me joy — it is practical, adorable, and a perfect small gift.
Switch Things Up
I love customizing this Bunny Bag by changing yarn colors — try pastel shades for a soft baby look or bright colors for a playful twist.
You can make it smaller or larger by using a thinner or thicker yarn and adjusting the hook size; bulky yarn will create a chunkier, cuddlier bag.
I often add a small lining by sewing in a lightweight fabric to protect the inside and give more structure to the purse.
Try different strap styles: a braided cord, a chain, or a short wrist strap for a clutch-style bag.
Embroider different facial expressions or add felt cheeks and nose pieces for a mixed-media finish.
Replace the wooden button with a snap or magnetic closure for a cleaner look and easier opening for children.
Decorate with tiny appliques like flowers, stars or initials to personalize each bag for gifts or special events.
If you want a keychain version, shorten the strap to 5-8 cm and add a keyring — a perfect small gift or bag charm.
I sometimes use variegated yarn for a fun, tonal texture that makes every bag unique without changing the pattern at all.
For durability, double the yarn for the strap or sew a fabric tube inside the strap to prevent stretching over time.
Common Mistakes & How to Fix Them
✗ Skipping the slip stitch at the end of rounds causes misaligned starting points; always finish each round with a slst and begin the next round with ch2 as instructed.
✗ Not counting chains and stitches after turning leads to incorrect stitch counts; recount the chain foundation and the first rows carefully before continuing.
✗ Sewing ears without matching front and back loops can make them sit unevenly; attach the back of the ear to the back loop and the front to the front loop and pin before sewing.
✗ Using inconsistent tension during the cord strap makes the length uneven; keep even tension and check the strap length as you go until you reach 85cm.