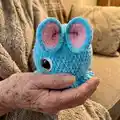
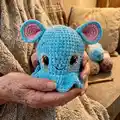
About This Blue the Dumbo Octopus Amigurumi Pattern
This pattern creates a cute dumbo-style octopus amigurumi worked top-down in bulky weight yarn. It includes detailed round-by-round instructions for the head, body, frilled tentacles, and ears. Photos and assembly notes guide you through eye placement, sewing, and finishing touches.
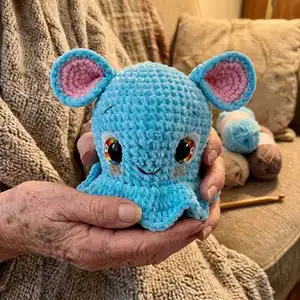
Perfect for intermediate crocheters who want a quick, cuddly project using chunky yarn. The pattern includes tips for eye placement and a YouTube reference for the eye-sinking technique.
Why You'll Love This Blue the Dumbo Octopus Amigurumi Pattern
I absolutely love this pattern because it combines soft chunky yarn with playful dumbo-style ears, creating a toy that is both simple and charming. I enjoy how quickly the bulky yarn builds shape, making it a satisfying project to complete in a weekend. The eye-sinking technique adds expressive personality, and I love how you can customize the colors and expressions. Sewing the ears and frill gives a fun finishing stage that makes the octopus feel truly handmade and special.
Switch Things Up
I love how easy it is to customize this octopus by simply changing yarn colors; I often swap the blue for lavender or mint for a fresh look.
You can make a mini keychain version by using a lighter yarn weight and a smaller hook to create a pocket-sized octopus.
I sometimes add tiny embroidered freckles or spots to the cheeks for character, which gives each octopus a unique personality.
Try different eye sizes or styles — flat safety eyes, glass eyes, or embroidered eyes all change the expression dramatically.
If you want posable ears, consider inserting a thin wire into the ear seam before closing it up, but be cautious if the toy is for a small child.
For a fanciful version, add sequins or a tiny crocheted hat to the top of the head to create themed gift versions for holidays or birthdays.
I enjoy making matching sibling octopi by changing only the accent color so they read as a set while staying quick to make.
Experiment with the frill by increasing or decreasing the number of repeat petals to make a fuller or subtler ruffle.
Use felt or stitched details for the eye backing instead of glued felt if you prefer a fully sewn finish that is machine-wash friendly.
I often embroider different mouth shapes — small smile, big grin, or surprised 'o' — to change personality without altering the body pattern.
To make a baby-safe version, omit safety eyes and embroider eyes instead, making the toy suitable for infants.
Mix yarn textures for contrast: a chenille body with cotton accents for ears or frill creates an interesting tactile toy.
Common Mistakes & How to Fix Them
✗ Placing safety eyes too close to the edge can cause slippage when stuffing; measure and mark between rounds 15 and 16 leaving 11 holes between eyes before inserting them.
✗ Forgetting to use a stitch marker will make it hard to track the start of rounds; place a marker at the first stitch and move it each round to maintain correct stitch counts.
✗ Overstuffing the head and body will distort shaping and make sewing difficult; stuff gradually, shaping as you go and remove stuffing when fitting eye backs or washers.
✗ Skipping the eye-sinking procedure can leave eyes too proud or misaligned; follow the yarn back-and-forth technique described to achieve a sunken, expressive look and adjust placement if needed.
✗ Not pinning the ears before sewing often results in lopsided ears; pin or baste the ears in place and check symmetry from multiple angles before permanently stitching.