🧢 Beautiful ✨ Detailed πŸ’ Adorable

Round Bag with T-Shirt Yarn Pattern

Round Bag with T-Shirt Yarn Pattern
4.9β˜… Rating
5-7 Hours Time Needed
3.7K Made This
βœ‚οΈ

Beginner Friendly Level

Perfect for those just starting their crochet journey, with clear instructions and simple techniques

⏱️

Weekend Treat

Takes 5-7 hours, making it an enjoyable project to finish over a couple of days.

✨

Stylish Touch

An elegant detail to elevate any look, combining traditional techniques with contemporary design sensibilities.

About This Round Bag with T-Shirt Yarn Pattern

This pattern teaches you to crochet a round handbag using t-shirt yarn, creating firm circular panels and a neat seam. You will learn increases, split single stitch technique, and how to finish edges neatly. The design includes instructions for attaching hardware, a leather valve flap, a chain strap, and a tassel for a polished finish.
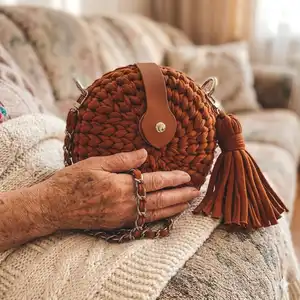
Round Bag with T-Shirt Yarn Pattern crochet pattern - detailed view of completed project

Clear step-by-step photos and a linked video tutorial make this beginner-friendly project easy to follow. The finished bag measures about 7-8 inches (18-20 cm) in diameter.

Why You'll Love This Round Bag with T-Shirt Yarn Pattern

I absolutely love this pattern because it turns simple t-shirt yarn into a fashionable, structured bag that looks far more complex than it is. I love how quickly the circular panels grow with just single crochet and increases, making it satisfying to see fast progress. I also enjoy adding the hardware and tassel β€” those finishing touches give the bag personality and professionalism. Making this bag always reminds me that basic stitches can create beautiful, wearable items.

Round Bag with T-Shirt Yarn Pattern step 1 - construction progress Round Bag with T-Shirt Yarn Pattern step 2 - assembly progress Round Bag with T-Shirt Yarn Pattern step 3 - details and accessories Round Bag with T-Shirt Yarn Pattern step 4 - final assembly and finishing

Switch Things Up

I love customizing this pattern by changing the yarn color to match seasons β€” try pastels for spring or deep tones for autumn.

I often make a mini version using thinner yarn and a smaller hook to create a keychain-sized bag or coin pouch.

I sometimes line the inside with fabric to give the bag extra structure and to protect small items from catching on the yarn.

I switch the closure style too: instead of a valve with a button, you can add a magnetic snap or a zipper for extra security.

I like swapping the metal chain for a braided t-shirt yarn strap for a softer, fully handmade look.

I experiment with different tassel sizes and styles β€” try multiple smaller tassels or a pompom for a playful finish.

I occasionally embroider initials or add beads to the flap to personalize gifts for friends and family.

I recommend trying contrast-colored trim for bold edges or a tonal palette for a more refined look.

If you want a larger bag, I increase the number of increasing rounds and keep the increase pattern consistent to maintain a flat base.

I also like to repurpose old T-shirts to make the yarn, giving the bag an eco-friendly twist and a unique texture.

Common Mistakes & How to Fix Them

βœ— Taking yarn from the middle of the bobbin can tangle the thread and make crocheting harder; always pull the working thread from the outside for smooth tension and easier handling. βœ— Crocheting into the wrong loop will change the texture and shape of the circle; insert your hook between the legs to split the stitch for a tidy split single stitch result. βœ— Skipping the step to pull the end through the first-row stitches leaves a visible hole in the center; pull the tail through and tighten from the wrong side to close and secure the center. βœ— Overstretching or pulling stitches too tight when joining two panels causes an uneven seam; insert the hook first into one part then the other and work evenly to maintain a flat edge.
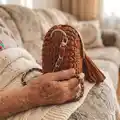
Round Bag with T-Shirt Yarn Pattern

Create a compact, stylish round bag using t-shirt yarn and basic single crochet stitches. This pattern walks you through crocheting two sturdy circular panels, joining them, and adding hardware and a tassel for a finished look. Perfect for a handmade gift or a fashionable accessory you can customize. Follow the clear step-by-step photos and video link to make your own round bag.

Beginner Friendly 5-7 Hours

Materials Needed for Round Bag with T-Shirt Yarn Pattern

β€” Main Fabric

  • 01
    T-shirt yarn, width 7-9 mm, approximately 131 yards (120 meters)

β€” Tools Required

  • 01
    Crochet hook N6 - 6 mm
  • 02
    Set of hardware: chain - 47 inches (120 cm); valve with button; 2 snap hook-rings; 3 snap hooks
  • 03
    Sewing thread (color to match yarn)
  • 04
    Sewing needle
  • 05
    Needle with large eyelet
  • 06
    Scissors
  • 07
    Iron and damp cloth

Progress Tracker

0% Complete

β€” Base (circle) :

Info :

Crochet 2 CH.

Round 1 :

1 row. Crochet 6 SC in the 2nd loop from the hook. In the 1st SC crochet CH like on the video (6)

Info :

Next, crochet the split single stitch. For that, insert the hook between the legs of each stitch, to split the stitch from the face and from the wrong side.

Round 2 :

1 Inc * 6 = 12, CH (12)

Info :

After crocheting 2nd row, the hole will be formed in the middle. The end needs to be hidden and thus the hole will be removed. Pull the end through all the stitches of the 1st row from the wrong side. Tighten, strengthen, hide and cut the end of the thread.

Round 3 :

(1 SC, 1 Inc) * 6 = 18, CH (18)

Round 4 :

(2 SC, 1 Inc) * 6 = 24, CH (24)

Round 5 :

(3 SC, 1 Inc) * 6 = 30, CH (30)

Round 6 :

(4 SC, 1 Inc) * 6 = 36, CH. Don’t cut the thread. Steam the circle with an iron through a damp cloth at high setting. T-shirt yarn can withstand high temperatures but iron through a damp cloth so the canvas does not shine. (36)

Round 7 :

36 SC, CH (36)

Round 8 :

36 SC. Don’t cut the thread. (36)

Info :

Pull the loop under 1st SC, pull out on the wrong side under last SC. Crochet the base trim SlSt in each loop. Cut the end. Pull the end under 1st SlSt, pull back on the wrong side. Strengthen and hide the end.

Info :

Steam the edge with an iron through a damp cloth. Similarly, crochet the second part of the bag (repeat all base rounds to make a second identical circle).

β€” Assembly :

Info :

Join the 2 parts of the bag with the edges. Insert the hook in the loops of the previous row of both parts of the bag. Pull out the loop. Again, insert the hook in the loops of the previous row of both parts of the bag. Pull out the next loop, crochet SlSt. Each time insert the hook, first in one part, then in the other. Crochet SlSt, leave unconnected 7-8 inches (18-20 cm). Strengthen and hide both ends of the thread on the wrong side.

Info :

Insert the snap hook-rings in the places where the connecting seam ends.

Info :

Sew on the valve. Sew on the top part of the valve. Then position the lower part of the valve to where it is supposed to be and sew on it.

Info :

Cut off the piece of the yarn 48 inches (122 cm) long. Pass the piece of the yarn through each link of the chain with the needle with a large eyelet. Sew in the ends with the sewing needle and the sewing thread matching the color of the yarn.

Info :

Fasten the shoulder strap to the snap hook-rings.

β€” Make the tassel :

Info :

Cut off 20-25 pieces of the yarn 13-14 inches (33-35 cm) long. Intercept with a longer piece in the middle. Put a snap hook on the piece of the yarn.

Info :

Wrap the bundle with a long piece several times. Tie the ends, hide them under the turns. Spread the tassel with hands, cut off the ends exactly.

Info :

Hang the tassel on any snap hook-ring.

Info :

Congratulations! Your cute bag is ready.

Assembly Instructions

  • Join the two circular panels by inserting the hook into the loop of the previous row of both panels and slip stitching through both loops, alternating one panel then the other to create an even seam.
  • Leave a gap of about 7-8 inches (18-20 cm) unconnected when slip stitching to allow for attaching hardware or to thread the chain later, then secure and hide thread ends on the wrong side.
  • Insert snap hook-rings where the connecting seam ends; these act as anchor points for the shoulder strap and tassel.
  • Sew the valve (flap) onto the top panel: first sew the top part in place, then position and sew the lower part, reinforcing with matching sewing thread.
  • Thread a 48 inch (122 cm) strip of yarn through each link of the metal chain using a large-eye needle, then sew the yarn ends securely into the bag to finish the chain strap.
  • Attach the shoulder strap to the snap hook-rings and fasten securely; hide any remaining ends on the wrong side to keep the interior tidy.

Important Notes

  • πŸ’‘Take the thread not from the middle of the bobbin but from the outside; the more yarn you unwind the easier it will be to crochet.
  • πŸ’‘Be careful not to twist the working thread; if the thread is twisted all the loops will look messy, so keep yarn flat and untwisted while working.
  • πŸ’‘When crocheting with t-shirt yarn pull the working thread just above the level of the column and hold the hook at an angle (not perpendicular) to avoid holes in the fabric.
  • πŸ’‘Steam the finished circles and edges through a damp cloth to flatten and set the canvas without making it shiny.

This round t-shirt yarn bag pattern is a delightful project that combines simple crochet techniques with stylish hardware for a polished result. Make yours in any color and add a tassel or leather flap for extra charm. Perfect as a gift or a statement accessory you can proudly make by hand. 🧢✨

You ask,

we answer.

FAQs

What size will the finished piece be?

The finished bag measures approximately 7-8 inches (18-20 cm) in diameter and about 4 3/8 inches (11 cm) wide when using the specified t-shirt yarn and 6 mm hook.

Can I use different yarn weights for this pattern?

Yes, you can use different yarn thicknesses, but the final size and stitch tension will change; adjust the hook size accordingly and expect a different finished diameter.

Do I need prior crochet experience for this pattern?

This pattern is beginner friendly, so basic knowledge of single crochet, increases, and slip stitch is recommended for best results.

How long does this project typically take to complete?

Most crocheters complete this project in about 5-7 hours depending on speed and experience, including assembly and finishing details like chain threading and tassel making.