🧢 Beautiful ✨ Detailed πŸ’ Adorable

Positive Potato Amigurumi Pattern

Positive Potato Amigurumi Pattern
4.2β˜… Rating
2-3 Hours Time Needed
4.0K Made This
βœ‚οΈ

Beginner Friendly Level

Perfect for those just starting their crochet journey, with clear instructions and simple techniques

⏱️

Bite-Sized Project

Finishes in 2-4 hoursβ€”perfect for an afternoon of creative relaxation.

🎁

Tiny Treasure

Small, sweet, and gift-worthy creations that fit perfectly in the palm of your hand with detailed charm.

About This Positive Potato Amigurumi Pattern

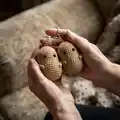
This pattern creates a small Positive Potato amigurumi, perfect as a keyring or backpack charm. It uses 8ply (DK) yarn and basic crochet stitches for an easy, satisfying make. The design includes tiny arms, a stitched mouth, and a printable saying to add a positive message. The finished piece measures approximately 7 cm tall.

Positive Potato Amigurumi Pattern crochet pattern - detailed view of completed project

Quick to work up and great for making multiples as gifts or classroom treats. Use safety eyes or embroider features for child-safe versions.

Why You'll Love This Positive Potato Amigurumi Pattern

I absolutely love this pattern because it is so quick to make and brings instant smiles. I enjoy that a small amount of yarn and basic stitches create such a charming little character. I love adding the tiny printed sayings because they make each potato personal and uplifting. The pattern is forgiving and perfect for practicing consistent tension and neat finishing.

Positive Potato Amigurumi Pattern step 1 - construction progress Positive Potato Amigurumi Pattern step 2 - assembly progress Positive Potato Amigurumi Pattern step 3 - details and accessories Positive Potato Amigurumi Pattern step 4 - final assembly and finishing

Switch Things Up

I love experimenting with different yarn colors to change the character of each potato; try warm browns, soft pastels, or even bright novelty yarns for a playful look.

If you want a bigger version, use a bulkier yarn and a larger hook; for a tiny version make it with fingering yarn and a smaller hook to create a keyring-sized mini.

I often swap safety eyes for embroidered eyes for child-safe versions or to give the potato a softer, more handcrafted expression.

Add tiny accessories like a crocheted scarf, a little hat, or felt cheeks to personalize your potatoes for seasons or special events.

Change the saying to suit the recipientβ€”print, laminate or strengthen with tape, or sew a tiny fabric label for a permanent message.

Embellish with embroidery details like freckles, eyebrows, or a tiny heart to give each potato unique personality.

For posable arms, consider adding a small wire inside the arm piece before stuffing so you can bend hands to hold the saying.

I sometimes make a magnet version by sewing a small flat magnet into the back before finishing for fridge decor.

Try grouping several potatoes in a color palette to make a cheerful set of gifts or classroom rewards.

Use different hook sizes and tension to practice gauge control; keeping tension consistent will give the neatest finish and the best fit for the sayings and arms.

Common Mistakes & How to Fix Them

βœ— Placing safety eyes too close together will look unbalanced; measure and mark placement first and place eyes between rows 5 and 6 with three stitches between for a symmetrical face. βœ— Forgetting to move the stitch marker after each round causes confusion in counting; place a marker at the start of every round and move it after completing the round to stay on track. βœ— Overstuffing the potato will distort the shape and make the seams hard to close; stuff gradually and add small amounts until you achieve a smooth, firm but slightly squishy shape. βœ— Cutting yarn tails too short makes sewing arms and sayings difficult; leave long ends for sewing and weaving through the body to secure parts firmly. βœ— Using safety eyes for toys intended for young children can be unsafe; embroider the eyes instead if the item is for a child under three and ensure attachments are secure.

Positive Potato Amigurumi Pattern

Make a tiny, cheerful Positive Potato keychain that spreads smiles wherever it goes. This quick, friendly amigurumi uses simple stitches and minimal materials so you can finish one in an afternoon. Perfect for gifts, classroom rewards, or little reminders of encouragement. The finished potato measures about 7 cm tall and can be made as a keyring or backpack charm.

Beginner Friendly 2-3 Hours

Materials Needed for Positive Potato Amigurumi Pattern

β€” Main Fabric

  • 01
    20g 8ply (DK) yarn in beige or any potato-coloured yarn (any yarn and crochet hook can be used as size is unimportant)
  • 02
    Black yarn for embroidering the mouth and small facial details
  • 03
    Polyester stuffing - small amount to fill a 7 cm amigurumi
  • 04
    2 x 8mm safety eyes (use embroidery instead if making for a child under 3)
  • 05
    Printed paper 'sayings' (optional) to attach to the potato

β€” Tools Required

  • 01
    Crochet hook size 3.5mm (UK 9, US 4)
  • 02
    Scissors
  • 03
    Yarn needle for sewing and weaving ends
  • 04
    Stitch markers
  • 05
    Polyester stuffing
  • 06
    2 x 8mm safety eyes (or needle and contrasting yarn to embroider eyes)
  • 07
    Small clip or clasp or keyring for attaching to backpacks (optional)
  • 08
    Sticky tape or clear tape to strengthen printed sayings (optional)
  • 09
    Pins for positioning arms and sayings when assembling

Progress Tracker

0% Complete

β€” Body :

Round 1 :

6 dc into magic circle (6)

Round 2 :

2dc in each around, (12), PM and move after every round

Round 3 :

(dc, 2dc) around, (18)

Round 4-8 :

dc around, (5 rounds)

Info :

Place eyes between rows 5 and 6 with 3 sts in between.

Round 9 :

(dc 5, 2dc) around, (21)

Round 10 :

dc around,

Round 11 :

(dc 6, 2dc), around, (24)

Round 12 :

dc around,

Round 13 :

(dc 6, dc dec) around, (21)

Round 14 :

(dc 5, dc dec) around, (18)

Round 15 :

(dc, dc dec) around, (12)

β€” Stuff potato :

Round 16 :

(dc dec) around, (6), top up stuffing, cut yarn and thread through the last 6sts and pull up tight, FO

β€” Arms/hand (make 2) :

Item Name (P1) :

Leaving a long end, ch 3, turn. 2. dc in 2nd ch from hook, dc, (2), turn. 3-4. ch 1, dc 2. 5. dc dec, FO leaving a long end of yarn.

β€” Assembly :

Info :

Print the sheet of 'sayings'. Cut out your chosen 'saying' leaving a margin on each side (see pic). Place a piece of sticky tape across the 'saying' to strengthen it.

Info :

Centre the 'saying' on the body of the potato, place the arms on each side so that the hands are on the margin of the 'saying'. Pin the arms in place and using the long yarn end, stitch firmly across the end.

Info :

Using the long end of yarn, at the hand end, and holding the 'saying' in place, push the needle through the 'saying' in the middle of the margin, secure the end firmly by weaving through the body.

Info :

Make a mouth using black yarn.

Info :

Attach a clasp or keyring chain, (optional)

Assembly Instructions

  • Place 2 x 8mm safety eyes between rounds 5 and 6 with three stitches between them before closing the head, or embroider eyes if making for a young child.
  • Print and cut out a chosen 'saying', strengthen with a strip of sticky tape across the face, then centre the 'saying' on the potato body and pin in place.
  • Position the arms so the little hands sit over the margin of the 'saying', then stitch the arms in place using the long yarn ends and weave securely through the body.
  • Using the long yarn tail at the hand end, push the needle through the saying's margin to secure it, then weave and knot the yarn inside the body to hide the ends.
  • Embroider a small mouth with black yarn centered between the eyes, and attach a clasp or keyring if desired to create a keychain or bag charm.

Important Notes

  • πŸ’‘Use a stitch marker and move it after every round to keep track of the beginning of rounds and maintain accurate stitch counts.
  • πŸ’‘Place eyes before rounds that close the head and use embroidery instead of safety eyes for any toy intended for children under three.
  • πŸ’‘Stuff gradually to avoid lumps and to maintain the desired shape; top up stuffing before closing the final rounds to achieve a smooth finish.
  • πŸ’‘Leave long yarn tails on small pieces like the arms to make sewing and securing them to the body easier and more secure.

Thank you for choosing the Positive Potato pattern β€” a tiny reminder that little things can brighten someone’s day! 🧢 Make a handful, personalize the sayings, and spread a bit of cheer with these pocket-sized friends. ✨ Happy crocheting and enjoy gifting these sweet, tiny treasures! 😊

You ask,

we answer.

FAQs

What size will the finished piece be?

The finished amigurumi measures approximately 7 cm (2.75") tall when using 8ply (DK) yarn and a 3.5 mm hook as recommended.

Can I use different yarn weights for this pattern?

Yes, but changing yarn weight and hook size will affect the final size; use a larger hook and bulkier yarn for a chunkier potato or thinner yarn for a mini version.

Do I need prior crochet experience for this pattern?

This pattern is beginner friendly and uses basic stitches, but familiarity with working in the round and simple increases/decreases is helpful.

Are safety eyes required or can I embroider the face?

You can use 8mm safety eyes, but for toys intended for children under 3 it is safer to embroider the eyes and attach all pieces securely.

How long does it typically take to complete one potato?

Most crafters can complete a single Positive Potato in roughly 2-3 hours depending on experience and whether you add extra finishing details.