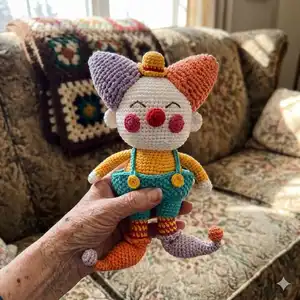
Create a cheerful handmade clown amigurumi with this complete crochet pattern. Youll learn shaping, spike single crochet, and clever assembly steps to make a bright, poseable toy. Perfect for gifting or adding a playful touch to your decor, this pattern uses simple motifs and color changes to build a charming character. Follow the clear rounds and photo-assisted assembling notes to finish a polished, adorable clown.
Progress Tracker
0% Complete
— Head :
Round 1 :
sc 6 into a magic loop (6)
Round 3 :
[sc 1, inc 1] 6x (18)
Round 4 :
sc 1, inc 1, [sc 2, inc 1] 5x, sc 1 (24)
Round 5 :
[sc 3, inc 1] 6x (30)
Round 6 :
sc 2, inc 1, [sc 4, inc 1] 5x, sc 2 (36)
Round 7 :
[sc 5, inc 1] 6x (42)
Round 8 :
sc 3, inc 1, [sc 6, inc 1] 5x, sc 3 (48)
Round 9 :
[sc 7, inc 1] 6x (54)
Round 10 :
sc 4, inc 1, [sc 8, inc 1] 5x, sc 4 (60)
Round 11-23 :
sc 60 (13 rnds) (60)
Round 24 :
[sc 8, dec 1] 6x (54)
Round 25 :
[sc 7, dec 1] 6x (48)
Round 26 :
[sc 6, dec 1] 6x (42)
Round 27 :
[sc 5, dec 1] 6x (36)
Round 28 :
[sc 4, dec 1] 6x (30)
Round 29 :
[sc 3, dec 1] 6x (24)
Info :
Break the yarn with a long rest. Stuff firmly.
— Hairs (yarn B X1, yarn C X1) :
Round 1 :
sc 6 into a magic loop (6)
Round 2 :
BLO [sc 1, inc] 3x (9)
Round 3 :
BLO [sc 2, inc] 3x (12)
Round 4 :
BLO [sc 3, inc] 3x (15)
Round 5 :
BLO [sc 4, inc] 3x (18)
Round 6 :
BLO [sc 5, inc] 3x (21)
Round 7 :
BLO [sc 6, inc] 3x (24)
Round 9 :
BLO [sc 7, inc] 3x (27)
Round 11 :
BLO [sc 8, inc] 3x (30)
Round 13 :
BLO [sc 9, inc] 3x (33)
Info :
Break the yarn with a long rest.
— Ears (yarn A, X2) :
Round 1 :
sc 6 into a magic loop (6)
Round 3-4 :
sc 12 (2 rnds) (12)
Info :
Break the yarn with a long rest to sew, use the tapestry needle to sew 2 edges together.
— Nose (yarn D) :
Round 1-4 :
Repeat rnd 1-4 of the Ear (12)
Round 5 :
[sc 2, dec] 3x (9)
Info :
Break the yarn with a long rest to sew.
— Cheeks (yarn E, X2) :
Round 1 :
sc 6 into a magic loop (6)
Round 2 :
inc 6, slst on the 1st st of this rnd (12)
Info :
Break the yarn with a long rest to sew.
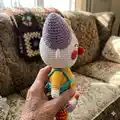
— Hat (yarn F) :
Round 1-3 :
Repeat rnd 1-3 of the Head (18)
Round 4-6 :
sc 18 (3 rnds), change to yarn D (18)
Round 7-8 :
sc 18 (2 rnds), change to yarn F (18)
Round 9 :
FLO, inc 18 (36)
Info :
Break the yarn with a long rest to sew.
— Hat (yarn B: X1, yarn C: X1) :
Round 1 :
sc 3 in a magic loop (3)
Round 4 :
[sc 1, inc 1] 3x (9)
Round 6 :
[sc 2, inc 1] 3x (12)
Round 8 :
[sc 3, inc 1] 3x (15)
Round 9 :
sc 5 BLO (only BLO for 5 sts, then back to crochet on both loops for the remaining sts), sc 10 (15)
Round 10 :
[sc 2, inc 1, sc 2] 3x (18)
Round 11 :
sc 5 on the 5 remaining loops on rnd 9, skip 5 first sts of this rnd, then back to crochet on this rnd, sc 13 (see Assembling part) (18)
Round 12 :
[sc 5, inc 1] 3x (21)
Round 14 :
[sc 6, inc 1] 3x (24)
Round 16 :
[sc 5, inc 1] 4x (28)
Round 17 :
[sc 6, inc 1] 4x (32)
Round 18 :
[sc 7, inc 1] 4x (36)
Round 19 :
[sc 8, inc 1] 4x (40)
Round 20 :
[sc 9, inc 1] 4x (44)
Round 21 :
[sc 10, inc 1] 4x (48)
Round 22 :
[sc 11, inc 1] 4x (52)
Info :
Break yarn B, crochet the 2nd piece with yarn C, but do not break the yarn this time. Mark 2 sts (on each piece): the 26th st & 37th st of the last rnd. The distance between 2 marked sts is 12 sts. Use the tapestry needle to sew these 12 sts from each piece together, only sew on back loop (see Assembling part).
— Arms (yarn A, X2) :
Round 1 :
sc 6 in a magic loop (6)
Round 2 :
[sc 1, inc 1] 3x (9)
Round 3 :
sc 4, Bobble 1, sc 4 (9)
Round 4 :
sc 9, change to yarn F (9)
Round 5-18 :
sc 9 (14 rnds) (9)
Info :
Break the yarn with a long rest, stuff slightly the lower part, use the tapestry needle to sew 2 edges together.
— Buttons (yarn F, X2) :
Round 1 :
sc 9 in a magic loop (9)
Info :
Break the yarn with a long rest.
— Shoe's Balls (yarn B X1, yarn C X1) :
Round 1-4 :
Repeat rnd 1-4 of the Ear, start stuffing slightly (12)
Info :
Break the yarn with a long rest, weave in the last 6 sts on the last rnd.
— Legs (yarn B X1, yarn C X1) :
Round 1 :
sc 3 into a magic loop (3)
Round 3 :
sc 2, inc 2, sc 2 (8)
Round 4 :
dec 1, sc 1, inc 2, sc 1, dec 1 (8)
Round 5 :
sc 3, inc 2, sc 3 (10)
Round 6 :
dec 1, sc 2, inc 2, sc 2, dec 1 (10)
Round 7 :
sc 4, inc 2, sc 4 (12)
Round 8 :
sc 5, inc 2, sc 5 (14)
Round 9 :
sc 6, inc 2, sc 6 (16)
Round 10 :
sc 7, inc 2, sc 7 (18)
Round 11 :
sc 8, inc 2, sc 8 (20)
Round 12-13 :
sc 20 (2 rnds) (20)
Round 14 :
sc 9, sc 1 on the 3rd loop (see Assembling part), sc 10 (20)
Round 15 :
dec 1, sc 6, dec 2, sc 6, dec 1 (16)
Round 16 :
dec 1, sc 4, dec 2, sc 4, dec 1, start stuffing firmly (12)
Round 17 :
FLO, dec 1, sc 3, inc 2, sc 3, dec 1 (12)
Round 18-19 :
dec 1, sc 3, inc 2, sc 3, dec 1 (2 rnds) (12)
Round 20 :
dec 1, sc 3, inc 1, slst on the remaining loops of the 10th st of rnd 14 (see Assembling part), inc 1, sc 3, dec 1 (12)
Round 21 :
sc 6, skip the slst st of the previous rnd, sc 6 (12)
Round 22 :
FLO, *ch 3, slst 1 on the next st*, repeat ** to the end, break yarn B/C, change to yarn E (12)
Round 23 :
continue to crochet on the back loops of rnd 22, sc 12, change to yarn F (12)
Round 24-28 :
sc 12 (change to yarn E/F each rnd) (5 rnds), change to yarn G (12)
Round 29 :
[sc 1, inc 1] 6x (18)
Round 30-33 :
sc 18 (4 rnds) (18)
Round 34 :
sc 3, break the yarn (3)
Info :
Make the 2nd leg the same way but do not break the yarn, join with the 1st leg by slst 1 on the last st of the 1st leg, continue to crochet the body.
— Body (yarn G) :
Round 35 :
sc 18 (on the 1st leg), sc 18 (on the 2nd leg) (36)
Round 36 :
[sc 5, inc 1] 6x (42)
Round 37 :
BLO, sc 42 (42)
Round 38-41 :
sc 42 (4 rnds), change to yarn F (42)
Round 42-46 :
sc 42 (5 rnds) (42)
Round 47 :
[sc 5, dec 1] 6x (36)
Round 49 :
[sc 4, inc 1] 6x (30)
Round 51 :
[sc 3, inc 1] 6x (24)
Info :
Break the yarn with a long rest to sew later, stuff. Turn to the back side of the body, join yarn G on the 1st of the remaining loop of the 37th rnd (see Assembling Part), continue to crochet the overalls.
— Overalls :
Round 1 :
[sc 1, inc 1] 21x (63)
Round 3 :
[sc 1, spike sc 1] 31x, sc 1 (see Special Stitches at page 5 for Spike sc) (63)
Round 4 :
[spike sc 1, sc 1] 31x, spike sc 1 (63)
Round 5-10 :
repeat (rnd 3 & 4) 3 more times (6 rnds) (63)
Round 11 :
ch 30, slst on the 23, slst on all remaining chains, continue to crochet on the overalls, [sc 1, spike sc 1] 3x, ch 30, slst on the 23, slst on all remaining chains, slst on the next st of the overalls (63)
Info :
Break & hide the remaining yarn.
— Legs (alternate body connection instructions) :
Info :
After finishing sewing, there are: (52-12) + (52-12) = 80 sts. If you count more or less 80 sts, just dec or inc to reach this number. Connect yarn B/C (depending on which color is the ending color, just choose the matching color), the next st will be the 1st st for next rnds.
Round 1 :
sc 40, sc 40 (80)
Round 2 :
[sc 9, dec 1, sc 9] 2x, [sc 9, dec 1, sc 9] 2x (76)
Round 3 :
[sc 8, dec 1, sc 9] 2x, [sc 8, dec 1, sc 9] 2x (72)
Round 4-7 :
sc 36, sc 36 (4 rnds) (72)
Info :
Break the yarn with a long rest.
— Legs (continued detailed rounds) :
Round 23 :
[sc 2, sc 2] 5x (20)
Round 24 :
[inc 2, inc 2] 5x (40)
Round 25 :
[sc 4, sc 4] 5x (40)
Round 26 :
[sc 3, inc 1, sc 3, inc 1] 5x (50)
Round 27 :
[sc 4, inc 1, sc 4, inc 1] 5x (60)
Round 28-36 :
[sc 6, sc 6] 5x (9 rnds) (60)
Round 37 :
sc 6, sc 2, dec 1, sc 2, sc 6, dec 1, sc 4, sc 4, dec 1, sc 6, sc 2, dec 1, sc 4, sc 4, dec 1 (54)
Round 38 :
[sc 6, sc 5] 2x, [sc 5, sc 6] 2x, sc 5 (54)
Round 39 :
sc 2, dec 1, sc 2, sc 5, dec 1, sc 4, sc 3, dec 1, sc 5, sc 2, dec 1, sc 2, sc 5, dec 1, sc 4, sc 3, dec 1, sc 5 (48)
Round 40 :
sc 5, sc 5, sc 5, sc 4, sc 5, sc 5, sc 5, sc 5, sc 5, sc 4, sc 5 (48)
Round 41 :
sc 3, dec 1, sc 5, sc 1, dec 1, sc 2, sc 4, dec 1, sc 3, sc 3, dec 1, sc 5, sc 1, dec 1, sc 2, sc 4, dec 1, sc 3 (42)
Round 42 :
sc 4, sc 5, [sc 4, sc 4] 2x, sc 5, sc 4, sc 4, sc 4, start stuffing (42)
Round 43 :
sc 4, dec 1, sc 3, sc 2, dec 1, sc 4, sc 1, dec 1, sc 1, sc 4, dec 1, sc 3, sc 2, dec 1, sc 4, sc 1, dec 1, sc 1 (36)
Round 44 :
sc 4, [sc 4, sc 3] 2x, sc 4, sc 4, sc 3, sc 4, sc 3 (36)
Round 45 :
dec 1, sc 2, sc 2, dec 1, sc 3, sc 1, dec 1, sc 1, sc 3, dec 1, sc 2, sc 2, dec 1, sc 3, sc 1, dec 1, sc 3 (30)
Round 46 :
(BLO) [sc 3, sc 3] 5x, break yarn C (30)
Round 47 :
[sc 3, dec 1] 6x (24)
Info :
Break the yarn with a long rest. Turn the body up side down, join yarn D on rnd 46, crochet on the remaining loops to make the collar.
— Collar :
Info :
Break the yarn, hide the remaining yarn.
— Arms (yarn D, X2) :
Round 1 :
sc 6 in a magic loop (6)
Round 2 :
[sc 1, inc 1] 3x (9)
Round 3 :
sc 4, Bobble 1, sc 4 (9)
Round 4 :
sc 9, change to yarn B (9)
Round 5-20 :
sc 9 (16 rnds) (9)
Info :
Break the yarn with a long rest, use the tapestry needle to sew 2 edges together.
— Hat's Balls (yarn B: X1, Yarn C: X1) :
Round 1 :
sc 6 into a magic loop (6)
Round 3 :
[sc 2, inc 1] 4x (16)
Round 4-5 :
sc 16 (2 rnds) (16)
Round 6 :
[sc 2, dec 1] 4x, stuffing (12)
Info :
Break the yarn with a long rest, weave in the last 6 sts.
— Details / Special Stitches :
Info :
Special Stitches – Spike Single Crochet (Spike Sc): Work 1 normal sc, insert hook from front to back in the row below to create Spike Sc. Pull yarn over and yarn over, Spike sc will be longer than normal sc. Work *sc, spike sc* to the end as instructed in the pattern (see Special Stitches section for photos).
— Assembling :
Info :
Define the 3rd loop of the 10th st of the leg's 14th rnd. Sc 1 on the 3rd loop. Continue to crochet as normal.
Info :
Mark this st with a marker. Continue to crochet as instructed to the 20th rnd, slst on the marked st. Slst on the marked st.
Info :
Continue to crochet as instructed. Make the 2nd leg the same way, but do not break the yarn. Slst with the last st of 1st leg. Crochet to the body as instructed.
Info :
Use brown thread to embroider the eye, 4 sts for each eye (at rnd 14). Embroider the eyes as shown in photos. The distance between 2 eyes is 4-5 sts. Attach the nose 1 rnd below the eyes.
Info :
Attach the cheeks on each side. Attach the hair on each side of the head (from the 3rd rnd to the 15th rnd of the head). 6 sts apart from each hair. Attach the hat between 2 hairs. Attach the head to the body.
Info :
Join yarn B/C on the 1st of the 2nd rnd. Continue crocheting *ch 3, slst 1 on the next st* on the remaining loops. Crochet each hair with yarn B and C.
This colorful Clown amigurumi is designed to bring playful cheer to your home or gifts. The pattern uses fun textures and bright color changes to make each detail pop. Make one for yourself or create a family of clowns in different colorways! 🧶🎪