🧢 Beautiful ✨ Detailed πŸ’ Adorable

Crochet Cushion Pattern

Crochet Cushion Pattern
4.3β˜… Rating
5-7 Hours Time Needed
3.5K Made This
βœ‚οΈ

Beginner Friendly Level

Perfect for those just starting their crochet journey, with clear instructions and simple techniques

⏱️

Weekend Treat

Takes 5-7 hours, making it an enjoyable project to finish over a couple of days.

🏑

Cozy Accent

A warm touch for your space that transforms ordinary corners into inviting nooks filled with handmade charm.

About This Crochet Cushion Pattern

This pattern shows you how to make a colourful granny-square cushion cover with full step-by-step instructions. You will make the front squares, crochet a matching back, join both pieces and add a decorative edging. The pattern uses simple US terms and is perfect for mixing cotton colours.

Crochet Cushion Pattern crochet pattern - detailed view of completed project

The instructions use standard double crochet and single crochet stitches with clear change-of-colour steps. Ideal for using small yarn scraps and for practising joining and edging techniques.

Why You'll Love This Crochet Cushion Pattern

I absolutely love this pattern because it celebrates colour and simple crochet construction in a way that feels joyful to make. I enjoy how each square becomes a little experiment in colour placement and texture. The pattern is forgiving and easy to personalise, which means I can make dozens of different combinations without getting bored. It brings together useful skills like colour-changing, joining squares and edging into one satisfying project.

Crochet Cushion Pattern step 1 - construction progress Crochet Cushion Pattern step 2 - assembly progress Crochet Cushion Pattern step 3 - details and accessories Crochet Cushion Pattern step 4 - final assembly and finishing

Switch Things Up

I love how easy it is to customise this cushion by changing colours and placement; try a monochrome palette for a modern look.

I often make the cushion larger by adding extra rows to each square and using a thicker yarn with a larger hook for a chunky version.

For a mini version suitable as a pincushion or ornament, use fingering yarn and a smaller hook to scale down the design.

I sometimes add embroidered details or small appliques on a few squares to give the piece unique focal points.

If you prefer a neater seam, join squares using the mattress stitch or slip-stitch join instead of single crochet joins to reduce bulk.

I like to experiment with different edgings: try picot, shell, or crab stitch for varied finishes that change the style completely.

Adding buttons, tassels, or pompoms to the corners makes the cushion playful and gives it extra personality.

I also recommend testing different colour sequences across the 3x3 grid β€” diagonal gradients or checkerboard layouts are especially effective.

For outdoor use, choose a cotton blend or a yarn labeled for outdoor use and make sure to seal ends securely to withstand wear.

I sometimes stuff the inner cushion slightly firmer for a more sculpted look, or softer for a relaxed, pliable cushion.

Common Mistakes & How to Fix Them

βœ— Skipping the slip stitch join at the end of a round can leave the square uneven; always slip stitch into the specified stitch to secure the round. βœ— Not changing colour cleanly causes visible loose ends; weave in ends or change colour at the end of the round and pull the new colour through the last stitch to secure. βœ— Forgetting to count stitches along the side will give uneven edges; count the 17 SC per side when joining and check your stitch count frequently. βœ— Pulling the yarn too tight when making corners shrinks the square; keep a relaxed tension and form corners with CH-2 or CH-3 as indicated to retain shape. βœ— Joining squares without lining up corners can twist the cushion; pin or lay squares out first and join matching corners so the pattern sits flat.

Crochet Cushion Pattern

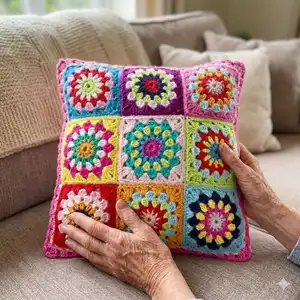
Make a bright, colourful granny-square cushion that transforms any room with a handmade touch. This pattern guides you through making the front squares, a matching back, joining and a neat edging so you can personalise colours and finishes. Ideal for using cotton scraps and practicing colour changes, the finished cushion fits a 40cm inner cushion.

Beginner Friendly 5-7 Hours

Materials Needed for Crochet Cushion Pattern

β€” Main Fabric

  • 01
    Cotton yarns suitable for 2.5mm hook (multiple colours) β€” mix of Catania Cotton and Phildar Coton 3 (small amounts of each colour)
  • 02
    Yarn A: White (used as main background colour)
  • 03
    Assorted colours: soft pink, hot pink, red, purple and other accent colours (enough to make 9 front squares and matching back)
  • 04
    Inner cushion pad 40 cm x 40 cm

β€” Tools Required

  • 01
    Crochet hook size 2.50mm
  • 02
    Sewing needle
  • 03
    A pair of scissors
  • 04
    Pins (optional for assembly)
  • 05
    Tapestry/yarn needle for weaving in ends

Progress Tracker

0% Complete

β€” Materials :

Info :

An inner cushion of 40 centimeters wide and high. Various colours of cotton for crochet hook size 2.50mm. I used a mix of Catania Cotton and Phildar Coton 3. Crochet hook, size 2.50mm. Sewing needle. A pair of scissors.

β€” Abbreviations :

Infos :

CH: chain. CH-SP: chain space. SC: single crochet. SS: slip stitch. DC: double crochet.

β€” Notes :

Info :

In this pattern Yarn A is white. Yarn B is one of the other colors. The blanket is made out of 32 squares and a large edging. I made 8 squares with soft pink, 8 with hot pink, 8 with red, 8 with purple.

β€” Squares of the front :

Round 1 :

CH 6, 1 SLST in the first CH to form a ring.

Round 2 :

CH 3 (counts as DC), 11 DC into ring.

Round 3 :

SS to top of beginning CH-3, change colour.

Round 4 :

1SC in between the next two DC, CH 2 (counts as DC). 1 DC in between the same two DC. *2 DC in between the next two DC.* Repeat from * around.

Round 5 :

SS to top of beginning CH-2. Change colour.

Round 6 :

SS to top of next DC, 1SC in between the next two DC, CH 2 (counts as DC). 2 DC in between the same two DC. *3 DC in between the next two DC. Repeat from * around.

Round 7 :

SS to top of beginning CH-2. Change colour.

Round 8 :

SS to top of next 2 DC, 1SC in between the next two DC. CH 2, 3 DC in between the same space. *CH 2, 4 DC in between the next set of three DC, 4DC in between the next set of three DC, 4DC in between the next set of three DC.* Repeat around.

Round 9 :

Slip stitch to top of beginning CH-2. Change colour.

Round 10 :

CH 3, 2 DC in between two DC. below.

Round 11 :

*CH 1, 3 DC in between next set of four DC, CH 3, 3 DC in the same opening. CH 1, 3 DC in between the next set of four, CH 1, 3 DC in the next set of four.* Repeat from * until you've gone round. Slip stitch top top of CH-3.

Round 12 :

Do 1 SC in every DC, and 1 SC in every ch-1-space. In every corner: 1SC, 1 CH, 1SC.

β€” How to join the squares :

Info :

Make 9 squares using the method above. Join the squares by doing 1 SC in every SC.

β€” Edging :

Round 1 :

Do 1 SC in every SC around. End with a SS in the first SC and change colour.

Info :

Note: On each side of a square you have to count 17 SC, so you have 51 SC on every side of the cushion.

Round 2 :

CH 3, 2 DC in the corner. *Skip 2 SC, 3DC in the next SC. Repeat from * until you reach the corner. In every corner: 3 DC, CH 3, 3 DC. Repeat from *. End with 3 DC in the corner, CH 3, do a slip stitch in the beginning CH-3.

β€” The back of the cushion :

Info :

Note: change colour after every row.

Round 1 :

Ch4 and join into a ring with a SS.

Round 2 :

Ch3 (counts as 1DC), 2DC into ring, (ch2, 3DC in ring) 3 times, ch2, join with SS to top of beg CH-3 to join.

Round 3 :

Ch4 (counts as 1DC, CH1), *(3DC, ch2, 3DC) into CH-2 sp, CH1; rep from * 2 more times. 3DC, ch2, 2DC, SS in 3rd of begin ch-4 to join.

Round 4 :

CH5 (counts as 1DC, ch2), 3DC into same CH-SP, CH1, *3DC into next CH-SP, CH1, (3DC, ch2 3DC) into CH-2 sp, CH1; rep from * 2 more times, 3DC into next CH-SP, CH1, 2 DC into corner CH-2 sp at start of round, SS in 3rd of begin CH-5 to join.

Round 5 :

CH5 (count as 1DC, ch2), 3DC into same CH-SP, CH1, *(3DC into next CH-SP, CH1) twice, (3DC, ch2, 3DC) into CH-2 sp, CH1; rep from * 2 more times, (3DC into next CH-SP, CH1) twice, 2DC into corner CH-2 sp at start of round, SS in 3rd of begin CH-5 to join.

Round 6 :

CH5 (count as 1DC, ch2), 3DC into same CH-SP, CH1, *(3DC into next CH-SP, CH1) three times, (3DC, ch2, 3DC) into CH-2 sp, CH1; rep from * 2 more times, (3DC into next CH-SP, CH1) three times, 2DC into corner CH-2 sp at start of round, SS in 3rd of begin CH-5 to join.

Info :

Grow your square using the method above until your square has 18 rows. For the last row, use the same colour as the colour in the last row of the front.

β€” How to join the front and the back :

Info :

Sew the front to the back or make an edging doing 1 SC in every SC.

β€” Notes :

Info :

Designing crochet patterns is a time-consuming and difficult job. I'd love to see you make as many cushions as you like for yourself or to give as a gifts. But please do not make copies of this pattern, don't distribute this pattern, don't share it and don't sell it as if it is your design. If you post your own cushion somewhere on the WorldWideWeb, I'd love it if you refer to my shop.

Assembly Instructions

  • Make 9 front squares following the front square instructions and arrange them in a 3x3 layout before joining.
  • Join the squares by inserting hook into matching SCs and working 1 SC in every SC across the seams to create a flat panel.
  • Make a matching back square (grow to 18 rows) and align with the front panel; sew the front to the back using a whipstitch or mattress stitch for a neat seam.
  • Alternatively, after joining front and back, work the edging rounds around the joined panels to finish the cushion cover and leave an opening to insert the 40 cm inner cushion.
  • Insert the 40 cm inner cushion and close the opening by sewing or continuing the edging so the cushion is fully enclosed.

Important Notes

  • πŸ’‘Change colour after every row on the back panel as specified to mirror the colourful front and maintain a consistent look.
  • πŸ’‘On each side of a joined square count 17 single crochets so each side has 51 SC for a square made of three joined segments.
  • πŸ’‘Work slip stitch joins carefully to keep rounds even and to make colour changes tidy at the beginning of rounds.
  • πŸ’‘Pin or lay out all squares before joining to ensure colours are balanced and identical colours do not appear in the same positions.

This colourful granny-square cushion pattern is perfect for using up scrap cotton yarn and adding handmade charm to your home. Create a cosy accent with bright, cheerful squares and a neat decorative edging. Whether you make one or a dozen, each cushion brings warmth and personality to your space. 🧢🏑

You ask,

we answer.

FAQs

What size will the finished cushion cover be?

The finished cushion cover is designed to fit a 40 cm x 40 cm inner cushion when you use the recommended yarn and 2.5mm hook.

Can I use different yarn weights for this pattern?

You can, but it will change the finished size; use the appropriate hook for your chosen yarn and make a gauge square first to adjust the number of squares or rows.

Do I need prior crochet experience for this pattern?

This pattern is beginner friendly and uses basic stitches (DC, SC, SS) and straightforward colour changes, so basic crochet knowledge is recommended.

How long does this project typically take to complete?

Most crocheters finish the cushion in about 5-7 hours depending on experience and how many colour changes you make.