🧢 Beautiful ✨ Detailed πŸ’ Adorable

Paris Crochet Bag Pattern

Paris Crochet Bag Pattern
4.2β˜… Rating
12-15 Hours Time Needed
3.2K Made This
βœ‚οΈ

Intermediate Level

Ideal for those with basic crochet experience, featuring slightly more advanced stitches and techniques to expand your skills.

⏱️

Multi-Day Project

A rewarding 12+ hour journeyβ€”perfect for dedicated crafters who love detailed work.

✨

Stylish Touch

An elegant detail to elevate any look, combining traditional techniques with contemporary design sensibilities.

About This Paris Crochet Bag Pattern

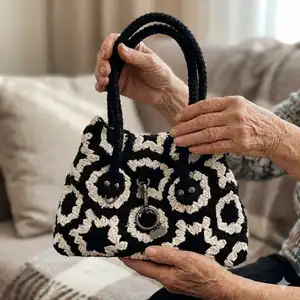
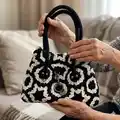
This pattern shows you how to crochet a fashionable hexagon-granny canvas bag using paper-twisted raffia yarn and contrasting colors. You will make 11 granny star hexagons, join them into a structured canvas, add a sewn lining, and create braided-style crocheted handles. The design mixes crochet texture with practical construction for a sturdy, stylish bag.

Paris Crochet Bag Pattern crochet pattern - detailed view of completed project

Detailed step-by-step photos and joining diagrams are included to help you assemble the bag accurately. The pattern uses simple repeat motifs and color changes to create a bold, graphic surface.

Why You'll Love This Paris Crochet Bag Pattern

I absolutely love this pattern because it combines the joy of crocheting granny hexagons with practical bag construction. I adore how the contrasting colors create a striking, graphic look that feels both modern and timeless. The combination of crochet and sewn lining gives the finished bag durability while keeping handmade charm. Making the handles and seeing the canvas come together is always a rewarding step in the process.

Paris Crochet Bag Pattern step 1 - construction progress Paris Crochet Bag Pattern step 2 - assembly progress Paris Crochet Bag Pattern step 3 - details and accessories Paris Crochet Bag Pattern step 4 - final assembly and finishing

Switch Things Up

I love how easily you can customize this pattern by changing colors; try bright summer shades or soft neutrals for a completely different vibe.

You can make the bag larger or smaller by adding or removing rounds on each hexagon and using a different yarn weight with an adjusted hook size.

I often experiment with metallic thread or a shiny raffia for an evening version of the bag that glitters in low light.

For portability, convert the pattern into a mini crossbody by shortening the handle and adding a metal chain or leather strap attachments.

If you prefer a softer bag, line it with quilt batting before sewing the fabric lining to add cushioned structure and a plush feel.

I sometimes add an inner pocket or zip pocket to the lining for keys and phone β€” place it about 10-12 cm from the top edge for easy reach.

For a bolder look, mix three colors and create a gradient or radial color change across the hexagons as you assemble the canvas.

Make the handles sturdier by inserting a thin cord or rope inside the crocheted handle before closing the trim for extra strength and structure.

I recommend trying felt or leather gussets at the bottom corners if you want a more angular silhouette and extra durability in high-wear areas.

Finally, personalize your bag with a metal tag, tassels, or a crocheted flower attached to the snap hook for a signature finishing touch.

Common Mistakes & How to Fix Them

βœ— Not unwinding twisted raffia into balls before starting can cause tangles and uneven tension; always unwind the raffia into smooth balls and secure with a rubber band. βœ— Tight chain loops for the handle make a stiff, shortened handle; work the foundation chains loosely and maintain relaxed tension for flexible handles. βœ— Forgetting to twist yarn ends at color changes causes long twisted tails and messy joins; twist the yarn from the wrong side and turn the work to avoid twisting. βœ— Failing to steam and shape each hexagon leads to uneven hexagon sizes and poor alignment; steam each hexagon on both sides and measure to 15 cm before joining.

Paris Crochet Bag Pattern

Create a chic Paris-inspired crochet bag made from twisted raffia yarn and joined hexagon granny stars. This pattern guides you through crocheting 11 hexagons, joining a unique canvas, adding a sewn lining, and making sturdy handles for a finished structured tote. Perfect for makers who like combining crochet and sewing for a polished handmade accessory.

Intermediate 12-15 Hours

Materials Needed for Paris Crochet Bag Pattern

β€” Main Fabric

  • 01
    Paper twisted raffia yarn, 180-200 gr (approx. 440 yards / 400 m) of each color (base/dark and additional/light)
  • 02
    Base color (dark) - approx. 180-200 g
  • 03
    Additional color (light) - approx. 180-200 g
  • 04
    Fabric for the lining, 40 x 40 inches (1 x 1 m)
  • 05
    Small additional scraps for pockets (optional)

β€” Tools Required

  • 01
    Crochet hook size 3-3.5 mm
  • 02
    Plastic needle with large eyelet
  • 03
    Sewing needle and thread (color to match yarn)
  • 04
    Scissors
  • 05
    Stitch markers
  • 06
    Yarn needle for weaving ends
  • 07
    Small lock or snap hook (60 x 20 mm) and snap hook ring (35 mm)
  • 08
    Pins for assembly
  • 09
    Iron or steamer for blocking/steaming hexagons

Progress Tracker

0% Complete

β€” Crochet the Granny Star (Hexagon) :

Infos :

Base color - dark. Additional color - light. The diagram for crocheting the granny star is in the appendix 1.

Round 1 :

Take the yarn of the base color. Crochet 5 CH.

Round 2 :

Join in a circle, SlSt.

Round 3 :

1 row. Pull the loop 20 mm.

Round 4 :

Twist the hook clockwise, then over the loop. Pull one more loop. Crochet two loops together, then two more. This is mock stitch and the first post of the row, 2 DC, CH.

Round 5 :

Next, (3 DC, CH)*4, 3 DC.

Round 6 :

Crochet the end into this row, cut off the excess.

Round 7 :

2 row. Take the yarn of an additional color. Insert the hook under the 1st loop of the row. Pull the loop 20 mm.

Round 8 :

Make the mock stitch, 2 DC, CH, 3 DC, CH.

Round 9 :

Next, (3 DC, CH, 3 DC, CH)*4, 3 DC, CH, 3 DC, SlSt.

Round 10 :

Crochet in the base thread to this row. Crochet the end into the 1st cluster, cut off the excess.

Round 11 :

3 row. Pull the loop 20 mm. Make the mock stitch, 2 DC, change the color to the base one, CH.

Round 12 :

Next, (3 DC, CH, 3 DC, change the color to an additional one, CH, 3 DC, change the color to the base one, CH)*5, 3 DC, CH, 3 DC, SlSt.

Info :

Please note that when changing the thread, do not crochet in another color, but twist the yarn from the wrong side. To prevent the yarn from twisting together, turn the work on the hook away from yourself after each color change.

Round 13 :

4 row. Pull the loop 20 mm. Make the mock stitch, 2 DC, CH, 3 DC, change the color to an additional one, CH.

Round 14 :

Next, (3 DC, CH, 3 DC, change the color to the base one, CH, 3 DC, CH, 3 DC, change the color to an additional one, CH)*5, 3 DC, CH, 3 DC, SlSt.

Round 15 :

5 row. Pull the loop 20 mm. Make the mock stitch, 2 DC, change the color to the base one, CH, 3 DC, change the color to an additional one, CH, 3 DC, change the color to the base one, CH.

Round 16 :

Next, (3 DC, CH, 3 DC, change the color to an additional one, CH, 3 DC, change the color to the base one, CH, 3 DC, change the color to an additional one, CH, 3 DC, change the color to the base one, CH)*5, 3 DC, CH, 3 DC, change the color to an additional one, CH.

Round 17 :

Cut the thread, pull out the end. Insert the hook under the 1st loop of the row, pull the end. Insert the hook under the last loop of the row. Pull the end back to the wrong side. Tie the knot. Hide the ends between the loops.

Info :

Similarly crochet 10 more granny star (total 11 granny hexagons).

Info :

Steam each hexagon on the front and wrong side. The hexagon measures approximately 6 inches (15 cm).

β€” Sew the Canvas :

Round 1 :

Take the two hexagons and turn on the wrong side.

Round 2 :

Take the yarn of the base color. Insert the hook on the back loops only in the corner. Pull the loop. Crochet 3 SlSt on the back loop only (BLO).

Round 3 :

Take the yarn of an additional color, crochet 4 SlSt BLO. Change the color to the base one, 4 SlSt BLO. Change the color to an additional one, 4 SlSt BLO. Change the color to the base one, 4 SlSt BLO. Crochet the last SlSt in CH in the corner (=15 SlSt).

Round 4 :

Cut the thread, pull out the end. Strengthen all ends.

Round 5 :

Join 8 hexagons in 4 pairs in the same way.

Round 6 :

Then, join 2 pairs and 1 hexagon into the strip of 5 hexagons. After that, take the strip of 5 elements and 1 pair. Place them parallel to each other. Begin to join from the left side.

Round 7 :

Crochet 15 SlSt BLO, make the last SlSt in SlSt of the pair and CH in the corner. Make 1 more SlSt in the corner to strengthen the seam. Cut the additional thread. Next crochet with the thread of the base color.

Round 8 :

On the next sides of the hexagons, crochet 15 SlSt BLO + the additional SlSt in the corner. Add and cut off the additional thread at each side of the hexagons.

Round 9 :

Then, join 1 more hexagon to the last pair.

Round 10 :

On the other side of the strip of 5 elements, add the pair, and then the last hexagon. Strengthen and hide all ends.

Info :

Steam the canvas on the front and wrong sides.

β€” Lining :

Round 1 :

Fold the fabric in half and draw along the contour of the canvas. Make the lining from two halves if the fabric is not enough.

Round 2 :

Cut out the lining with 10-15 mm seam allowances. If desired, you can cut out a pocket.

Round 3 :

Sew the lining on the side seams. Then, fold the top edge. The shape of the lining repeats the shape of the bag and resembles a 3D trapezoid.

Info :

At this stage, you can give it to the atelier (optional professional finishing).

β€” Assembly :

Round 1 :

Join the side seams of the bag in the same way as joined the canvas.

Round 2 :

Strengthen and hide all ends. Twist the towel into the roll. Steam the seams on the wrong side.

Round 3 :

Turn the bag inside out. Straighten the seams with your hands.

Info :

Diagram of the bag and the lining assembly is in the appendix.

β€” Crochet the Handle (*2) :

Round 1 :

Take the yarn of the base color. Crochet 76 CH. Don't tighten the loops, crochet loosely.

Round 2 :

1 row. Crochet 75 SC from the 2nd loop from the hook, CH.

Round 3 :

Insert the hook through the last SC. Pull out the end. Crochet the end into the next row.

Round 4 :

2 row. 75 SC BLO, CH.

Round 5 :

3 row. 75 SC BLO and the front loop only (FLO) of the pre-previous row, CH.

Round 6 :

4-6 rows. 75 SC BLO and FLO of the pre-previous row, CH.

Round 7 :

7 row. 75 SC BLO and FLO of the pre-previous row. Cut the thread, pull out the end. Strengthen and hide the end.

β€” Base Trim and Join of the Handle :

Round 1 :

Turn the canvas of the handle with the other side to you.

Round 2 :

Count 4 SC from the left corner. Insert the hook in the 5th SC, pull the loop. Crochet 3 SC. Next crochet 3 SC in 1 in the corner, 3 SC, 3 SC in 1 in the corner, 3 SC.

Round 3 :

Turn the fabric with the wrong side facing up. Fold the handle in half lengthwise. Insert the hook on the 5th loops from the edge. Pull the loop.

Round 4 :

Next crochet 66 SlSt to the other end of the handle. Don't tighten the loops, so as not to tighten the handle. Insert the hook on the loop of the chain and both loops of the SC of the last row.

Round 5 :

Cut the thread, pull out the end. Strengthen and hide the end.

Assembly Instructions

  • Join the hexagon pieces into pairs and then into strips using 15 SlSt BLO on the hexagon sides; align pieces carefully and crochet seams to form the canvas.
  • Sew the canvas sides together following the diagram so the bag shape forms; strengthen seams and hide thread ends as you go.
  • Make the fabric lining from the canvas outline, sew side seams and fold the top edge to create a 3D trapezoid lining, then insert and hand-sew or machine-stitch the lining inside the crochet bag.
  • Make two handles and attach them by joining the trim of the handle to the bag top: count stitches, place ends symmetrically and sew or crochet the handle ends securely.
  • Add snap hook or small lock to the bag top as desired and steam the whole bag to shape; press seams to flatten and finish by hiding any remaining yarn tails.

Important Notes

  • πŸ’‘Before starting, unwind twisted raffia into balls to avoid tangles and ensure even tension throughout the project.
  • πŸ’‘When changing colors, twist the yarn from the wrong side rather than crocheting over a different color to prevent bulky joins.
  • πŸ’‘Steam and shape each hexagon to the specified size (approx. 15 cm) before joining to ensure a neat, even canvas.

This Paris-inspired raffia crochet bag brings a graphic hexagon motif to life with striking contrast and handcrafted charm. The pattern blends crochet and sewing for a polished, durable accessory you can proudly carry anywhere. Make it in bold contrasts or soft pastels β€” your handmade tote will always be uniquely yours. πŸ‘œβœ¨

You ask,

we answer.

FAQs

What size will the finished bag be?

The finished bag from the specified materials measures approximately 13 inches (33 cm) length x 9 inches (23 cm) height x 8 inches (20 cm) width, with handles approx. 24 inches (60 cm) long.

What yarn is recommended for this pattern?

Use paper twisted raffia yarn; the pattern specifies 180-200 g (approx. 440 yards / 400 m) of each color (base and additional).

Can I use different yarn instead of raffia?

Yes, but changing yarn type will affect texture and size; choose a similarly thick ribbon or cord yarn and adjust hook size for gauge.

How long does this project take to complete?

This is a multi-day project and typically requires 12-15 hours depending on your speed, sewing time for the lining, and finishing steps.

Do I need sewing skills to finish this bag?

Basic sewing skills are needed to make the lining and sew it into the finished crochet canvas; a simple straight seam and turning the lining are sufficient.