๐Ÿงถ Beautiful โœจ Detailed ๐Ÿ’ Adorable

Bunny Amigurumi Pattern

Bunny Amigurumi Pattern
4.0โ˜… Rating
5-7 Hours Time Needed
2.8K Made This
โœ‚๏ธ

Beginner Friendly Level

Perfect for those just starting their crochet journey, with clear instructions and simple techniques

โฑ๏ธ

Weekend Treat

Takes 5-7 hours, making it an enjoyable project to finish over a couple of days.

๐Ÿงธ

Cute Companion

An adorable friend to cherish, handcrafted with love to bring comfort and joy for years to come.

About This Bunny Amigurumi Pattern

This pattern creates a plush velvet bunny amigurumi approximately 12 inches tall using soft, chunky plush yarn. The design focuses on simple shaping using single crochet and half double crochet to produce rounded paws, ears, and a cuddly body. Photographic steps and clear stitch counts guide you through each section for an enjoyable make.
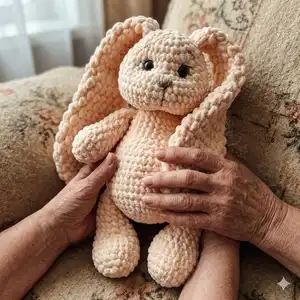
Bunny Amigurumi Pattern crochet pattern - detailed view of completed project

Beginner-friendly construction, worked mostly in spirals with markers for consistent rounds. The finished bunny is perfect for gifts or nursery decor and uses standard crochet abbreviations.

Why You'll Love This Bunny Amigurumi Pattern

I absolutely love this pattern because the plush yarn creates a wonderfully soft and squishy bunny that is irresistible to hold. I enjoy how quickly the body and paws grow with simple repeat rounds, making it a satisfying project to finish in a weekend. The pattern is approachable for beginners yet produces a professional-looking amigurumi every time. I also love adding personal touches like embroidered features and slightly different ear positions to give each bunny a unique personality.

Bunny Amigurumi Pattern step 1 - construction progress Bunny Amigurumi Pattern step 2 - assembly progress Bunny Amigurumi Pattern step 3 - details and accessories Bunny Amigurumi Pattern step 4 - final assembly and finishing

Switch Things Up

I love how easy it is to customize this bunny by changing yarn colorsโ€”try a soft pastel for a nursery gift or bold tones for a playful look.

You can vary the size by switching yarn weight and hook: a bulkier yarn and larger hook yields a chunky cuddly bunny, while thinner yarn makes a delicate mini version.

I often add embroidered cheeks or a tiny scarf to personalize each bunny and give it character.

Try different eye types: safety eyes for durability, embroidered eyes for a completely soft toy, or glass beads for a vintage style.

If you want posable limbs, insert a small wire armature into the legs before stuffing to allow gentle posing.

To make a seasonal bunny, crochet small accessories like a flower crown, a tiny sweater or a removable hat.

I recommend experimenting with ear shapesโ€”make them shorter or wider to change the bunny's personality and silhouette.

Combine textures by using a different yarn for the inner ear or muzzle to add subtle contrast and tactile interest.

Make a pair or a set in graduated sizes to create a charming family collection perfect for gifting or display.

When sewing parts together, I pin everything in place and compare both sides before stitching to ensure symmetry and a neat finish.

Common Mistakes & How to Fix Them

โœ— Skipping the marker when working in spiral rounds causes confusion with stitch counts; place a marker in the first stitch of each round and move it each row to stay accurate. โœ— Crocheting too tightly with plush velvet yarn makes it hard to work and results in a stiff fabric; relax your tension and pull the working loop up to hook level as instructed to avoid holes. โœ— Overstuffing the paws or body creates lumps and distorts shaping; stuff gently and evenly, adding small amounts until the desired firmness is reached. โœ— Not counting increases and decreases precisely leads to uneven shaping; count stitches after each round and mark increases/decreases to maintain the correct stitch totals.
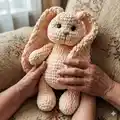
Bunny Amigurumi Pattern

Make a soft, cuddly bunny using plush velvet yarn and easy-to-follow instructions. This pattern guides you through each paw, ear and body section with clear steps and helpful photos. Perfect for gifting or adding a handmade friend to your home. Follow the stitch counts and tips to create a charming 12-inch bunny.

Beginner Friendly 5-7 Hours

Materials Needed for Bunny Amigurumi Pattern

โ€” Main Fabric

  • 01
    Plush/velvet yarn (approx. 130 yards / 120m per 100g), 2 skeins (example: Baby Love plush yarn, peach color)
  • 02
    Small quantity of contrasting yarn for muzzle embroidery (any color as desired)

โ€” Tools Required

  • 01
    Crochet hook 4 mm
  • 02
    Crochet hook 6 mm
  • 03
    Safety eyes 15 mm (2 pieces)
  • 04
    Polyester stuffing (soft stuffing)
  • 05
    Plastic needle with large eyelet
  • 06
    Stitch markers (3 pieces recommended)
  • 07
    Scissors

Progress Tracker

0% Complete

โ€” Hind paws :

Info :

Take the 4 mm hook. Crochet 5 CH.

Round 1 :

From the 2nd loop from the hook 3 SC, 3 SC in 1, 2 SC, 1 Inc (=10)

Info :

Next crochet a spiral.

Round 2 :

1 Inc, 2 SC, 3 Inc, 2 SC, 2 Inc (=16)

Info :

Place the marker in the 1st SC of the row. Next rearrange the marker to the 1st SC of the each subsequent row.

Note :

When crochet SC, pull the working loop to the level of the hook. Then the canvas will be without holes.

Note :

Then tighten the loop on the hook back.

Round 3 :

1 SC, 1 Inc, 3 SC, 1 Inc, 3 SC, 1 Inc, 3 SC, 1 Inc, 2 SC (=20)

Round 4 :

1 SC, 1 Inc, (4 SC, 1 Inc)*3, 3 SC (=24)

Round 5-6 :

2 rows of 24 SC.

Round 7 :

6 SC, (1 Dec, 1 SC)*3, 1 Dec, 5 SC, 1 Dec (=19)

Round 8 :

4 SC, 4 Dec, 5 SC, 1 Dec (=14)

Round 9-14 :

6 rows of 14 SC.

Info :

Take some stuffing. Take the same amount for the second paw to ensure they are equally filled. Gently stuff the lower part of the paw. Fold in half.

Finish :

Crochet 6 SC on both part. Cut the thread, pull out the end.

Info :

Similarly crochet the 2nd paw.

โ€” Front paws :

Info :

Take the 4 mm hook. Crochet 2 CH.

Round 1 :

6 SC in the 2nd loop from the hook.

Info :

Next crochet a spiral.

Round 2 :

6 Inc (=12). Place the marker in the 1st SC of the row. Next rearrange the marker to the 1st SC of the each subsequent row.

Round 3 :

(5 SC, 1 Inc)*2 (=14)

Round 4-7 :

4 rows of 14 SC.

Round 8 :

10 SC, 2 Dec (=12)

Round 9-13 :

5 rows of 12 SC.

Info :

Take some stuffing. Take the same amount for the second paw to ensure they are equally filled. Gently stuff the lower 2/3 of the paw. Fold in half.

Finish :

Crochet 5 SC on both part. Cut the thread, pull out the end.

Info :

Similarly crochet the 2nd paw.

โ€” Ears :

Info :

Take the 6 mm hook. Crochet 2 CH.

Round 1 :

6 HDC in the 2nd loop from the hook.

Info :

Next crochet a spiral. Crochet the loops loosely to create a voluminous pattern.

Round 2 :

6 Inc (=12). Place the marker in the 1st HDC of the row. Next rearrange the marker to the 1st HDC of the each subsequent row.

Round 3 :

(1 HDC, 1 Inc)*6 (=18)

Round 4-8 :

5 rows of 18 HDC.

Round 9 :

(4 HDC, 1 Dec)*3 (=15)

Round 10-12 :

3 rows of 15 HDC.

Round 13 :

(3 HDC, 1 Dec)*3 (=12)

Finish :

Fold in half. Crochet 4 SlSt on both part. Cut the thread, pull out the end.

Info :

Similarly crochet the 2nd ear.

โ€” Body :

Info :

Take the 4 mm hook. Crochet 2 CH.

Round 1 :

6 SC in the 2nd loop from the hook.

Info :

Next crochet a spiral.

Round 2 :

6 Inc (=12). Place the marker in the 1st SC of the row. Next rearrange the marker to the 1st SC of the each subsequent row.

Round 3 :

12 Inc (=24)

Round 4 :

(3 SC, 1 Inc)*6 (=30)

Assembly Instructions

  • Attach the ears to the top of the head symmetrically: align the ear bases along the top seam and sew using the long tails with a whipstitch or invisible stitch, securing firmly.
  • Position the front paws on either side of the body between the rounds where the chest begins (approx mid-body) and sew securely, angling slightly so the paws sit naturally.
  • Sew the hind paws to the bottom of the body, spacing them evenly on either side of the center and sewing through several stitches for a stable attachment.
  • Embroider the muzzle and nose using a contrasting yarn and plastic needle; sew safety eyes between the specified head rounds, then embroider details before final assembly.

Important Notes

  • ๐Ÿ’กWork in a continuous spiral for most pieces and use a stitch marker to track the first stitch of each round to avoid accidental joining.
  • ๐Ÿ’กWhen working with plush/velvet yarn, pull the working loop up to the level of the hook to reduce visible holes and create a fuller fabric.
  • ๐Ÿ’กStuff parts gradually and evenly; under-stuffing causes floppy pieces while overstuffing distorts shapeโ€”aim for firm but soft stuffing.

This adorable Bunny pattern makes a lovable handmade companion perfect for gifting or snuggling. Follow the clear photo steps and stitch counts to create a plush, soft amigurumi with personality. Make one for yourself or craft a whole familyโ€”happy crocheting! ๐Ÿงถ๐Ÿ’•

You ask,

we answer.

FAQs

What size will the finished piece be?

The finished bunny measures approximately 12 inches (30 cm) tall using the recommended plush yarn and hook sizes.

Can I use different yarn weights for this pattern?

Yes, you can use different yarn weights but the final size and texture will change; use a suitable hook for your yarn and adjust stuffing accordingly.

Do I need prior crochet experience for this pattern?

This pattern is beginner friendly and uses basic stitches (SC, HDC) but you should be comfortable working in the round and following stitch counts.

How long does this project typically take to complete?

Most crocheters finish this bunny in 5-7 hours, depending on experience and how many details are added.