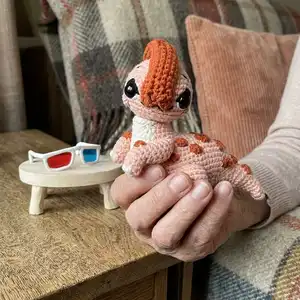
Make a charming little Parasaurolophus named Ginny with this detailed crochet pattern. Youll learn shaping, color-changing (jacquard) and how to assemble a posable head using a cotter pin. The pattern includes full step-by-step rounds, photo references and a bonus 3D glasses tutorial so you can add personality. Perfect for gifting or adding to your amigurumi collection, this pattern helps you create a polished, professional-looking toy.
Progress Tracker
0% Complete
— Conventions :
Info :
I - loop = chain; SC - single crochet; SL ST - slip stitch; INC - increase; DEC - decrease; (...) - total number of loops in a round; [...]xN - repeat what is indicated in round brackets N times.
— CREST (Yarn A) :
Round 1 :
26 loops, turning, 25sc (starting from the 2nd loop from the hook) (25l)
Round 2 :
1 loop, turning, 25sc (25l)
Round 3 :
1 loop, turning, dec, 23sc (24l)
Round 4 :
1 loop, turning, 22sc, dec (23l)
Round 5 :
1 loop, turning, 23sc (23l)
Round 6 :
1 loop, turning, 22sc, inc (24l)
Round 7 :
1 loop, turning, inc, 23sc (25l)
Round 8-9 :
1 loop, turning, 25sc (25l)
Round 10 :
1 loop, turning, 25 sl st (25l)
Round 11 :
9 sc straight from the point Start (see photo 1). Fold the detail in half and crochet both sides together 25 sl st (see photos 2-6). Crochet [dec]x4, sl st in the remaining hole (see photos 7-8). Cut the thread, leaving a long end for sewing. Pass the thread through all the loops using a yarn needle. Tighten and secure. Move the thread 7 stitches to the left (see photo 9).
— HEAD (Yarn B) :
Round 1 :
2 loops, 6sc in 2nd loop from hook (amigurumi ring) (6l)
Round 3 :
[sc, inc]x6 (18l)
Round 4 :
[2sc, inc]x6 (24l)
Round 5 :
[3sc, inc]x6 (30l)
Round 6 :
[4sc, inc]x6 (36l)
Round 7 :
[5sc, inc]x6 (42l)
Round 14 :
[5sc, dec]x6 (36l)
Round 15 :
[4sc, dec]x6 (30l)
Round 16 :
[3sc, dec]x6 (24l)
Info :
Baste the crest to the head with extra black thread (see photos 10-13). Sew the crest to the head (see photos 14-18). Remove extra thread.
Insert eyes :
Insert safety eyes between the rounds 11 and 12, the distance between them is approximately 12 stitches, don't fix yet (see photo 19).
Embroider eyes :
Using the yarn needle to do from above of the eye 'loose stitch' of black thread floss (see photos 20, 21). Separate one thread and fasten with a needle 'loose stitch' in the middle of the eye (see photos 22, 23). In the same way, embroider one more 'loose stitch' 1 mm higher than the previous one, in order to get an oval shape (see photos 24-27). Using yarn needle to do from below the eye 'loose stitch' of white thread floss (see photos 28, 29). Separate one thread and fasten with a needle 'loose stitch' (see photo 30). Press the eye to the embroidered line and fasten it. Divide the black threads floss in half, embroider the nostrils and mouth (see photos 31-36).
Round 17 :
[2sc, dec]x6 (18l)
Round 18 :
[sc, dec]x6 (12l)
Start stuffing :
Start stuffing the head with synthepus and continue crocheting.
CHEEKS (2 pcs) :
Crochet cheeks with a hook 1,5 mm (Pink threads mouline): 1: 2 loops, 6sc in 2nd loop from hook (amigurumi ring), sl st in 1st sc (6l). Cut and fix the thread, leaving a long end for sewing. Sew the cheeks to the head with the wrong side outward (see photos 41, 42).
Round 19 :
[dec]x6 (6l). Trim the thread. Pass the thread through all the loops using a yarn needle. Tighten and secure (see photo 45).
— NECK and BODY :
Round 1 :
Yarn B: 2 loops, 8sc in 2nd loop from hook (amigurumi ring) (8l)
Info :
Next, you need to crochet the body of yarn B and yarn C at once, alternately change the thread, but not cutting it to get a white breast. This technique is called jacquard. Color changing technique: when crocheting the last pink sc, insert the hook into the loop, pull out the thread, crochet this sc to the end with a white thread. Then the pink thread is thrown forward, and the white working thread goes backwards. To change the color back: when crocheting the last white sc, insert the hook into the loop, pull out the thread, crochet this sc to the end with the pink thread.
Round 3 :
[3sc, inc]x2 (Yarn C); [3sc, inc]x2 (Yarn B) (20l)
Round 4 :
only through back loops 10sc (Yarn C); 10sc (Yarn B) (20l)
Round 5 :
[4sc, inc]x2 (Yarn C); [4sc, inc]x2 (Yarn B) (24l)
Round 6 :
12sc (Yarn C); 6sc, 4 loops, turning, 3sc starting from the 2nd loop from the hook, sl st in the same loop (in which the last sc was crocheted before the chain), 6sc (Yarn B) (30l) (see photos 67-71).
Round 7 :
12sc (Yarn C); 9sc, 4 loops, turning, 3sc starting from the 2nd loop from the hook, sl st in the same loop, 9sc (Yarn B) (36l) (see photo 72).
Round 8 :
[5sc, inc]x2 (Yarn C); [5sc, inc]x4 (Yarn B) (42l)
Round 9 :
14sc (Yarn C); [6sc, inc]x2, 4 loops, turning, 3sc starting from the 2nd loop from the hook, sl st in the same loop, [6sc, inc]x2 (Yarn B) (52l) (see photo 73)
Round 10 :
14sc (Yarn C); [7sc, inc]x2, 6sc, [7sc, inc]x2 (Yarn B) (56l)
Round 11 :
14sc (Yarn C); 21sc, 4 loops, turning, 3sc starting from the 2nd loop from the hook, sl st in the same loop, 21sc (Yarn B) (62l) (see photo 74)
Round 12 :
14sc (Yarn C); 24sc, 4 loops, turning, 3sc starting from the 2nd loop from the hook, sl st in the same loop, 24sc (Yarn B) (68l) (see photo 75). Don't cut the thread. Take another end of the yarn ball and crochet the tail.
— TAIL (Yarn B) :
Round 1 :
2 loops, 4sc in 2nd loop from hook (amigurumi ring) (4l)
Round 2 :
[inc]x2, dec (5l)
Round 3 :
sc, [inc]x2, dec (6l)
Round 4 :
sc, [inc]x2, sc, dec (7l)
Round 5 :
sc, [inc]x3, sc, dec (9l)
Round 6 :
2sc, inc, sc, inc, 2sc, dec (10l)
Round 8 :
3sc, [inc]x3, 2sc, dec (12l)
Round 10 :
3sc, [inc]x5, 2sc, dec (16l)
Info :
Cut and fix the thread. Stuff the tail with synthepus. Mark with a pin the place where the tail connects to the back - move the pin to the 3rd loop from the beginning of the round count clockwise (see photo 76). Connect the body with the tail in the next round. To connect the details insert the hook initially into the tail (from the inside to the outside), and then into the body (from the outside to the inside) (see photos 77-81).
Round 13 (incomplete round) :
14sc (Yarn C); crochet 24sc along the body, crochet 6sc of the body together with 6sc of the tail, then crochet 24sc along the body (Yarn B) (see photo 82)
Round 14 :
15sc (Yarn C); crochet 23sc on the body, crochet 10sc on the tail, crochet 24sc on the body (72l) (Yarn B) (see photos 83,84)
Info :
Sew the holes between the body and the tail using extra thread (see photo 85).
Round 15 :
15sc (Yarn C); 17sc, [dec]x3, 10sc, [dec]x3, 18sc (Yarn B) (66l)
Round 16 :
16sc (Yarn C); 13sc, [dec]x3, 10sc, [dec]x3, 15sc (Yarn B) (60l)
Round 17 :
16sc (Yarn C); 10sc, [dec]x3, 10sc, [dec]x3, 12sc (Yarn B) (54l)
Info :
Next cut the yarn B and continue crocheting with yarn C only (see photo 86)!
Round 18 :
28sc, [dec]x6, 14sc (48l)
Round 19 :
[6sc, dec]x6 (42l)
Round 20 :
[5sc, dec]x6 (36l)
Round 21 :
[4sc, dec]x6 (30l)
Round 22 :
[3sc, dec]x6 (24l)
Round 23 :
[2sc, dec]x6 (18l)
Round 24 :
[sc, dec]x6 (12l)
Round 25 :
[dec]x6 (6l) Trim the thread. Pass the thread through all the loops using a yarn needle. Tighten and secure.
— LEGS, 2 pcs (Yarn B) :
Round 1 :
7 loops, turning, 6sc (starting from the 2nd loop from the hook), 6sc (from the back of the chain) (12l)
Round 2 :
[2sc, inc]x4 (16l)
Round 7 :
[6sc, dec]x2 (14l)
Round 8 :
[5sc, dec]x2 (12l)
Round 9-10 :
12sc (12l) Start stuffing the leg with synthepus.
Round 11 :
[dec]x2, 4sc, [dec]x2 (8l)
Round 12 :
dec, 4sc, dec (6l)
Round 13 :
6sc only through back loops (6l) Completely fill the leg, don't stuff further.
Round 14 :
[inc]x2, 4sc (8l)
Round 15 :
sc, [inc]x2, 5sc (10l)
Round 16-17 :
10sc (10l) Change the thread to Yarn C (leave the long end of Yarn B). Remove the pin that marking the beginning of the round. Fold the resulting 10 loops in half and in the next round, crochet both halves together.
Round 18 :
1 loop, turning, 5 sl st (5l) (see photos 88-93)
Round 19 :
1 loop, turning, [[sl st, dc, sl st] - in one loop, sl st]x2, {sl st, dc, sl st} - in one loop (see photo 94). 'Squeeze' the foot to the leg with a few stitches using the left thread of Yarn B (see photos 95, 96).
— HANDS, 2 pcs (Yarn B) :
Round 1 :
2 loops, 6sc in 2nd loop from hook (amigurumi ring) (6l)
Round 2 :
[2sc, inc]x2 (8l)
Round 3 :
[3sc, inc]x2 (10l)
Round 7-8 :
[inc]x3, sc, [dec]x3 (10l)
Round 10-11 :
[dec]x3, sc, [inc]x3 (10l)
Stuff :
Stuff the hand with synthepus.
Round 12 :
[dec]x2, sc, [dec]x2, sc (6l) Trim the thread. Pass the thread through all the loops using a yarn needle. Tighten and secure (see photo 97).
NAILS :
Embroider 3 nails on each hand with French knot (Yarn C) (see photos 98, 99).
— SPOTS (Yarn A) :
SMALL (8 pcs) :
1: 3 loops, turning, 2sc (starting from the 2nd loop from the hook), 2sc (from the back of the chain) sl st in 1st sc (4l). Cut and fix the thread, leaving a long end for sewing.
MIDDLE (6 pcs) :
1: 4 loops, turning, 3sc (starting from the 2nd loop from the hook), 3sc (from the back of the chain) sl st in 1st sc (6l). Cut and fix the thread, leaving a long end for sewing.
BIG (4 pcs) :
1: 5 loops, turning, 4sc (starting from the 2nd loop from the hook), 4sc (from the back of the chain) sl st in 1st sc (8l). Cut and fix the thread, leaving a long end for sewing. Sew on the spots on the hands, legs, back and tail (see photos 100-102).
— Assemblage :
Info :
Sew your crocheted hands and legs to the body with a threaded bracing (use round-nosed pliers to make it easier to pull the needle). For this, it is necessary: 1. Attach the hands and legs using needles for cutting (hands between 9 and 10 rounds of body, distance between hands approx 18 stitches, legs between 15 and 16 rounds of body, distance between legs approx 28 stitches - view from above, see photos 103-105). Check that the dinosaur stand steadily. Detach the hands and legs without removing the needles from them, and insert other needles for cutting in their place (see photos 106, 107).
Info :
2. Insert the needle through the back into the hand attachment point (leaving the loose end of the thread outside) (see photos 108, 109). 3. Thread the needle through two loops on the inner surface of the hand (the needle for cutting must be in the middle) (see photo 110). 4. Insert the needle into the body at the hand attachment point and pull out it at the point of attachment of the second hand (see photo 111). 5. Pass the needle through the second hand in the same way (see photo 112). 6. Sew the body and the hands two more times in the same way for strength (see photo 113). 7. Insert the needle at the hand attachment point and pull out it at the point of attachment of the opposite leg (see photo 114). 8. Thread the needle through the leg (see photo 115). 9. Insert the needle into the body at the leg attachment point and pull out it at the point of attachment of the second leg (see photo 116). 10. Pass the needle through the second leg (see photo 117). 11. Sew the body and the legs two more times in the same way for strength (see photo 118). 12. Insert the needle into the body at the leg attachment point and pull out it the back in the place, where it was introduced at the very beginning (see photo 119). 13. Tie a few knots and hide the thread (see photo 120).
Finishing :
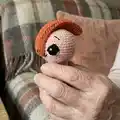
Congratulations, you did a great job and created a small miracle! Embrace your parasaurolophus (see photos 121-123)!
— BONUS 3D GLASSES :
Info :
It is necessary to measure the desired width of the glasses (for me it is approximately 5.6 cm / 2.2 inches). Enlarge or reduce the reference photo so that size matches, cut lenses from translucent material, make a frame from yarn C and floral wire, assemble and fix with super glue 'Moment' (see photos 124-126 and video tutorial reference).
This adorable Parasaurolophus Ginny pattern brings a playful, collectible dinosaur to life with tiny details like a crest, spots and even 3D glasses. The design mixes small technical skills with joyful finishing touches to create a durable, display-ready toy. Share Ginny with friends or make a whole herd for a whimsical nursery collection. 🧶🦕