🧢 Beautiful ✨ Detailed πŸ’ Adorable

Niahs Balloon Dog Amigurumi Pattern

Niahs Balloon Dog Amigurumi Pattern
4.0β˜… Rating
12-15 Hours Time Needed
3.6K Made This
βœ‚οΈ

Intermediate Level

Ideal for those with basic crochet experience, featuring slightly more advanced stitches and techniques to expand your skills.

⏱️

Multi-Day Project

A rewarding 12+ hour journeyβ€”perfect for dedicated crafters who love detailed work.

🧸

Cute Companion

An adorable friend to cherish, handcrafted with love to bring comfort and joy for years to come.

About This Niahs Balloon Dog Amigurumi Pattern

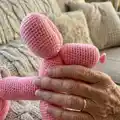
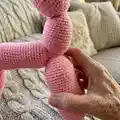
This pattern creates a whimsical balloon dog amigurumi by crocheting a long balloon tube and shaping it into legs, body, neck and head. The design uses single crochet worked in spirals with clear round-by-round counts. The finished dog measures roughly 20 cm tall and 23 cm from tail to nose using recommended yarn and hook.

Niahs Balloon Dog Amigurumi Pattern crochet pattern - detailed view of completed project

The pattern includes a full rounds list, stuffing reminders, and a step-by-step photo guide for sewing the joints. Youll also find yarn, hook and gauge details to help you achieve the correct size.

Why You'll Love This Niahs Balloon Dog Amigurumi Pattern

I absolutely love this pattern because it turns simple single crochet stitches into a playful, sculptural balloon dog that brings a smile. I enjoy how the segment-by-segment construction makes shaping very visual and satisfying. The pattern is forgiving and allows you to adjust stuffing to get the exact silhouette you want. I love sharing this pattern because it is unique, whimsical, and perfect for handmade gifts or decorative conversation pieces.

Niahs Balloon Dog Amigurumi Pattern step 1 - construction progress Niahs Balloon Dog Amigurumi Pattern step 2 - assembly progress Niahs Balloon Dog Amigurumi Pattern step 3 - details and accessories Niahs Balloon Dog Amigurumi Pattern step 4 - final assembly and finishing

Switch Things Up

I love how versatile this balloon dog is for color changes; I often make stripes by alternating colors every few rounds to give the dog a playful look.

I sometimes use a thicker cotton yarn and a larger hook to create a chunky, sturdier version that works well as a pillow or floor toy.

For tiny keychain versions I use finer yarn and a smaller hook to scale down the pattern into a mini charm.

I like to add embroidered eyes or tiny felt patches to personalize faces and give each dog a unique expression.

If I want posable legs I add a thin wire through the leg segments before stuffing, securing the wire ends inside the body.

I experiment with stuffing firmness to change how round or elongated each bump becomes β€” softer stuffing gives a floppy look, firmer stuffing gives crisp balloon bumps.

I sometimes attach a small collar or bow using contrast yarn to make a gift-ready finished piece with minimal extras.

To change size quickly, I swap yarn weight and recalculate how many stitches I want per 10 cm, then adjust rounds to keep proportions.

I also try alternating surface crochet rows or slip stitch ridges along the body for a textured, modern look.

When sewing joints I always pin first and compare both sides for symmetry; you can also baste with a contrasting thread to preview placement before sewing permanently.

Common Mistakes & How to Fix Them

βœ— Not checking gauge before starting and ending up with the wrong size; always make a 10 cm swatch and adjust hook size to match 24 sc per 10 cm. βœ— Forgetting to stuff segments as you go, which results in uneven lumps; add stuffing gradually and shape each bump while crocheting. βœ— Skipping the stitch count during increases or decreases leads to mismatched segments; count stitches after each round to ensure accuracy. βœ— Sewing joints without pinning first can cause misalignment; pin or baste the joints in place and compare to the photos before permanently sewing them. βœ— Tightening the yarn too much when closing the nose can pull the shape in; use a gentle even tension and finish with a knot or small neat stitch to close the hole.

Niahs Balloon Dog Amigurumi Pattern

Make a playful balloon dog using single crochet in the round β€” a charming amigurumi to brighten any shelf or gift. This pattern guides you from crocheting the balloon segments to sewing them together into a dog shape. Youll work in spirals with clear round counts and a simple shaping guide with photos. Ideal for anyone who loves fun, structural crochet projects.

Intermediate 12-15 Hours

Materials Needed for Niahs Balloon Dog Amigurumi Pattern

β€” Main Fabric

  • 01
    Cotton yarn 8/4 (standard cotton), 50 g = about 170 m; approximately 60 g total (any color)

β€” Tools Required

  • 01
    Crochet hook size 2.0-2.5 mm (US B-1)
  • 02
    Tapestry/needling sewing needle
  • 03
    Scissors
  • 04
    Polyester stuffing
  • 05
    Stitch markers (optional)
  • 06
    Yarn needle for weaving ends

Progress Tracker

0% Complete

β€” The balloon :

Info :

The balloon dog is crocheted in the same way as an actual balloon dog, by crocheting the balloon first, and then shaping it as a dog afterwards. The balloon dog is about 20 cm tall, and 23 cm from tail to nose. It is worked in spirals. Start off with a ml.

Round 1 :

6 sc in ml (6)

Round 2-6 :

sc all the way around (6) – 5 rounds (tip of the tail)

Round 7 :

*sc inc* x6 (12)

Round 8 :

*1 sc, sc inc* x6 (18)

Round 9 :

*2 sc, sc inc* x6 (24)

Round 10 :

*3 sc, sc inc* x6 (30)

Round 11-25 :

sc all the way around (30) – 15 rounds (tail)

Round 26 :

*3 sc, sc dec* x6 (24)

Round 27 :

*2 sc, sc dec* x6 (18)

Info :

Put some stuffing in it.

Round 28 :

*1 sc, sc dec* x6 (12)

Round 29 :

*sc dec* x6 (6)

Round 30 :

sc all the way around (6)

Round 31 :

*sc inc* x6 (12)

Round 32 :

*1 sc, sc inc* x6 (18)

Round 33 :

*2 sc, sc inc* x6 (24)

Round 34 :

*3 sc, sc inc* x6 (30)

Round 35-51 :

sc all the way around (30) - 17 rounds (leg 1)

Round 52-60 :

repeat round 26-34 (30)

Round 61-77 :

sc all the way around (30) - 17 rounds (leg 2)

Round 78-86 :

repeat round 26-34 (30)

Round 87-106 :

sc all the way around (30) - 20 rounds (body)

Round 107-115 :

repeat round 26-34 (30)

Round 116-132 :

sc all the way around (30) - 17 rounds (leg 3)

Round 133-141 :

repeat round 26-34 (30)

Round 142-158 :

sc all the way around (30) - 17 rounds (leg 3)

Round 159-167 :

repeat round 26-34 (30)

Round 168-179 :

sc all the way around (30) - 12 rounds (neck)

Round 180-188 :

repeat round 26-34 (30)

Round 189-203 :

sc all the way around (30) - 15 rounds (ear 1)

Round 204-212 :

repeat round 26-34 (30)

Round 213-227 :

sc all the way around (30) - 15 rounds (ear 2)

Round 228-236 :

repeat round 26-34 (30)

Round 237-249 :

sc all the way around (30) - 13 rounds (nose)

Round 250 :

*3 sc, sc dec* x6 (24)

Round 251 :

*2 sc, sc dec* x6 (18)

Info :

Put some stuffing in it.

Round 252 :

*1 sc, sc dec* x6 (12)

Round 253 :

*sc dec* x6 (6)

Round 254 :

sc all the way around (6)

Round 255 :

*sc inc* x6 (12)

Round 256 :

*1 sc, sc inc* x6 (18)

Info :

Slip st in the next stitch, cut the yarn pull it through and weave in the ends.

Info :

It should now look like the piece on the picture.

β€” Shaping the balloon :

Step 1 :

Throughout the picture guide I have given all the joints numbers, like on the picture above.

Step 2 :

For the first pair of legs, you will need to sew joint no 1 and 3 together, as shown on the pictures above.

Step 3 :

When they have been sewn together, it should look like the picture above.

Step 4 :

For the second pair of legs, you will need to sew joint no 4 and 6 together, as shown on the pictures above.

Step 5 :

When they have been sewn together, it should look like the picture above.

Step 6 :

For the ears, you will need to sew joint no 7 and 9 together, as shown on the pictures above.

Step 7 :

When they have been sewn together it should look like the picture above.

Step 8 :

The last thing to do is to close the hole at the tip of the nose. You can either sew it together, or you can tie a tight knot about the outside.

Info :

You balloon dog is now done!

Assembly Instructions

  • Sew joint no 1 and no 3 together to form the first pair of legs, matching the seams and securing with several whipstitches.
  • Sew joint no 4 and no 6 together to form the second pair of legs, then adjust positioning so the body sits evenly.
  • Sew joint no 7 and no 9 together to attach the ears (head bump) to the nose section, ensuring the nose points forward.
  • Close the hole at the tip of the nose by sewing the opening or tying a tight knot around the outside, then weave in the tail end neatly.

Important Notes

  • πŸ’‘Work in continuous spirals; do not join rounds unless you prefer a seam at the join.
  • πŸ’‘Stuff each bump as you go to keep a smooth, balloon-like shape and avoid overstuffing which can distort the segments.
  • πŸ’‘Use the gauge guidance: 10 cm = 24 sc; change hook size if you are not matching this gauge to keep the finished proportions correct.
  • πŸ’‘Pin joints before sewing to check placement and symmetry and adjust before making permanent stitches.

This adorable Balloon Dog is a playful amigurumi toy that brings joy to any handmade collection. 🧢 Follow the round-by-round instructions and photo guide to shape your own balloon pup with confidence. 🐢 Perfect as a quirky gift or a cheerful decor piece that shows off your crochet skills.

You ask,

we answer.

FAQs

What size will the finished piece be?

The balloon dog is approximately 20 cm tall and 23 cm from tail to nose when using the recommended cotton 8/4 yarn and hook size.

Can I use different yarn weights for this pattern?

Yes, you can use different yarn weights but this will change the finished size; adjust the hook size and check gauge (24 sc = 10 cm) before starting.

Do I need prior crochet experience for this pattern?

This pattern is rated intermediate; you should be comfortable working single crochet in spirals and using increases and decreases.

How long does this project typically take to complete?

Most crocheters finish this project in about 12-15 hours depending on experience, stuffing, and sewing speed.