🧢 Beautiful ✨ Detailed πŸ’ Adorable

Mini Hulk Amigurumi Pattern

Mini Hulk Amigurumi Pattern
4.8β˜… Rating
2-4 Hours Time Needed
3.8K Made This
βœ‚οΈ

Beginner Friendly Level

Perfect for those just starting their crochet journey, with clear instructions and simple techniques

⏱️

Bite-Sized Project

Finishes in 2-4 hoursβ€”perfect for an afternoon of creative relaxation.

🧸

Cute Companion

An adorable friend to cherish, handcrafted with love to bring comfort and joy for years to come.

About This Mini Hulk Amigurumi Pattern

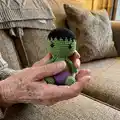
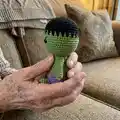
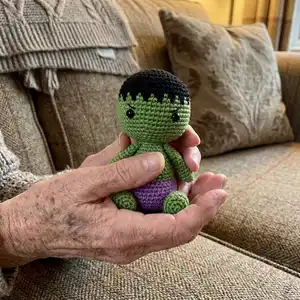
This pattern creates a small, seated Hulk-style amigurumi with contrasting hair color and simple limbs. Youll work continuous rounds with color changes to make the hairline detail and shape the body and head in one piece. The pattern is compact and designed for quick assembly with minimal parts. It is written in standard amigurumi notation for easy following.

Mini Hulk Amigurumi Pattern crochet pattern - detailed view of completed project

Designed to be worked in spiral rounds with clear round-by-round instructions and helpful notes. Ideal for a relaxing afternoon project that yields a cute, gift-ready toy.

Why You'll Love This Mini Hulk Amigurumi Pattern

I absolutely love this pattern because it turns simple stitches into a character full of personality with minimal pieces to sew. I enjoy the quick colorwork at the hairline β€” it adds a fun detail without complicated techniques. I love how portable this project is; you can make it in a few sittings and have an adorable finished toy. I also appreciate that it uses basic stitches so I can customize yarn and hook to make different sizes.

Mini Hulk Amigurumi Pattern step 1 - construction progress Mini Hulk Amigurumi Pattern step 2 - assembly progress Mini Hulk Amigurumi Pattern step 3 - details and accessories Mini Hulk Amigurumi Pattern step 4 - final assembly and finishing

Switch Things Up

I love experimenting with color swaps β€” try soft pastel shades instead of the bold green and purple for a sweeter look.

I often change yarn weight and hook size to make a tiny keychain or a larger cuddle-sized version; thicker yarn and a bigger hook create a chunkier doll.

I recommend swapping the black hair for a dark brown or navy if you want a subtler contrast with the green face.

You can replace safety eyes with embroidered eyes for a fully washable, child-safe toy.

I sometimes add tiny crocheted shorts or a removable cape to create different character versions and add play value.

Try embroidering a smile or freckles to change the expression and personality of your amigurumi.

Adding a short wire inside the arms or legs gives light posability for display β€” just be careful if the toy is for small children.

I like to sew on felt accessories or tiny props (like a mini hammer) for themed gift versions.

To make a set, change only the hair and shorts colors so they coordinate as a family of characters.

For texture, consider using a boucl yarn for the hair area to create a fuzzy hairstyle and more visual interest.

Common Mistakes & How to Fix Them

βœ— Skipping the use of a stitch marker can lead to lost rounds and miscounted stitches; use a marker to mark the start of each round and move it every round. βœ— Stuffing too much at once makes shaping difficult and can distort the amigurumi; stuff gradually as you go, shaping with small amounts of fiberfill. βœ— Changing colors carelessly at the hairline can create loose loops and gaps; secure color changes by pulling the new color through the two loops of the last stitch and weave in ends neatly. βœ— Forgetting to place safety eyes at the correct rounds results in uneven facial features; place eyes between rounds 16 and 17, 11 stitches apart, before stuffing further. βœ— Not aligning openings before closing limbs causes uneven seams and bulky joins; press openings flat and align three stitches side-by-side before sewing to the body.

Mini Hulk Amigurumi Pattern

Make a tiny, adorable Hulk-inspired amigurumi that stands about 13 cm tall. This pattern gives you step-by-step rounds, color changes, and finishing tips so you can crochet a charming little character. Perfect for gifting or adding to your collection, it uses standard stitches and easy shaping. Youll enjoy quick progress and a fun colorwork detail at the hairline.

Beginner Friendly 2-4 Hours

Materials Needed for Mini Hulk Amigurumi Pattern

β€” Main Fabric

  • 01
    YarnArt Jeans yarn - green color (amount as needed for body, head, limbs)
  • 02
    YarnArt Jeans yarn - purple color (amount as needed for lower body)
  • 03
    YarnArt Jeans yarn - black color (small amount for hair)
  • 04
    Note: Use yarn weight appropriate for your hook and yarn label recommendations; finished toy measures approx.13 cm using the specified materials

β€” Tools Required

  • 01
    Crochet hook Clover Soft Touch 2.00 mm (or suitable hook for your yarn)
  • 02
    8 mm black safety eyes (2 pieces)
  • 03
    Toys filler / polyester stuffing
  • 04
    Black thin thread for embroidered eyebrows
  • 05
    Scissors
  • 06
    Tapestry needle / yarn needle for sewing and weaving ends
  • 07
    Pins for assembly placement
  • 08
    Stitch marker to track rounds

Progress Tracker

0% Complete

β€” Info :

Info :

Skill level -easy. Pattern does not contain crochet tutorials! You should have basic crochet skills. Approx.13cm (about 5.1 inches) tall using the materials stated in the pattern. You may use any size yarn for this amigurumi, just make sure to use the hook size suggestion on the yarn label. Use safety eyes that are a suitable size for the yarn you are using.

β€” Materials :

Info :

-The hook suitable under your yarn. I have Clover Soft Touch 2.00 mm. -Yarn: green, purple and black colors. I used Β«YarnArtJeansΒ» yarn. -8 mm black safety eyes. -Toys filler. -Black thin thread (eyebrows). -Toys filler. -Scissors. -Tapestry needle. -Pins. -Stitch marker.

β€” Terms Used :

Infos :

MR -magic ring. sc-single crochet. ch-chain stitch. slst-slip stitch. blo-through back loops only. inc-increase (stitch 2 times into the next stitch). dec -invisible decrease (crochet 2 sc together using invisible method). hdc -half double crochet. (...)xn -repeat instructions in brackets n times. R -round.

β€” Notes :

Infos :

-Crochet continuously in a spiral, unless otherwise specified. -In order to not lose track of the number of worked stitches in each round, use a stitch marker to mark the beginning of each round -a thin thread of contrasting color. -Crochet tightly enough so the filler is not visible through the holes between loops. -Tightly and gradually fill all the details of the toy in the process of crocheting. -Size of the finished toy can vary depending on the materials used, the density of crocheting and filling, etc.

β€” Body + head :

Info :

Stuff body and head firmly, stuffing as you go. Start working with purple yarn.

Round 1 :

6 scMR (6)

Round 2 :

6 inc(12)

Round 3 :

(1 sc, inc)x6 (18)

Round 4 :

(2 sc, inc)x6 (24)

Round 5 :

(3 sc, inc)x6 (30)

Round 6 :

(4 sc, inc)x6 (36)

Round 7 :

(5 sc, inc)x6 (42)

Round 8-10 :

42 sc (3 rounds) (42)

Round 11 :

(5 sc, dec)x6 (36)

Round 12 :

36 sc (36)

Round 13 :

36 hdc (36)

Info :

Continue on with green.

Round 14 :

(4 sc, dec)x6 (30)

Round 15 :

30 sc (30)

Round 16 :

(13 sc, dec)x2 (28)

Round 17 :

28 sc (28)

Round 18 :

(12 sc, dec)x2 (26)

Round 19 :

26 sc (26)

Round 20 :

(11 sc, dec)x2 (24)

Round 21 :

24 sc (24)

Round 22 :

(2 sc, dec)x6 (18)

Round 23 :

18 sc (18). Cut the yarn. Stuff the body firmly.

β€” Arm x2 :

Info :

Crochet withgreen.

Round 1 :

6 sc MR(6)

Round 2 :

(2 sc, inc)x2 (8)

Round 3-8 :

8 sc (8)

Info :

Stuff only half of the arms.

Round 9-13 :

8 sc (8)

Info :

Do not stuff of the arms. This way the arm doesn't stick out too much after sewing it to the body. Press the opening with your fingers, aligning 3 stitches side by side. Break the yarn and leave a long tail to sew arms to body.

β€” Head :

Info :

Crochet with black yarn.

Round 1 :

6 sc MR(6)

Round 2 :

6 inc(12)

Round 3 :

(1 sc, inc)x6 (18)

Round 4 :

(2 sc, inc)x6 (24)

Round 5 :

(3 sc, inc)x6 (30)

Round 6 :

(4 sc, inc)x6 (36)

Round 7 :

(5 sc, inc)x6 (42)

Round 8 :

(6 sc, inc)x6 (48)

Round 9 :

(7 sc, inc)x6 (54)

Round 10-11 :

54 sc (2 rounds)(54)

Info :

In the next 12 and 13 rounds we will alternate green and black colors.

Round 12 :

(green 1 sc, black 2 sc)x18 (54)

Round 13 :

(green 2 sc, black 1 sc)x18 (54)

Info :

Continue on with green.

Round 14-19 :

54 sc (6 rounds)(54)

Round 20 :

(7 sc, dec)x6 (48)

Round 21 :

(6 sc, dec)x6 (42)

Info :

Place safety eyes between rounds 16 and 17, 11 sta part.

Round 22 :

(5 sc, dec)x6 (36)

Round 23 :

(4 sc, dec)x6 (30)

Round 24 :

(3 sc, dec)x6 (24)

Info :

Start to stuff the head.

Round 25 :

(2 sc, dec)x6 (18)

Round 26 :

Only through back loops, (1 sc, dec)x6 (12)

Round 27 :

6 dec. Leave the thread for sewing.

β€” Leg x2 :

Info :

Start working with green yarn.

Round 1 :

6 sc MR(6)

Round 2 :

6 inc(12)

Round 3 :

inc, 3 sc, 3 inc, 3 sc, 2 inc(18)

Round 4 :

7 sc, 3 inc, 8 sc (21)

Round 5 :

Only through back loops, 21 sc (21)

Round 6 :

7 sc, 3 dec, 8 sc (18)

Round 7 :

4 sc, 4 dec, 6 sc (14)

Round 8 :

2 sc, 4 dec, 4 sc (10)

Round 9 :

(3 sc, dec)x2 (8)

Info :

Stuff only half of the legs.

Round 10-15 :

8 sc(6 rounds) (8)

Round 16 :

Only 5 sc. Do not stuff of the legs. Press the opening with your fingers, aligning 3 stitches side by side. Break the yarn and leave a long tail.

β€” Finishing :

Info :

Sew the head to the body. Sew the legs to the body. Sew the arms to the body symmetrically. Embroider eyebrows.

Assembly Instructions

  • Attach the head to the top opening of the body and sew securely using a whipstitch, aligning the head center with the body top and using the leaving tail from Round 27 to close the seam.
  • Position and sew the legs to the bottom of the body, spacing them evenly so the amigurumi can sit stably; use the long tails left from Round 16 of each leg to sew in place.
  • Sew the arms to the sides of the body symmetrically using the long tails left from the arm pieces, aligning them approximately at body rounds 10-12 so they sit naturally.
  • Place and secure safety eyes between head rounds 16 and 17, 11 stitches apart before stuffing fully, then embroider small eyebrows above the eyes with black thin thread.

Important Notes

  • πŸ’‘Use a stitch marker to mark the beginning of each round and move it each round to avoid losing track of rounds and stitch counts.
  • πŸ’‘Stuff gradually while crocheting for smooth shaping and to avoid large lumps; stuff firm enough so the filler is not visible through stitches.
  • πŸ’‘Press openings flat and align stitches before sewing limbs to the body to ensure neat seams and symmetric placement.
  • πŸ’‘Work in continuous spiral rounds unless otherwise noted and weave in ends as you go to keep the finishing tidy.

This cute Mini Hulk amigurumi is quick to crochet and full of personality, perfect for gifting or decorating your space.🧢 The pattern uses simple stitches and an easy color-change trick to make the hairline detail pop.😊 Have fun customizing colors and expressions β€” happy crocheting!🧡

You ask,

we answer.

FAQs

What size will the finished piece be?

The finished amigurumi measures approximately 13 cm (about 5.1 inches) tall when using the recommended yarn and 2.00 mm hook.

Can I use different yarn weights for this pattern?

Yes, you can use different yarn weights, but this will change the finished size; choose an appropriate hook for your yarn and check gauge visually.

Do I need prior crochet experience for this pattern?

This pattern is rated beginner friendly and requires basic crochet skills like single crochet, increases, decreases, and working in the round.

How long does this project typically take to complete?

Most crocheters finish this project in 2-4 hours, though time may vary depending on experience and how carefully you stuff and assemble the pieces.