🧢 Beautiful ✨ Detailed πŸ’ Adorable

Alan the Lion Amigurumi Pattern

Alan the Lion Amigurumi Pattern
3.9β˜… Rating
12+ Hours Time Needed
3.8K Made This
βœ‚οΈ

Intermediate Level

Ideal for those with basic crochet experience, featuring slightly more advanced stitches and techniques to expand your skills.

⏱️

Multi-Day Project

A rewarding 12+ hour journeyβ€”perfect for dedicated crafters who love detailed work.

🧸

Cute Companion

An adorable friend to cherish, handcrafted with love to bring comfort and joy for years to come.

About This Alan the Lion Amigurumi Pattern

This pattern creates a soft, poseable lion amigurumi named Alan with a voluminous wool mane. It uses semi-thick cotton yarn and simple amigurumi techniques with clear round-by-round instructions. Color changes form a striped t-shirt effect and the mane is added with wool threads for a natural look.

Alan the Lion Amigurumi Pattern crochet pattern - detailed view of completed project

You will find step-by-step rounds for every piece and detailed assembly notes. Perfect for making a cherished handmade toy or a thoughtful gift.

Why You'll Love This Alan the Lion Amigurumi Pattern

I absolutely love this pattern because it combines simple amigurumi shaping with a dramatic wool mane that gives Alan personality. I enjoy making the subtle color changes for the t-shirt β€” they create a playful striped effect. The assembly steps make it easy to position the head, limbs and tail for a balanced finished doll. And adding the hair is wonderfully meditative; it takes time but the result is warm and tactile.

Alan the Lion Amigurumi Pattern step 1 - construction progress Alan the Lion Amigurumi Pattern step 2 - assembly progress Alan the Lion Amigurumi Pattern step 3 - details and accessories Alan the Lion Amigurumi Pattern step 4 - final assembly and finishing

Switch Things Up

I love customizing Alan by changing the t-shirt colors and stripe sequence to create unique personalities for each lion.

You can make a mini version by using thinner yarn and a smaller hook or a chunky cuddly version by using bulky yarn and a larger hook.

I often swap the mane wool for a different texture like boucle for a fluffy look, or a softer alpaca blend for a more subtle mane.

Try embroidering eyebrows or a small mouth to alter Alan's expression β€” slight changes produce surprisingly different personalities.

For a gender-neutral look, go with mixed pastels or earth tones for the t-shirt and mane.

If you prefer fewer hairpieces, skip stitches systematically to create a less dense mane and a lighter overall look.

You can add clothing like a tiny scarf, hat, or removable sweater to give Alan a seasonal wardrobe and more play options.

Make keychain minis by decreasing rounds proportionally and leaving out stuffing in small areas to keep it lightweight.

I sometimes add a small bell or ribbon to the tail for decoration, but avoid small parts if making for very young children.

When gifting, personalize with initials embroidered on the t-shirt or a tiny name tag sewn to the back.

Common Mistakes & How to Fix Them

βœ— Skipping stitch markers during spiral rounds leads to losing track of the start of the round; use a marker at the beginning of every round to keep your counts accurate. βœ— Not stuffing as you go causes lumps or hollow sections later; stuff gradually and adjust stuffing while shaping each piece for smooth curves and firm structure. βœ— Cutting yarn at color changes can cause tension issues and loose ends; carry or tuck the yarn and secure threads as recommended to keep a neat join. βœ— Ignoring stitch counts after increases and decreases may cause incorrect shaping; always count stitches at the end of each round, especially after complex rounds. βœ— Pulling yarn too tightly when making mane hairpieces will distort the head shape; insert and knot hair gently and adjust tension to match the surrounding fabric. βœ— Sewing parts without pinning leads to misaligned limbs; pin and check placement before stitching each part securely to the body.

Alan the Lion Amigurumi Pattern

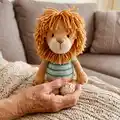
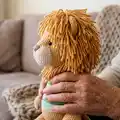
Make a cuddly Alan the Lion amigurumi with this detailed intermediate crochet pattern. You will learn how to crochet the head, snout, body, arms, legs, tail and a full wool mane step-by-step. The pattern includes color change tips, assembly instructions, and finishing techniques so your lion looks neat and full of personality.

Intermediate 12+ Hours

Materials Needed for Alan the Lion Amigurumi Pattern

β€” Main Fabric

  • 01
    Semi-thick cotton yarn 8/6 or DK in camel color (approx 80 g)
  • 02
    Semi-thick cotton yarn 8/6 or DK in natural color (amount included in 80 g main yarn estimate)
  • 03
    Light turquoise (t-shirt color) - small amount for stripes
  • 04
    Aquamarine green (t-shirt color) - small amount for stripes
  • 05
    Brown yarn for nose and claws (small amount)
  • 06
    Acrylic wool like cashmilon wool 4/7 in camel color for the mane (approx 60 g)

β€” Tools Required

  • 01
    Crochet hook size 2.25mm or 2.5mm
  • 02
    Black safety eyes 8mm or 10mm (2 pieces)
  • 03
    Polyester fiberfill stuffing
  • 04
    Sewing needle for sewing parts and embroidery
  • 05
    Stitch markers
  • 06
    Scissors
  • 07
    Pins for assembly

Progress Tracker

0% Complete

β€” Head :

R1 :

Make 6 sc in a magic ring (6)

R2 :

6 inc (12)

R3 :

(1 inc, 1 sc) x6 (18)

R4 :

(3 inc, 6sc) x2 (24)

R5 :

(1 inc, 1 sc) x3, 6sc, (1 inc, 1 sc) x3, 6sc (30)

R6 :

(1 inc, 2sc) x3, 6sc, (1 inc, 2sc) x3, 6sc (36)

Infos :

From R7 to R10 add the camel color as instructed below. These stitches in camel must stay centered.

R7 :

12sc in natural, 6sc in camel, 18sc in natural (36)

R8 :

11sc in natural, 8sc in camel, 17sc in natural (36)

R9 :

10sc in natural, 10sc in camel, 16sc in natural (36)

R10 :

9sc in natural, 12sc in camel, 15sc in natural (36)

Info :

From now on continue in camel color. Cut the natural yarn.

R11 :

10sc, (1 inc, 1sc) x6, 14sc (42)

R12 :

42sc (42)

R13 :

10sc, (1 inc, 2sc) x6, 14sc (48)

R14 :

10sc, (1 inc, 3sc) x6, 14sc (54)

R15 :

(1 inc, 8sc) x6 (60)

R16 to R25 :

60sc (60) 10 rounds

R26 :

(1 dec, 8sc) x6 (54)

R27 :

54pb (54)

R28 :

(1 dec, 7sc) x6 (48)

R29 :

48pb (48)

R30 :

(1 dec, 6sc) x6 (42)

Info :

Place the eyes on the 2nd R counting from the last R in natural color and with 9 or 10 stitches of separation.

R31 :

(1 dec,5sc) x6 (36)

R32 :

(1 dec,4sc) x6 (30)

Info :

Fill with polyfiber.

R33 :

(1 dec,3sc) x6 (24)

R34 :

(1 dec,2sc) x6 (18)

R35 :

(1 dec,1sc) x6 (12)

Info :

Finish filling the snout and the head tightly before closing. Close with 1 sl sc, hide the thread and cut.

Info :

Note: I like closing with 12 stitches because it keeps a flatten form. If you prefer, take two stitches together from the front loop until closing the circle and adjust with a couple stitches and hide the threads.

Info :

To give expression to the face push inside the eyes a bit by introducing the sewing needle with camel yarn on both sides of the eye and pull slightly; repeat to adjust as you like.

Embroider the nose :

Start from the 2nd round from the center of the magic ring and take in the central 6sc. Cover the triangle completely with various stitches, make one or two horizontal stitches and finally embroider the vertical line.

β€” Ears x2 :

Info :

Use the camel color.

R1 :

6 sc in a magic ring (6)

R2 :

6 inc (12)

R3 :

(1 inc, 1sc) x6 (18)

R4 to R6 :

18sc (18) 3 rounds

R7 :

(1 dec, 7sc) x2 (16)

Info :

Close with 1 sl st and leave a thread to sew. Ears don't get filled. Sew the ears onto the head approx on round 11, counting from the eyes location and with 12 stitches of separation.

β€” Body :

R1 :

Make 6 sc in a magic ring (6)

R2 :

6 inc (12)

R3 :

(1 inc, 1sc) x6 (18)

R4 :

(1 inc, 2sc) x6 (24)

R5 :

(1 inc, 3sc) x6 (30)

R6 :

(1 inc, 4sc) x6 (36)

R7 :

(1 inc, 5sc) x6 (42)

R8 :

(1 inc, 6sc) x6 (48)

R9 :

(1 inc, 7sc) x6 (54)

R10 to R14 :

54sc (54)

Info :

Change to t-shirt color (light turquoise).

R15 to R19 :

54sc (54) 10 rounds (striped t-shirt area)

R20 :

(1 dec, 7sc) x6 (48) (there are 6 rounds in light turquoise)

Info :

Change to aquamarine green.

R21 and R22 :

48sc (48) 2 rounds

R23 :

(1 dec, 6sc) x6 (42)

R24 and R25 :

42sc (42) 2 rounds

R26 :

(1 dec, 5sc) x6 (36)

R27 and R28 :

36sc (36) 2 rounds

R29 :

(1 dec, 4sc) x6 (30)

R30 and R31 :

30sc (30) 2 rounds

R32 :

(1 dec, 3sc) x6 (24)

R33 and R34 :

24sc (24) 2 rounds

Info :

Close with 1 sl st and leave a long thread to sew. Fill the body with quite polyfiber.

β€” Legs x2 :

Info :

We start with natural color.

R1 :

Make 6sc in a magic ring (6)

R2 :

6 inc (12)

R3 :

(1 inc,1sc) x6 (18)

R4 :

(1 inc,2sc) x6 (24)

R5 :

(1 inc,3sc) x6 (30)

Info :

Change to camel color.

R6 to R9 :

30sc (30) 4 rounds

R10 :

9sc, 6 dec, 9sc (24)

R11 :

8sc, 4 dec, 8sc (20)

R12 :

8sc, 2 dec, 8sc (18)

R13 and R14 :

18sc (18) 2 rounds

Info :

Fill the base of the leg with polyfiber.

R15 :

(1 dec,7sc) x2 (16)

R16 and R17 :

16sc (16) 2 rounds

R18 :

1 dec, 14sc (15)

R19 to R24 :

15sc (15) 6 rounds

R25 :

(1 dec, 3sc) x3 (12)

Info :

Continue filling the leg up to the R23 approx. These last 2 rounds remain unfilled.

R26 :

Close by flattening both sides the knit and unite every pair of stitches with 1 sc. You should have 6sc. Cut the yarn keeping a long thread to sew.

Info :

Suggestion: Knit 2 or 3sc extras for the left leg when finished R25 and 7 or 8sc for the right leg to hide color changes as needed.

β€” Arms x2 :

Info :

We start with natural color.

R1 :

Make 6sc in a magic ring (6)

R2 :

6 inc (12)

R3 :

(1 inc,1sc) x6 (18)

R4 :

(1 inc,2sc) x6 (24)

Info :

Change to camel color.

R5 to R8 :

24sc (24) 4 rounds

R9 :

6sc, 6 dec, 6sc (18)

R10 :

6sc, 3 dec, 6sc (15)

R11 :

15sc (15)

R12 :

(1 dec,3sc) x3 (12)

Info :

Fill the base with polyfiber.

R13 to R21 :

12sc (12) 9 rounds

Info :

Knit 1 sc extra for the left arm and 2 or 3 sc extras for the right arm to help hide color changes.

Change to t-shirt color :

(light turquoise) R22 and R23 12sc (12) 2 rounds

Change to aquamarine green color :

R24 to R25 12sc (12) 2 rounds

R26 :

(1dec, 4sc) x2 (10)

Info :

Knit 2 sc extras for the left arm and 6 sc for the right one as same as the legs for better color changing placement.

Info :

Fill the arm with a bit of polyfiber. The last 3 rounds remain unfilled.

R27 :

Close by flattening both sides the knit and unite every pair of stitches with 1 sc. You should have 5 sc. Cut the yarn leaving a long thread to sew.

β€” Tail :

Info :

Crochet in camel color as follows.

R1 :

6 sc in a magic ring (6)

R2 :

6 inc (12)

R3 and R4 :

12sc (12) 2 rounds

R5 :

(1 dec, 2sc) x3 (9)

R6 to R19 :

9sc (9) 14 rounds

R20 :

Flatten and knit 4 sc taking together the opposites. Fill the base of the tail and then just a bit until half. It must be light. Do not put any polyfiber at the superior part.

Info :

Let's put the hair to the tail: cut wool threads approx 18 cm long. With the help of the crochet hook pass one through one stitch starting at the R5 of the tail. Make a knot of 1 round only and adjust to ensure. Repeat this all the way through the round and continue adding threads downwards covering all spaces. Finally cut as long as you like and model the hair as you wish.

β€” Assembling :

Step 1 :

We will start by sewing the head onto the body. The body's color changing must remain on the back. Use pins to set the head and make sure the eyes are placed in the center and at the front. Use the remaining body's thread and the sewing needle to sew.

Info :

The head is centered and resting over the body approx 5 rounds from the end of the last round in natural color from the snout.

Step 2 :

Sew the legs. The legs are placed 3 rounds beneath the first round of the t-shirt. Use pins to center them on both sides of the body and placed at the same distance. Add a couple stitches at the inferior part for more insurance.

Step 3 :

The arms are placed underneath the union of the head and the body. Make a couple stitches under the arm to secure them as you did with the legs.

Step 4 :

Sew the tail one round under the t-shirt.

Step 5 :

We will embroider Alan's claws with brown yarn, placing each claw centered with 3 stitches of separation taking over 3 rounds in total as shown on the images.

Step 6 :

Finally we will do the lion's mane. Use cashmilon wool and place hairpieces following the mane instructions; trim and shape to achieve the desired look.

Info :

Finish by checking symmetry, weave in ends and hide threads.

β€” Mane :

Info :

Important considerations: use cashmilon wool for the mane (camel color suggested). Cut strips approx 16-18 cm long. Use the crochet hook to put the hairpieces. The mane is placed in rows covering the head, delimiting the face and beard area. Work carefully to avoid holes, add hairpieces as needed and trim gradually until satisfied.

Info :

Follow the sequence in order to place each hairpiece: start at the inner border of the left ear (round where ears were sewn), cover all spaces, then continue to the other side and complete the round. You may divide the head and complete one half then the other if preferred.

Assembly Instructions

  • Sew the head to the body: center the head about 5 rounds above the end of the snout in natural color, pin in place and sew using the remaining body thread so the color change remains at the back.
  • Position and sew the legs: place the legs three rounds beneath the first round of the t-shirt, pin to ensure they are symmetric and sew securely. Add a couple of stitches on the underside for extra security.
  • Attach the arms beneath the head-body join: align arms like the pictures and make a couple of stitches under each arm to keep them fixed and natural looking.
  • Sew the tail: attach the tail one round under the t-shirt so it sits centered at the back.
  • Embroider claws: use brown yarn to embroider three claws on each leg and arm, spacing three stitches over three rounds as shown in the images.
  • Add the mane last: place hairpieces row by row starting around the ears, cover gaps, trim and shape gradually to achieve a neat voluminous mane.

Important Notes

  • πŸ’‘Always work spiral rounds and use a stitch marker at the beginning of each round to keep your place.
  • πŸ’‘Stuff gradually and adjust stuffing as you shape each part; overstuffing can distort the finished form.
  • πŸ’‘Pin all parts before sewing to ensure correct placement and symmetry for head, arms and legs.
  • πŸ’‘Use a hook one or two sizes smaller than the yarn maker recommendation to make tight stitches and avoid show-through stuffing.

This charming Alan the Lion pattern is a delightful mix of classic amigurumi shaping and a fluffy wool mane that brings character to every stitch. Whether you craft it as a treasured toy or a decorative companion, the step-by-step instructions will guide you from first loop to final trim. Enjoy placing each hairpiece and watching Alan come to life β€” happy crocheting! 🧢🧡

You ask,

we answer.

FAQs

What size will the finished piece be?

Alan is approximately 30 cm tall when using the recommended yarn and hook sizes and following the pattern instructions.

Can I use different yarn weights for this pattern?

Yes, you can use different yarn weights but the final size will change; choose an appropriate hook for the yarn and expect a different scale.

Do I need prior crochet experience for this pattern?

This pattern is rated intermediate, so basic amigurumi skills like magic ring, increases, decreases and sewing parts are recommended.

How long does this project typically take to complete?

This is a multi-day project; expect more than 12 hours in total, largely depending on how long you spend placing and trimming the mane.

Can I embroider the eyes instead of using safety eyes?

Yes, if you prefer no safety eyes you may embroider them with black yarn following the guidance in the pattern.