🧢 Beautiful ✨ Detailed πŸ’ Adorable

Lavender Plant Pattern

Lavender Plant Pattern
4.4β˜… Rating
2-4 Hours Time Needed
1.2K Made This
βœ‚οΈ

Beginner Friendly Level

Perfect for those just starting their crochet journey, with clear instructions and simple techniques

⏱️

Bite-Sized Project

Finishes in 2-4 hoursβ€”perfect for an afternoon of creative relaxation.

🏑

Cozy Accent

A warm touch for your space that transforms ordinary corners into inviting nooks filled with handmade charm.

About This Lavender Plant Pattern

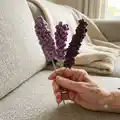
This pattern teaches you how to crochet a textured lavender flowerhead using DK weight yarn and basic stitches. It creates a delicate bloom that you can wire to make an elegant stem for bouquets or pot displays. The design is compact and approachable, with clear step-by-step photos to guide you. Perfect for small gifts, decor, or practice on textured stitches.

Lavender Plant Pattern crochet pattern - detailed view of completed project

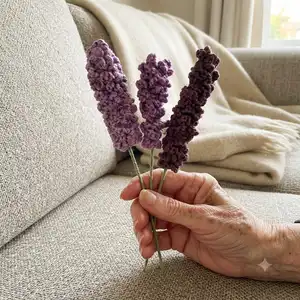
Designed for confident beginners, the pattern uses only simple stitches and straightforward shaping. The finished flowerhead wires onto a stem for realistic placement and display.

Why You'll Love This Lavender Plant Pattern

I absolutely love this pattern because it turns simple stitches into a beautifully textured lavender bloom that looks far more intricate than it actually is. I enjoy how quick it is to make a full sprig, so you can build a bunch in an afternoon for a bouquet. I love that the wired stem makes the pieces usable in real arrangements and crafts. Seeing the little clusters of petals take shape always feels rewarding and has become one of my go-to gift projects.

Lavender Plant Pattern step 1 - construction progress Lavender Plant Pattern step 2 - assembly progress Lavender Plant Pattern step 3 - details and accessories Lavender Plant Pattern step 4 - final assembly and finishing

Switch Things Up

I love adapting this pattern in many ways to suit different styles and projects.

You can swap the purple DK yarn for other colors to create lavender variations or entirely new flower types.

Use a finer yarn and smaller hook to make tiny sprigs perfect for earrings or keychains.

Make a chunky version with bulky yarn and a larger hook to create a bold statement flower for a wreath.

Try adding beads or French knots to the petals for textured centers or decorative detail.

Wrap multiple wired flowerheads together to form a small bouquet or corsage for gifting.

Combine with felt leaves or crocheted leaves for fuller stems and more realistic arrangements.

Embroider tiny stems or veins on added leaves for an extra handmade touch and realism.

Use floral tape and green embroidery floss to create a more natural-looking stem wrap when combining several heads.

I often experiment with different hook sizes and yarn blends to adjust stiffness and drape of the finished flower for different uses.

For a seasonal twist, change the purple to pastel shades for spring decor or jewel tones for autumn decoration.

Common Mistakes & How to Fix Them

βœ— Not keeping stitches tight enough will create gaps and loose petals; maintain a firm, consistent tension and use a slightly smaller hook if needed. βœ— Forgetting to work on the opposite side of the chain will give you only one row of petals; be sure to follow the instruction to turn and work along the chain's second side. βœ— Cutting the yarn too short when fastening off prevents secure sewing of the stem; always leave a long tail for attaching and sewing over the wire. βœ— Feeding the flower wire carelessly through the stitches can distort your work; feed the wire through one sc stitch in and one out next to it and bend the top to secure. βœ— Not sewing over the bent wire end causes the wire to slip out; use the yarn tail to sew over the bent end a few times to keep it firmly in place.

Lavender Plant Pattern

Create a delicate crocheted lavender flowerhead to use as home decor or a sweet handmade gift. This pattern uses DK yarn and simple single crochet stitches, perfect for confident beginners. You will make a textured flowerhead that is wired for a realistic stem and easy assembly. Follow the clear step-by-step instructions and photos to finish a charming lavender sprig.

Beginner Friendly 2-4 Hours

Materials Needed for Lavender Plant Pattern

β€” Main Fabric

  • 01
    DK (size 3) yarn, approximately 10 g purple shade

β€” Tools Required

  • 01
    Crochet hook size 3.5 mm
  • 02
    Yarn needle
  • 03
    Scissors
  • 04
    Flower wire for the stem
  • 05
    Tape for stem finishing (optional)
  • 06
    Stitch marker (optional)

Progress Tracker

0% Complete

β€” Materials :

Info :

3.5 mm crochet hook. Yarn needle. Scissors. Flower wire for the stem. DK (size 3) yarn: approximately 10 g purple shade.

β€” Abbreviations :

Info :

st(s): stitch(es). R: round/row. ch: chain. slst: slip stitch. beg: beginning. sc: single crochet. *_* repeat instructions from * to *

β€” Lavender plant :

Info :

With purple yarn.

Info :

Start by creating a slip knot and chain 50.

Round 1 :

Skip one from the hook, sc into each chain until one chain remains. Sc 5, slst into the final chain.

Info :

You will now be working on the opposite side of the chain.

Round 2 :

*ch 6, sc into the next stitch*, repeat from * to * until the end of the row, ch 6, sc into the opposite side of your work and repeat from * to * on the other side until you reach the first ch-6, slst and fasten off. Cut yarn but leave a long tail.

β€” Assembly :

Infos :

From the top end (where you finished your crocheting), start feeding the flower wire through the row 1 sc stitches, going in one and out next. Bend the top part of the wire so that your plant will not pop out of the top. Using the end tail of your yarn, sew over the bent end of the wire a few times to keep it in place. Push and twist the flowerhead towards the top. To finish off, add a little bit of tape to the stem just below the flowerhead to keep it in place.

Info :

Happy crocheting! If you have questions, message via Instagram @LunaCrochetDesigns or email LunaCrochetDesigns@gmail.com

Assembly Instructions

  • Feed the flower wire through the row 1 single crochet stitches from the top end, inserting the wire in one stitch and out the next to run the wire through the base of the flowerhead.
  • Bend the top part of the wire inside the flowerhead so the bent end prevents the wire from slipping out of the top of the crocheted piece.
  • Use the long tail left when fastening off to sew over the bent end of the wire several times, securing it firmly in place with yarn.
  • Push and twist the crocheted flowerhead up toward the top of the wire stem for a natural placement, then add a small piece of tape to the stem just below the flowerhead to help keep it in place.
  • Trim any excess wire if necessary and cover exposed wire with tape for safety and a cleaner finish.
  • Pin or position the flowerhead as desired, and if attaching multiple heads to one stem, stagger and secure each with yarn sewing and tape for stability.

Important Notes

  • πŸ’‘Gauge/tension is not important for this pattern as long as your stitches are tight and without gaps.
  • πŸ’‘If you struggle getting tight enough stitches, try a smaller hook than recommended to close gaps.
  • πŸ’‘Leave a long tail when fastening off so you have enough yarn to sew and secure the wire inside the flowerhead.
  • πŸ’‘Pin parts in place before permanently sewing or taping to check placement and symmetry.

This lavender plant pattern is a quick, pretty way to add handmade charm to your home or gifts.🌿 It works beautifully wired onto stems for bouquets or as single sprigs for decor.πŸ’œ Make a bunch for a lovely, everlasting arrangement that brightens any corner.🧢 Happy crocheting!

You ask,

we answer.

FAQs

What size will the finished piece be?

The finished lavender head measures a few centimeters long (flowerhead length will vary with tension), and a full wired sprig will depend on the length of flower wire you use.

Can I use different yarn weights for this pattern?

Yes, you can substitute yarn weights but the flower size will change; use an appropriate hook for your chosen yarn and expect a larger or smaller finished bloom.

Do I need prior crochet experience for this pattern?

This pattern is rated beginner friendly (confident beginner), so basic crochet knowledge like chain, single crochet, and slip stitch is recommended.

How long does this project typically take to complete?

Most crafters finish one lavender sprig in a couple of hours; the pattern is estimated to take about 2-4 hours depending on experience and number of sprigs made.