Create a soft, textured baby blanket with an elegant scallop border using this beginner-friendly crochet pattern. You will work a simple Suzette-based body in chunky yarn and finish with a decorative shell edging for a polished look. The pattern includes full row-by-row instructions, yarn quantities, and helpful placement notes to guide you from start to finish.
Progress Tracker
0% Complete
— Special Stitches :
Infos :
Shell Stitch – SK 1 ST, 5 DC into same ST, SK 1 ST, SC into the next ST. NOTE : I have increase the number of DC into the corners spaces to 8 DC on this pattern. Suzette Stitch – SK 1 ST, SC,DC into the next ST, SK 1 ST, SC, DC into the next ST.
— Gauge :
Info :
Gauge is not important in this pattern, however using other yarn weights and hook sizes will change your finished blanket size. This blanket's finished size is 26.5 inches x 37 inches (including border) My gauge for this using the King Cole Big Value was 10 DC x 5 rows in 10cm square
— Pattern Notes :
Info :
CH 1 at the beginning of each row counts as ST throughout. This pattern is a baby blanket size measuring 26.5 inches x 37 inches – it can be made bigger using longer starting chain in multiples of 2+1.
— Pattern Instruction :
Round 1 :
With a 8mm hook CH 52+1 (53)
Round 2 :
ROW 1 – SC into the second CH from the hook, DC into the same CH, SK 1 CH, *SC,DC into the next CH, SK 1 CH. Repeat from * until you have 1 CH remaining, 1 SC into this CH, CH 1 and turn work.
Round 3 :
ROW 2 – SK 1 ST, SC,DC, into the next ST, SK the next ST, *SC,DC into the next ST, SK the next ST. Repeat from * until you have 1 ST remaining, SC into the last remaing ST, CH 1 and turn work.
Round 4 :
ROWS 3-69 are a repeat of row 2.
Info :
After row 69 FO and sew in your ends.
— Border :
Info :
We will now work in the round. Attach you border colour to top right corner right side facing you. (This should be the short side of the blanket and be the end you FO on).
Round 1 :
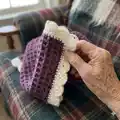
ROUND 1 – CH 4 (this counts as a HDC and CH 2), HDC into the same space, *HDC into each ST until you reach the second corner, HDC, CH 2, HDC into the corner ST. Working along the first long side, HDC into each CH 1 post and SC post of each row (see picture 1 for placement) until you reach the third corner, HDC, CH 2, HDC. Working the second short side repeat from * until you have reached the CH 4 from the begining, SS into top of the 2nd CH.
Info :
You should have a total of 246 HDC around the blanket including corners.
Info :
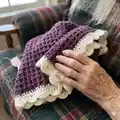
NOTE: When completing the second short side (the one which works into the foundation CH) take extra care when placing you HDC STs don't forget to place one in the skipped CH (see picture 2 for placement).
Round 2 :
ROUND 2 – CH 2, HDC, CH 2, HDC into the CH 2 space creating your first corner, *HDC into every ST until you reach the second corner, HDC, CH 2, HDC into the CH 2 space. Repeat from * until you reach the CH 2 at the beginning SS into the to top of the CH 2.
Info :
You should have a total of 256 HDC around the blanket including corners.
Round 3 :
ROUND 3 – CH 1 (does not count at ST), SK a ST, 8 DC into the 2 CH corner space, *SK a ST, SC into the next ST, SK a ST, 5 DC into the next ST. Repeat from * until you have 3 STs remaining before the corner, SK a ST, SC into the next ST, SK a ST, 8 DC into the CH 2 corner space (you should have 13 scallops between the corners). Repeat from * until you have 3 STs remaining before the corner, SK a ST, SC into the next ST, SK a ST, 8 DC into the CH 2 corner space (you should have 17 scallops between the corners). Repeat from * until you have 3 STs remaining before the corner, SK a ST, SC into the next ST, SK a ST, 8 DC into the CH 2 corner space (you should have 13 scallops between the corners). Repeat from * until you have 1 ST remaining and your starting CH 1, SC into the base of the CH 1, SS to the CH 1 and FO (you should have 17 scallops between the corners).
Info :
YOUR BLANKET IS NOW COMPLETE.
Infos :
Please feel free to sell any blankets you make from this pattern. If you do this, please credit me as the designer by linking back to my Folksy or Lovecraft shop. I can't wait to see all your creations and new colour combinations, so please tag me on my instagram/facebook page @craftylittlecottontail and use the hash tag #carissablanket so I can share your work and inspire others.
This Carissa Blanket pattern makes a cozy, textured baby blanket that is perfect for gifting or snuggling. The chunky body works up quickly while the scalloped border gives a polished, heirloom look. Make it in your favorite color combination and enjoy the speed and satisfaction of a weekend make. 🧶🧵