🧢 Beautiful ✨ Detailed πŸ’ Adorable

Checker It Out Crochet Bag Pattern

Checker It Out Crochet Bag Pattern
4.3β˜… Rating
5-7 Hours Time Needed
2.2K Made This
βœ‚οΈ

Beginner Friendly Level

Perfect for those just starting their crochet journey, with clear instructions and simple techniques

⏱️

Weekend Treat

Takes 5-7 hours, making it an enjoyable project to finish over a couple of days.

✨

Stylish Touch

An elegant detail to elevate any look, combining traditional techniques with contemporary design sensibilities.

About This Checker It Out Crochet Bag Pattern

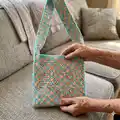
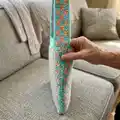
This pattern creates a checker-style crochet bag using Caron Coconut Cakes with two contrasting color panels. The bag features a worked chart pattern in single crochet, a wide strap worked continuous with the sides, and simple assembly instructions. It is portable, washable, and great for gifting or everyday use.

Checker It Out Crochet Bag Pattern crochet pattern - detailed view of completed project

The pattern uses a charted pattern that alternates two contrast colors to create a textured checker look. Clear step-by-step rows and finishing instructions make it friendly for new crocheters.

Why You'll Love This Checker It Out Crochet Bag Pattern

I absolutely love this pattern because it takes a simple stitch β€” single crochet β€” and turns it into beautiful checkerboard fabric using colorwork. I enjoy how quickly a bag panel emerges, giving a satisfying sense of progress as you work rows of the chart. The strap integrated with the sides creates a clean, sturdy finish that I love for daily use. I also like that the pattern uses one-skein cakes for a fun gradient effect and a second solid contrast for definition.

Checker It Out Crochet Bag Pattern step 1 - construction progress Checker It Out Crochet Bag Pattern step 2 - assembly progress Checker It Out Crochet Bag Pattern step 3 - details and accessories Checker It Out Crochet Bag Pattern step 4 - final assembly and finishing

Switch Things Up

I love customizing this bag by swapping the contrast colors to match seasons or outfits; try bright summer hues or muted neutrals for a different vibe.

I sometimes use a sport or DK weight yarn with a smaller hook to create a finer, more delicate-looking bag; adjust the chain and repeats if you want a narrower or wider bag.

For a sturdier tote I use a slightly heavier hook and tightly tension my single crochets, or line the bag with fabric for extra support and durability.

I often change the strap length by measuring against my shoulder and continuing the chart until the strap measures my preferred length before fastening off.

Try making mini versions as gift pouches or market-sized versions by increasing the number of chart repeats for a larger bag.

I sometimes add a button or snap closure at the top center to keep the bag closed when needed; simply sew it to the front panel and make a small loop on the opposite side.

I enjoy adding small crocheted pockets to the interior for organization; crochet a small rectangle in B and sew it inside at a comfortable height for your phone or keys.

To make a crossbody style, work the strap longer or add hardware like rings and clips to attach a wider, adjustable strap.

I also embellish with a tassel or pom-pom made from leftover yarn for a playful accent that coordinates with the contrasts.

Don’t be afraid to mix textures β€” try substituting one contrast with a subtle metallic or boucle for a unique finish, keeping in mind it will change drape and gauge.

Common Mistakes & How to Fix Them

βœ— Skipping the chart reading direction can flip your pattern unintentionally; read RS rows right to left and WS rows left to right to keep the checker motif correct. βœ— Not carrying the unused color across the top of the previous row can create uneven edges; always carry color not in use across the entire previous row and work stitches around it to maintain even gauge. βœ— Failing to place markers at the ends of rows will make alignment difficult during assembly; place stitch markers on each end of the last row to mark joining points and align panels accurately. βœ— Using an incorrect hook size without checking gauge results in incorrect bag dimensions; work a gauge swatch of 16 sc and 16 rows = 4" and adjust hook size until gauge is correct.

Checker It Out Crochet Bag Pattern

Make a stylish, colorful tote with this easy crochet pattern designed for quick assembly and lasting use. Youll work a simple charted single crochet pattern using two contrast colors to create a checker-style fabric. The finished bag is roomy yet lightweight β€” perfect for errands, beach days, or everyday carry.

Beginner Friendly 5-7 Hours

Materials Needed for Checker It Out Crochet Bag Pattern

β€” Main Fabric

  • 01
    Caron Coconut Cakes (8 oz/227 g; 481 yds/440 m) - Medium (#4) main cake
  • 02
    Contrast A: Tutti-Frutti (84002) - 1 ball or 335 yds/307 m
  • 03
    Contrast B: Sugar Teal (84005) - 1 ball or 350 yds/320 m

β€” Tools Required

  • 01
    Crochet hook size U.S. 7 (4.5 mm) Susan Bates Silvalume or size needed to obtain gauge
  • 02
    Susan Bates yarn needle
  • 03
    Susan Bates stitch markers
  • 04
    Scissors

Progress Tracker

0% Complete

β€” Bag Base :

Info :

With A, ch 13.

Info :

Work Chart, noting each square of chart is equal to 1 sc and reading RS rows from right to left and WS rows from left to right.

Info :

Carry color not in use across top of entire previous row and work sts around it. This will ensure even gauge as all sts will be worked around an extra strand of yarn held across top of previous row. Carry both colors up side of work. See Chart on page 2.

Round 1 :

1st row: (1st row of Chart - RS). 1 sc in 2nd ch from hook. 1 sc in each ch to end of chain. Turn. 12 sc.

Round 2 :

2nd row: (2nd row of Chart - WS). Ch 1. 1 sc in each sc to end of row. Turn.

Round 3-6 :

Rep last row until 6th row of chart is complete.

Round Info :

Rep last 6 rows of Chart Pat until Bag Base measures approx 12" [30.5 cm], ending with either 3rd row or 6th row of chart.

β€” Strap & Sides :

Info :

With A, ch 13. Work Chart as noted for Bag Base.

Round 1 :

1st row: (1st row of Chart - RS). 1 sc in 2nd ch from hook. 1 sc in each ch to end of chain. Turn. 12 sc.

Round 2 :

2nd row: (2nd row of Chart - WS). Ch 1. 1 sc in each sc to end of row. Turn.

Round Info :

Rep last row until 6th row of chart is complete.

Round Info :

Rep last 6 rows of Chart Pat until Strap measures approx 12" [30.5 cm], ending with either 3rd row or 6th row of chart. PM on each end of last row.

Round Info :

Cont in Chart Pat, until Strap measures approx 36" [91.5 cm], ending with either 3rd row or 6th row of chart. PM on each end of last row.

Round Info :

Cont in Chart Pat until Strap measures approx 48" [122 cm], ending with 3rd row or 6th row of chart. Fasten off.

β€” Front & Back Panels :

Info :

With A, ch 49. Work Chart as noted for Bag Base.

Round 1 :

1st row: (1st row of Chart - RS). 1 sc in 2nd ch from hook. 1 sc in each ch to end of chain. Turn. 48 sc.

Round 2 :

2nd row: (2nd row of Chart - WS). Ch 1. 1 sc in each sc to end of row. Turn.

Round Info :

Rep last row until 6th row of chart is complete.

Round Info :

Rep last 6 rows of Chart Pat until Front measures approx 12" [30.5 cm], ending with either 3rd row or 6th row of chart. Fasten off.

Round Info :

Rep last 6 rows of Chart Pat until work from beg measures approx 12" [30.5 cm], ending with either 3rd row or 6th row of chart. Next row: With B only, 1 sc in each sc to end of row. Fasten off.

β€” Finishing :

Info :

Join Bag Base to Front & Back Panels: With RS of Base facing, place lower edge of Front Panel behind long edge of Base with WS of work tog, aligning corner of Base with corner of Front Panel.

Round 1 :

1st row: Join B with sl st. Ch 1. Working through both thicknesses, work sc evenly across edge. Fasten off.

Round Info :

Rep to join Base to Back Panel.

Info :

Join Strap & Sides to Bag Base: With RS of Base facing, place beg edge of Strap & Sides behind short edge of Base with WS of work tog, aligning corner of Bottom with corner of Strap.

Round 1 :

1st row: Join B with sl st. Ch 1. Working through both thicknesses, work sc evenly across edge. Fasten off.

Round Info :

Rep to join opposite end of Strap & Sides to Base.

Info :

Join Strap & Sides to Front & Back Panels: Align top corners of Front and Back Panels to rows marked with st markers on Strap & Sides. Pin pieces tog if desired.

Round 1 :

1st row: Beg at bottom right corner of Front Panel, join B with sl st. Ch 1. Working through both thicknesses, work sc evenly up edge of Front Panel, across single edge of Strap, and down opposite edge of Front Panel. Fasten off.

Round Info :

Rep for other side.

Assembly Instructions

  • Join Bag Base to Front Panel by placing lower edge of Front Panel behind long edge of Base with WS of work together, aligning corners, then join with B using sl st, ch 1 and work sc evenly through both thicknesses across the edge; fasten off.
  • Rep the same joining method to attach Base to Back Panel so both panels are joined to the Base securely and evenly.
  • Place beginning edge of Strap & Sides behind the short edge of Bag Base with WS of work together, aligning corners, then join with B using sl st, ch 1 and work sc evenly through both thicknesses across the edge; repeat for opposite end.
  • Align top corners of Front and Back Panels to marked rows on Strap & Sides, pin pieces together if desired, then join by working sc through both thicknesses up the Front Panel edge, across the Strap edge, and down the opposite Front Panel edge; repeat for the other side.
  • Use stitch markers to mark ends of rows during construction so corners and seams align correctly during assembly and attachment.
  • Weave in all ends and check seams for even tension to ensure a smooth finished edge before blocking or using the bag.

Important Notes

  • πŸ’‘Use stitch markers to keep track of your rows and the ends of the Strap to ensure correct alignment during joining.
  • πŸ’‘Carry the unused contrast color across the top of the previous row and work stitches around it for even gauge and neat color transitions.
  • πŸ’‘Work a gauge swatch of 16 sc and 16 rows = 4" [10 cm] in Chart Pat to determine if you need to change hook size for correct finished measurements.

This cheerful Checker It Out bag blends bright colors and simple stitches into a wearable everyday tote. The charted single crochet pattern makes the checker design pop while keeping the technique accessible for beginners. Make one for yourself or as a thoughtful, handmade gift that will be used and loved. πŸ§Άβœ¨πŸ‘œ

You ask,

we answer.

FAQs

What size will the finished piece be?

The finished bag measures approximately 12" x 12" x 3" [30.5 x 30.5 x 7.5 cm], excluding the strap, when using the recommended yarn and hook size.

Can I use different yarn weights for this pattern?

Yes, you can use different yarn weights, but the final size and fabric density will change; always make a gauge swatch and adjust hook size to match 16 sc and 16 rows = 4" in the chart pattern.

Do I need prior crochet experience for this pattern?

This pattern is rated beginner friendly and uses only single crochet with charted color changes, so basic crochet skills and following a chart are recommended.

How long does this project typically take to complete?

Most crocheters complete this project in 5-7 hours, though time may vary based on experience level and working pace.