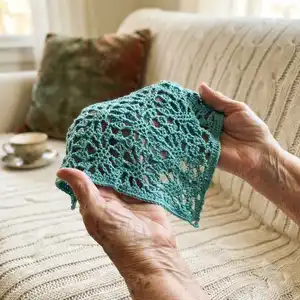
Make a delicate lace kerchief to wear as a headscarf or neck tie. This lightweight triangle kerchief is crocheted sideways with a beautiful open lace motif and adjustable tie ends. Youll enjoy the drape and lace detail made with fingering-weight yarn. Perfect for summer styling or as a charming handmade gift.
Progress Tracker
0% Complete
— Kerchief :
Info :
Kerchief is crocheted sideways, in turned rows. You will begin at one tip, and work increases along one edge to shape the triangle, then once you reach the center point of the kerchief, you will be making decreases along same edge for the reverse shaping. One edging round is worked which includes making the tie ends on each end. Sometimes turning chains count as a stitch, sometimes they do not; pay attention as this will be specified within the directions. Be sure to watch the video tutorial on the Creative Crochet Corner for tips.
Info :
Special Stitches: Double crochet three stitches together (decrease) (DC3tog): This decrease stitch is worked along one of the edges of the kerchief for shaping purposes. When it is worked at the end of the row, the last leg of the decrease always goes into the top of the turning ch from previous row. Each time you are directed to make this stitch, you will be instructed where to place each of the three legs of the decrease. This stitch is worked as follows: YO, insert hook into indicated space, yo and pull up loop, yo and pull through two loops on hook, yo and insert hook into second indicated space, yo and pull up loop, yo and pull through two loops on hook, yo and insert hook into third indicated space, yo and pull up loop, yo and pull through two loops on hook, yo and pull through all 4 loops on hook.
Info :
Increase Section: Ch 2.
Row 1 :
Working into the bottom of the ch, SC into the second ch from hook. 1 st.
Row 2 :
Ch 3 (counts as first DC of row), turn, 3 DC into the SC from previous row. 4 sts.
Row 3 :
Ch 4 (counts as first TR of row), turn, 2 DC into first st, ch 3, sk next 2 DC, DC in top of ch-3 from previous row. 1 TR, 3 DC, and 1 ch-3 sp.
Row 4 :
Ch 1 (does not count as a stitch), turn, SC into the first st, SC in next ch-3 sp, ch 3, sk next 2 DC, 3 DC into the top of ch-4 from previous row. 2 SC, 1 ch-3 sp, 3 DC.
Row 5 :
Ch 4 (counts as first TR of row), turn, 2 DC into first st, ch 3, sk next 2 DC, SC in next ch-3 sp, SC in each of the next 2 sts. 1 TR, 2 DC, 1 ch-3 sp, 3 SC.
Row 6 :
Ch 1 (does not count as a stitch), turn, SC into each of the next 2 sts, ch 3, sk next SC, 3 DC in next ch-3 sp, ch 1, sk next 2 DC, 3 DC into the top of ch-4 from previous row. 2 SC, 1 ch-3 sp, 6 DC, 1 ch-1 sp.
Row 7 :
Ch 4 (counts as first TR of row), turn, 2 DC into first st, ch 3, sk next 2 DC, DC in ch-1 sp, ch 3, sk next 3 DC, 3 DC in next ch-3 sp, ch 3, sk next SC, DC in next SC. 1 TR, 7 DC, 3 ch-3 sps.
Row 8 :
Ch 3 (counts as first DC of row), turn, 3 DC in next ch-3 sp, ch 3, sk next 3 DC, SC in next ch-3 sp, SC in next st, SC in next ch-3 sp, ch 3, sk next 2 DC, 3 DC into top of ch-4 from previous row.
Row 9 :
Ch 4 (counts as first TR of row), turn, 2 DC into first st, ch 3, sk next 2 DC, SC in next ch-3 sp, SC in each of the next 3 sts, SC in next ch-3 sp, ch 3, sk next 3 DC, 2 DC into top of ch-4 from previous row. 1 TR, 4 DC, 2 ch-3 sps, 5 SC.
Row 10 :
Ch 3 (counts as first DC of row), turn, sk next DC, 3 DC in next ch-3 sp, ch 3, sk next SC, 1 SC into each of the next 3 sts, ch 3, sk next SC, 3 DC in next ch-3 sp, ch 1, sk next 2 DC, 3 DC into the top of ch-4 from previous row. 10 DC, 2 ch-3 sp, 3 SC, 1 ch-1 sp.
Row 11 :
Ch 4 (counts as first TR of row), turn, 2 DC into first st, ch 3, sk next 2 DC, DC in ch-1 sp, ch 3, sk next 3 DC, 3 DC in next ch-3 sp, ch 3, sk next SC, DC in next SC, ch 3, sk next SC, 3 DC in next ch-3 sp, ch 3, sk next 3 DC, DC into top of ch-3 from previous row. 1 TR, 11 DC, 5 ch-3 sps.
Row 12 :
Ch 1 (does not count as a stitch), turn, SC into the first st, SC in next ch-sp, ch 3, sk next 3 DC, 3 DC in next ch-3 sp, ch 1, sk next DC, 3 DC in next ch-3 sp, ch 3, sk next 3 DC, SC in next ch-3 sp, SC in next st, SC in next ch-3 sp, ch 3, sk next 2 DC, 3 DC into the top of ch-4 from previous row. 5 SC, 3 ch-3 sps, 9 DC, 1 ch-1 sp.
Row 13 :
Ch 4 (counts as first TR of row), turn, 2 DC into first st, ch 3, sk next 2 DC, SC in next ch-3 sp, SC in each of the next 3 sts, SC in next ch-3 sp, ch 3, sk next 3 DC, 3 DC in next ch-1 sp, ch 3, sk next 3 DC, SC in next ch-3 sp, SC into each of the next 2 sts. 1 TR, 5 DC, and 3 ch-3 sps, 8 SC.
Row 14 :
Ch 1 (does not count as a stitch), turn, SC into each of the next 2 sts, ch 3, sk next SC, 3 DC into the next ch-3 sp, ch 1, sk next 3 DC, 3 DC in next ch-3 sp, ch 3, sk next SC, 1 SC into each of the next 3 sts, ch 3, sk next SC, 3 DC in next ch-3 sp, ch 1, sk next 2 DC, 3 DC into the top of ch-4 from previous row. 5 SC, 3 ch-3 sp, 12 DC, 2 ch-1 sps.
Row 15 :
Ch 4 (counts as first TR of row), turn, 2 DC into first st, ch 3, sk next 2 DC, DC in ch-1 sp, ch 3, sk next 3 DC, 3 DC in next ch-3 sp, ch 3, sk next SC, DC in next SC, ch 3, sk next SC, 3 DC in next ch-3 sp, ch 3, sk next 3 DC, DC in next ch-1 sp, ch 3, sk next 3 DC, 3 DC in ch-3 sp. 1 TR, 15 DC, 7 ch-3 sps.
Row 16 :
Ch 3 (counts as first DC of row), turn, *3 DC in next ch-3 sp, ch 3, sk next 3 DC, SC in next ch-3 sp, SC in next DC, SC in next ch-3 sp, ch 3, sk next 3 DC, 3 DC in next ch-3 sp, ch 1; repeat from * across, ending with last 3 DC into top of ch-4 from previous row.
Row 17 :
Ch 4 (counts as first TR of row), turn, 2 DC into first st, sk next 2 DC, *ch 3, SC in next ch-3 sp, SC in each of the next 3 sts, SC in next ch-3 sp, ch 3, sk next 3 DC, 3 DC in next ch-3 sp; repeat from * across, ending with 2 DC in top of ch-3 from previous row. 1 TR, 7 DC, 4 ch-3 sps, 10 SC.
Row 18 :
Ch 3 (counts as first DC of row), turn, *3 DC in next ch-3 sp, ch 3, sk next st, 1 SC into each of the next 3 sts, ch 3, sk next SC, 3 DC in next ch-3 sp, ch 1; repeat from * across until only 2 DC and ch-4 remain, sk 2 DC, 3 DC into top of ch-4 from previous row. 16 DC, 4 ch-3 sp, 6 SC, 2 ch-1 sps.
Row 19 :
Ch 4 (counts as first TR of row), turn, 2 DC into first st, sk next 2 DC, *ch 3, DC in ch-1 sp, ch 3, sk next 3 DC, 3 DC in next ch-3 sp, ch 3, sk next SC, DC in next SC, ch 3, sk next SC, 3 DC in next ch-3 sp; repeat from * across, until 3 DC and ch-3 remain, ch 3, sk next 3 DC, DC into top of ch-3 from previous row. 1 TR, 19 DC, 9 ch-3 sps.
Row 20 :
Ch 1 (does not count as a stitch), turn, SC into the first st, SC in next ch-3 sp, ch 3, sk next 3 DC, 3 DC in next ch-3 sp, *ch 1, sk next DC, 3 DC in next ch-3 sp, ch 3, sk next 3 DC, SC in next ch-3 sp, SC in next st, SC in next ch-3 sp, ch 3, sk next 3 DC, 3 DC in next ch-3 sp; repeat from * across ending by skipping the last 2 DC and working 3 DC in the top of the ch-4 from previous row. 8 SC, 5 ch-3 sps, 15 DC, 2 ch-1 sps.
Row 21 :
Ch 4 (counts as first TR of row), turn, 2 DC into first st, ch 3, sk next 2 DC, *SC in next ch-3 sp, SC in each of the next 3 sts, SC in next ch-3 sp, ch 3, sk next 3 DC, 3 DC in next ch-1 sp, ch 3, sk next 3 DC; repeat from * across until one ch-3 sp remains, SC in next ch-3 sp, SC into each of the next 2 sts. 1 TR, 8 DC, and 5 ch-3 sps, 13 SC.
Row 22 :
Ch 1 (does not count as a stitch), turn, SC into each of the next 2 sts, ch 3, sk next SC, 3 DC into the next ch-3 sp, *ch 1, sk next 3 DC, 3 DC in next ch-3 sp, ch 3, sk next SC, 1 SC into each of the next 3 sts, ch 3, sk next SC, 3 DC in next ch-3 sp; repeat from * until only 2 DC and ch-4 remain, ch 1, sk next 2 DC, 3 DC into the top of ch-4 from previous row. 8 SC, 12 DC, 5 ch-3 sp, 3 ch-1 sps.
Rows 23-30 :
Repeat Rows 15-22.
Rows 31-33 :
Repeat Rows 15-17.
Row 34 :
Ch 3 (counts as first DC of row), turn, *3 DC in next ch-3 sp, ch 3, sk next SC, 1 SC into each of the next 3 sts, ch 3, sk next SC, 3 DC in next ch-3 sp, ch 1; repeat from * across until only 2 ch-3 sps remain, 3 DC in next ch-3 sp, ch 3, sk next SC, 1 SC into each of the next 3 sts, ch 3, sk next SC, sk ch-3, DC3tog over next 3 sts (last leg of decrease will be made into top of turning ch). 22 DC, 8 ch-3 sp, 12 SC, 3 ch-1 sps, 1 DC3tog dec.
Row 35 :
Ch 4 (counts as first TR of row), turn, DC3tog with first leg of decrease in decrease from previous row, and the next 2 legs of the decrease made into the ch-3 sp, *ch 3, sk next SC, DC in next SC, ch 3, sk next SC, 3 DC in next ch-3 sp, ch 3, DC in next ch-1 sp, ch 3, sk next 3 DC, 3 DC in next ch-3 sp; repeat from * across, to last 3 SC sts of row, ch 3, sk next SC, DC in next SC, ch 3, sk next SC, 3 DC in next ch-3 sp, ch 3, sk next 3 DC, DC into top of ch-3 from previous row. 1 TR, 1 DC3tog dec, 29 DC, 15 ch-3 sps.
Row 36 :
Ch 1 (does not count as a stitch), turn, SC into the first st, SC into the next ch-sp, ch 3, sk next 3 DC, 3 DC in next ch-3 sp, *ch 1, sk next DC, 3 DC in next ch-3 sp, ch 3, sk next 3 DC, SC in next ch-3 sp, SC in next st, SC in next ch-3 sp; repeat from * across until only 1 ch-3 sp remains, ch 1, sk DC, DC3tog with the first 2 legs of decrease placed in last ch-3 sp, and last leg of decrease placed into top of ch-4 from previous row. 11 SC, 7 ch-3 sps, 21 DC, 4 ch-1 sps, 1 DC3tog dec.
Row 37 :
Ch 4 (counts as first TR of row), turn, DC3tog with the first leg of decrease in top of decrease from previous row, and the next 2 legs placed into the ch-1 sp, ch 3, sk next 3 DC, *SC in next ch-3 sp, SC in each of the next 3 sts, SC in next ch-3 sp, ch 3, sk next 3 DC, 3 DC in next ch-3 sp; repeat from * across until one ch-3 sp remains, SC in next ch-3 sp, SC into each of the next 2 sts. 1 TR, 1 DC3tog dec, 9 DC, and 7 ch-3 sps, 18 SC.
Row 38 :
Ch 1 (does not count as a stitch), turn, SC into each of the next 2 sts, ch 3, sk next SC, 3 DC into the next ch-3 sp, *ch 1, sk next 3 DC, 3 DC in next ch-3 sp, ch 3, sk next SC, 1 SC into each of the next 3 sts, ch 3, sk next SC, 3 DC in next ch-3 sp; repeat from * until only two ch-3 sps remains, ch 1, sk next 3 DC, 3 DC in next ch-3 sp, ch 3, sk next SC, 1 SC into each of the next 3 sts, ch 3, sk next SC, DC3tog with the first two legs of the decrease made into the ch-3 sp, and the third leg of decrease made into the top of the ch-4 from previous row. 11 SC, 18 DC, 7 ch-3 sp, 3 ch-1 sps, 1 DC3tog dec.
Row 39 :
Ch 4 (counts as first TR of row), turn, DC3tog with the first leg of decrease made into the top of the decrease from previous row, and the next 2 legs of the decrease made into the ch-3 sp, ch 3, sk next SC, DC in next st, *ch 3, sk next SC, 3 DC in next ch-3 sp, ch 3, sk next 3 DC, DC in next ch-1sp, ch 3, sk next 3 DC, 3 DC in next ch-3 sp, ch 3, sk next SC, DC in next SC; repeat from * to end. 1 TR, 1 DC3tog dec, 25 DC, 13 ch-3 sps.
Row 40 :
Ch 3 (counts as first DC of row), turn, *3 DC in next ch-3 sp, ch 3, sk next 3 DC, SC in next ch-3 sp, SC in next st, SC in next ch-3 sp, ch 3, sk next 3 DC, 3 DC in next ch-3 sp; repeat from * across; until 1 ch-3 sp remains, DC3tog with first two legs of decrease in ch-3 sp, and third leg of decrease in top of ch-4 from previous row. 19 DC, 6 ch-3 sps, 9 SC, 3 ch-1 sps, 1 DC3tog dec.
Row 41 :
Ch 4 (counts as first TR of row), turn, DC3tog with the first leg of decrease into decrease from previous row, and next 2 legs of decrease in ch-1 sp, *ch 3, sk next 3 DC, SC in next ch-3 sp, SC in each of the next 3 sts, SC in next ch-3 sp, ch 3, sk next 3 DC, 3 DC in next ch-3 sp; repeat from * across, ending with 2 DC in top of ch-3 from previous row. 1 TR, 1 DC3tog dec, 8 DC, 6 ch-3 sps, 15 SC.
Row 42 :
Ch 3 (counts as first DC of row), turn, *3 DC in next ch-3 sp, ch 3, sk next SC, 1 SC into each of the next 3 sts, ch 3, sk next SC, 3 DC in next ch-3 sp, ch 1, repeat from * across until only 2 ch-3 sps remain, 3 DC in next ch-3 sp, ch 3, sk next SC, 1 SC into each of the next 3 sts, ch 3, sk next SC, DC3tog with first two legs of dec into ch-3 sp and third leg of decrease into top of turning ch. 16 DC, 5 ch-3 sp, 9 SC, 2 ch-1 sps, 1 DC3tog dec.
Rows 43-48 :
Repeat Rows 35-40.
Row 49 :
Ch 4 (counts as first TR of row), turn, DC3tog with the first leg of decrease into decrease from previous row, and next 2 legs of decrease in ch-1 sp, ch 3, sk next 3 DC, SC in next ch-3 sp, SC in each of the next 3 sts, SC in next ch-3 sp, ch 3, sk next 3 DC, 3 DC in next ch-1 sp, ch 3, sk next 3 DC, SC in next ch-3 sp, SC in each of the next 3 sts, SC in next ch-3 sp, ch 3, sk next 3 DC, 2 DC in top of ch-3 from previous row. 1 TR, 1 DC3tog dec,4 ch-3 sps, 5 DC, 10 SC.
Row 50 :
Ch 3 (counts as first DC of row), turn, *3 DC in next ch-3 sp, ch 3, sk next SC, 1 SC into each of the next 3 sts, ch 3, sk next SC, 3 DC in next ch-3 sp, ch 1, 3 DC in next ch-3 sp, ch 3, sk next SC, 1 SC into each of the next 3 sts, ch 3, sk next SC, DC3tog making first two legs of decrease into ch-3 sp and third leg of decrease into top of ch-4 from previous row. 9 DC, 4 ch-3 sp, 6 SC, 1 ch-1 sp, 1 DC3tog dec.
Row 51 :
Ch 4 (counts as first TR of row), turn, DC3tog with first leg of decrease in decrease from previous row, and the next 2 legs of the decrease made into the ch-3 sp, ch 3, sk next SC, DC in next SC, ch 3, sk next SC, 3 DC in next ch-3 sp, ch 3, DC in next ch-1 sp, ch 3, sk next 3 DC, 3 DC in next ch-3 sp, ch 3, sk next SC, DC in next SC, ch 3, sk next SC, 3 DC in next ch-3 sp, ch 3, sk next 3 DC, DC into top of ch-3 from previous row. 1 TR, 1 DC3tog dec, 13 DC, 7 ch-3 sps.
Row 52 :
Ch 1 (does not count as a stitch), turn, SC into the first st, SC into the next ch-sp, ch 3, sk next 3 DC, 3 DC in next ch-3 sp, ch 1, sk next DC, 3 DC in next ch-3 sp, ch 3, sk next 3 DC, SC in next ch-3 sp, SC in next st, SC in next ch-3 sp, ch 3, sk next 3 DC, 3 DC in next ch-3 sp, ch 1, sk DC, DC3tog with the first 2 legs of decrease placed in last ch-3 sp, and last leg of decrease placed into top of ch-4 from previous row. 5 SC, 3 ch-3 sps, 9 DC, 2 ch-1 sps, 1 DC3tog dec.
Row 53 :
Ch 4 (counts as first TR of row), turn, DC3tog with the first leg of decrease in top of decrease from previous row, and the next 2 legs placed into the ch-1 sp, ch 3, sk next 3 DC, *SC in next ch-3 sp, SC in each of the next 3 sts, SC in next ch-3 sp, ch 3, sk next 3 DC, 3 DC in next ch-3 sp; repeat from * across until only 3 DC remain, SC in next ch-3 sp, SC into each of the next 2 sts. 1 TR, 1 DC3tog dec, 3 DC, and 3 ch-3 sps, 8 SC.
Row 54 :
Ch 1 (does not count as a stitch), turn, SC into each of the next 2 sts, ch 3, sk next SC, 3 DC into the next ch-3 sp, ch 1, sk next 3 DC, 3 DC in next ch-3 sp, ch 3, sk next SC, 1 SC into each of the next 3 sts, ch 3, sk next SC, DC3tog with the first two legs of the decrease made into the ch-3 sp, and the third leg of decrease made into the top of the ch-4 from previous row. 5 SC, 6 DC, 3 ch-3 sp, 1 ch-1 sp, 1 DC3tog dec.
Row 55 :
Ch 4 (counts as first TR of row), turn, DC3tog with the first leg of decrease made into the top of the decrease from previous row, and the next 2 legs of the decrease made into the ch-3 sp, ch 3, sk next SC, DC in next SC, *ch 3, sk next SC, 3 DC in next ch-3 sp, ch 3, sk next 3 DC, DC in next ch-1 sp, ch 3, sk next 3 DC, 3 DC in next ch-3 sp, ch 3, sk next SC, DC in next SC; repeat from * to Row end. 1 TR, 1 DC3tog dec, 9 DC, 5 ch-3 sps.
Row 56 :
Ch 3 (counts as first DC of row), turn, *3 DC in next ch-3 sp, ch 3, sk next 3 DC, SC in next ch-3 sp, SC in next st, SC in next ch-3 sp, ch 3, sk next 3 DC, 3 DC in next ch-3 sp, ch 1; repeat from * across, DC3tog with first two legs of decrease in ch-3 sp, and third leg of decrease in top of ch-4 from previous row. 7 DC, 2 ch-3 sps, 3 SC, 1 ch-1 sp, 1 DC3tog dec.
Row 57 :
Ch 4 (counts as first TR of row), turn, DC3tog with the first leg of decrease into decrease from previous row, and next 2 legs of decrease in ch-1 sp, ch 3, sk next 3 DC, SC in next ch-3 sp, SC in each of the next 3 sts, SC in next ch-3 sp, ch 3, sk next 3 DC, 2 DC in top of ch-3 from previous row. 1 TR, 1 DC3tog dec, 2 DC, 2 ch-3 sps, 5 SC.
Row 58 :
Ch 3 (counts as first DC of row), turn, *3 DC in next ch-3 sp, ch 3, sk next SC, 1 SC into each of the next 3 sts, ch 3, sk next SC, DC3tog making first two legs of decrease into ch-3 sp and third leg of decrease into top of ch-4 from previous row. 3 DC, 2 ch-3 sp, 3 SC, 1 DC3tog dec.
Row 59 :
Ch 4 (counts as first TR of row), turn, DC3tog with first leg of decrease in decrease from previous row, and the next 2 legs of the decrease made into the ch-3 sp, ch 3, sk next SC, DC in next SC, ch 3, sk next SC, 3 DC in next ch-3 sp, ch 3, sk next 3 DC, DC into top of ch-3 from previous row. 1 TR, 1 DC3tog dec, 4 DC, 3 ch-3 sps.
Row 60 :
Ch 1 (does not count as a stitch), turn, SC into the first st, SC into the next ch-sp, ch 3, sk next 3 DC, 3 DC in next ch-3 sp, ch 1, sk next DC, DC3tog with the first 2 legs of decrease placed in last ch-3 sp, and last leg of decrease placed into top of ch-4 from previous row. 2 SC, 1 ch-3 sp, 3 DC, 1 ch-1 sps, 1 DC3tog dec.
Row 61 :
Ch 4 (counts as first TR of row), turn, DC3tog with the first leg of decrease in top of decrease from previous row, and the next 2 legs placed into the ch-1 sp, ch 3, sk next 3 DC, SC in next ch-3 sp, SC into each of the next 2 sts. 1 TR, 1 DC3tog dec, 1 ch-3 sp, 3 SC.
Row 62 :
Ch 1 (does not count as a stitch), turn, SC into each of the next 2 sts, ch 3, sk next SC, DC3tog with the first two legs of the decrease made into the ch-3 sp, and the third leg of decrease made into the top of the ch-4 from previous row. 2 SC, 1 ch-3 sp, 1 DC3tog dec.
Row 63 :
Ch 4 (counts as first TR of row), turn, DC3tog with the first leg of decrease into the top of the decrease from previous row, and the next 2 legs of the decrease made into the ch-3 sp, ch 3, sk next SC, DC in next SC. 1 TR, 1 DC3tog dec, 1 DC, 1 ch-3 sp.
Row 64 :
Ch 3 (counts as first DC of row), turn, DC3tog with first two legs of decrease in ch-3 sp, and third leg of decrease in top of ch-4 from previous row. 1 DC, 1 DC3tog dec.
First tie end :
Ch 61, beginning with the second ch from hook and working into the bottom of the ch, 1 sl st into each of the next 60 chs. Do not fasten off.
Edging :
Continuing along one of the bottom sides of triangle, work approximately 66 SC along edge, making sure edge does not ruffle or warp when SC edging is made. If edge is constricted by this SC border, either use a larger hook or add more sts. If edge ruffles use a smaller hook or use fewer stitches. Tip: in order to work evenly along edge, fold edge in half and mark halfway point with stitch marker. Work 33 SC into each section. Rotate to continue working SC edging along next side of triangle, again with about 66 sts.
Second tie end :
Ch 61, beginning with the second ch from hook and working into the bottom of the ch, 1 sl st into each of the next 60 chs. Do not fasten off.
Top Edging :
Continuing along top edge of triangle, work approximately 94 SC along edge, making sure edge does not ruffle or warp when SC edging is made. If edge is constricted by this SC border, either use a larger hook or add more sts. If edge ruffles use a smaller hook or use fewer stitches. Tip: in order to work evenly along edge, fold edge in half and mark halfway point with stitch marker. Work 47 SC into each section. Sl st into first ch of first tie end to fasten off.
Finishing :
Weave in ends, block.
This airy Lace Kerchief is a delightful accessory to elevate your everyday look with handmade charm. The lightweight fingering yarn and open lace make it perfect for warm-weather styling or layering under jackets. Make one in your favorite color and enjoy a little wearable lace that packs a big style punch. 🧶✨🧵