Create your own charming Jack Sparrow amigurumi with this detailed intermediate crochet pattern. You will follow clear step-by-step rounds, assembly notes, and photo guidance to build the hat, hair, clothing and accessories. The pattern uses cotton threads and fine hooks for a compact, detailed doll you can customize. Enjoy making a unique handcrafted pirate companion perfect for gifting or display.
Progress Tracker
0% Complete
— Important Notes :
Info :
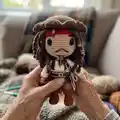
Remember that the final size of the amigurumi is determined by the thickness of the yarn and size of the crochet hook you use, in my case the final dimensions are 20cm high by 9cm wide.
Info :
I recommend that you read the pattern before beginning, so you will have a general idea of the project. This is an intermediate level pattern; it assumes that you know the basic stitches required to make amigurumis but nothing that you will not be able to do if you have patience and above all a love for what are you doing.
Info :
I have made it using X stitches.
— Materials :
Info :
2.5mm Crochet Hook for the body and 1.5mm - 1mm when indicated. Cotton thread: 3 shades of coffee, red, cream and dark beige (Sinfonia brand cotton thread, 6 strands). Filoseda or cotton thread for embroidery in dark blue (double strand), gray, beige, brown and wine color (Madame Tricote N8). 9mm or 10mm safety eyes (author used 9mm oval). Synthetic fiber fill. Beads to place in hair. Needle, scissors, stitch marker.
— Abbreviations :
Infos :
MR: Magic Ring. SC: Single Crochet. Dec: Decrease. Inc: Increase, 2Sc in the same stitch. Inc3: Increase, 3Sc in the same stitch. Inc4: Increase, 4Sc in the same stitch. BLO: Back Loop Only. FLO: Front Loop Only. *: Repeat stitches in brackets. R: Round. Ch: Chain. HDC: Half Double Crochet. DC: Double Crochet. Trc: Treble Crochet. Slst: Slip Stitch.
— Legs X2 :
Round R1 :
6 Chains, in the 2nd Stitch from the hook make, 4Sc + Inc4, 3Sc + Inc3 (14)
Round R2 :
4Sc + 4Inc, 4Sc + 2Inc (20)
Round R5 :
3Sc + 2Dec, 1Dec HDC, 2Dec + 7Sc (15)
Round R6 :
Sc + 5Dec + 4Sc (10)
Round R7-11 :
10Sc (5R) (10)
Info :
* Change to a lighter brown.
Round R12 :
BLO (Sc + Inc) *5 (15)
Round R13-14 :
15Sc (2R) (15)
Round R15 :
(Sc + Dec) *5 (10)
Round R17 :
Chain 4, these will serve as the union between both legs, join to the center of the second leg, crochet the 10Sc of that leg + 4Sc of the central chains, continue on the other leg with 10Sc and finally the 4Sc of the center chain (28)
— Boot Cuffs :
Info :
Note the orientation of the leg to knit the edge of the boot. In the 10FL of the R12 we will do:
Round R1 :
Hook with 1 Chain (Sc + Inc) *5 (15)
Round R2-3 :
15Sc (2R) (15)
Info :
* Cut yarn over, repeat from R1 to R16.
— Continue with the Body :
Round R17 :
10Sc + 4Sc + 10Sc + 4Sc (28)
Round R18-19 :
28Sc (2R) (28)
Round R20 :
4Sc + Dec, (5Sc + Dec)*3 + Sc (24)
Round R22 :
BLO 24Sc put thread on hold, that is, we will not cut it. (24)
Info :
* Change to skin tone.
Round R23 :
BLO make 4Dec, 1 front - 1 back, and 1 on each side. (20)
Round R24-28 :
20Sc (5R) (20)
Round R29 :
(2Sc + Dec) *5 (15)
Round R31 :
(Sc + Dec) *5 (10)
Round R34-35 :
20Sc (2R) (20)
Round R37 :
5Dec, Slst (5)
— T-Shirt :
Info :
We will continue with the cream thread that we had left on R22, and we will work the 24FL of R23.
Round R1 :
1 Chain and turn + 24HDC (24)
Info :
Cut the yarn and make an invisible close, then mark the central point in front of the amigurumi. This is now the last stitch of the row.
Round R2 :
Attach the yarn next to the marker and continue with: 1 Chain stitch + 23 HDC (23)
Round R3 :
1 Chain stitch and turn + 23HDC (23)
Round R4 :
1 Chain stitch and turn + Dec +19HDC + Dec (21)
Round R5 :
1 Chain stitch and turn + Dec +17HDC + Dec (19)
Info :
Cut yarn and bind off.
— Head :
Round R3 :
(Sc + Inc) *6 (18)
Round R4 :
Sc + Inc, (2Sc + Inc) *5 + Sc (24)
Round R5 :
(3Sc + Inc) *6 (30)
Round R6 :
2Sc + Inc, (4Sc + Inc) *5 + 2Sc (36)
Round R7 :
(5Sc + Inc) *6 (42)
Round R8 :
3Sc + Inc, (6Sc + Inc) *5 + 3Sc (48)
Round R9 :
(7Sc + Inc) *6 (54)
Round R10-18 :
54Sc (9R) (54)
Round R19 :
(7Sc + Dec) *6 (48)
Round R20 :
3Sc + Dec, (6Sc + Dec) *5 + 3Sc (42)
Round R21 :
(5Sc + Dec) *6 (36)
Round R22 :
2Sc + Dec, (4Sc + Dec) *5 + 2Sc (30)
Round R23 :
(3Sc + Dec) *6 (24)
Round R24 :
Sc + Dec, (2Sc + Dec) *5 + Sc (18)
Info :
Insert the top of the body into the head, in this way we will obtain a mobile head, since the decreases that will follow will close around the neck and this will prevent it from coming off. Be careful when closing and weaving in the thread so that this does not impede the mobility of the head. Ensure that you fill the head as firmly as possible so that it does not lose its shape when you make the final decreases on the last round. Do your best to fill around the neck as you go.
Round R25 :
(Sc + Dec) *6 (12)
— Arms X 2 :
Round R3 :
5Sc + (2Chain, Sc + Sc at the base of the point) + Sc (8)
Round R4 :
5Sc, skip finger stitches + Sc (6)
Info :
Note: In case you need more help on this I have linked a tutorial for you. https://youtu.be/HI-oAfVMG-w
Round R8 :
(Sc + Inc) *6 (18)
Round R9-10 :
18Sc (2R) (18)
Round R11 :
(Sc + Dec) *6 (12)
Round R13 :
(2Sc + Dec) *3 (9)
Round R14-16 :
9Sc (3R) (9)
Info :
You can introduce wire in the arms to give them some mobility, fill them in, use a little material, only what is necessary to give a little shape to the lower part of the shirt sleeve. At the end of the arm, shape the thumb, you can pass some stitches around it.
Section :
Sleeve Cuffs: In the 6FL of the R8 we will: Attach yarn + 1 Chain stitch and we will make Inc of HDC in each point. (12)
— Handkerchief :
Info :
With 1mm crochet hook and beige embroidery thread.
Round R1 :
Chain 82, beginning on the 3rd chain from the hook, 80HDC (80)
Round R2 :
Chain 2 and turn + 80HDC (80)
Round R3 :
Chain 4, turn, beginning on the 3rd chain from the hook, 10DC + 72HDC (82)
Round R4 :
Chain 2 and turn, 73HDC + 8DC, do not work the last stitch. (81)
Round R5 :
Chain 2 and turn + 81HDC (81)
Round R6 :
Chain 2 and turn, 80HDC + 8DC, do not work the last stitch. (80)
Round R7 :
Chain 2 and turn + 80 HDC (80)
Info :
Embroider 2 rows of Slst along the entire length of the handkerchief, use the wine-colored floss and the 1mm needle.
— Jacket :
Info :
With the double-stranded blue embroidery floss with the 1.5mm crochet hook.
Round R1 :
Chain 30, beginning in the 3rd Ch from the hook, 28HDC (28)
Round R2 :
Chain 2 turn, 3HDC + Chain 6, skip 6st + 10HDC + Chain 6, skip 6st + 3HDC (28)
Round R3-13 :
Chain 2, turn + 28HC (11R) (28)
— Belt :
Round R1 :
With brown embroidery thread and the 1mm crochet hook. Chain 46, from the 3rd Ch from the hook we will do 44HDC (44)
Round R2 :
Chain 1 turn and continue along the opposite side with 44HDC (45)
— Head Band :
Round R1 :
With Red yarn and using the 2.5mm crochet hook: Ch 50, beginning in the 3rd chain from the hook, 48HDC (48)
Round R2 :
Ch 1 turn + 9Sc + 8HDC + 14DC + 8HDC + 9Sc (48)
Round R3 :
Ch 1 turn + 17HDC + 14DC + 17HDC (48)
— Rear Band :
Round :
Chain 42, beginning in the 3rd Ch from the hook: 8DC + 7HDC + 8Sc + 9HDC + 6DC + 2Trc (40)
— Hair :
Round R1 :
With brown yarn and using the 2.5mm crochet hook: MR 8Sc (8)
Round R3 :
(Sc + Inc) *8 (24)
Round R4 :
FLO (2Sc + Inc) *8 + Slst (32)
— First Layer (hair strands) :
Round R1-5 :
Chain 28 from the 3rd Ch from the hook, 26HDC *2 (26)
Round R6-12 :
Chain 26 from the 3rd Ch from the hook, 24HDC (24)
Round R13-16 :
Chain 28 from the 3rd Ch from the hook, 26HDC *2 (26)
Info :
You will end up with a total of 25 locks or strands of hair.
— Second Layer (hair strands) :
Round 1-3 :
Chain 32 from the 3rd ch from the hook we will make 30HDC *2 (30)
Round 4 :
Chain 26 from the 3rd ch from the hook we will make 24HDC *2 (24)
Round 5-9 :
Chain 22 from the 3rd ch from the hook we will make 20HDC (5) (20)
Round 10 :
Chain 26 from the 3rd ch from the hook we will make 24HDC *2 (24)
Round 11-12 :
Chain 32 from the 3rd ch from the hook we will make 30HDC *2 (30)
Info :
We will have a total of 19 locks or strands of hair.
— Hat :
Info :
2.5mm crochet hook, you can knit the hat in a single shade of brown either with the same thread that we worked the pants or the hair with, author used a combination and made the change at R14.
Round R3 :
(Sc + Inc) *8 (24)
Round R4 :
Sc + Inc, (2Sc + Inc) *7 + Sc (32)
Round R5 :
(3Sc + Inc) *8 (40)
Round R6 :
2Sc + Inc, (4Sc + Inc) *7 + 2Sc (48)
Round R8 :
(5Sc + Inc) *8 (56)
Round R9-12 :
56Sc (4R) (56)
Round R13 :
FLO 3Sc + Inc, (6Sc + Inc) *7 + 3Sc (64)
Info :
Change to Brown yarn.
Round R14 :
(7Sc + Inc) *8 (72)
Round R15 :
(5Sc + Inc) *12 (84)
Round R16 :
(Inc + 6Sc) *12 (96)
Round R17 :
(Inc + 7Sc) *12 (108)
Round R18 :
(Inc + 8Sc) *12 (120)
Info :
Fold the brim of the hat to the desired shape.
— Joining pieces :
Info :
Now we'll start putting the pieces together. Place the hair on the head, help yourself using pins to fix it while you are accommodating the strands. You can sew the strands with a needle and thread giving a few stitches this is what I have done, or you can glue them with some type of glue or fabric glue.
Info :
Leave free 4 strands of the 1st layer and 3 strands of the 2nd layer all of them in front of the face of our amigurumi. We will make a braid with the strands of 32 chains that we had woven, the ones that are left over will go under the headband, except for the 3 front strands that we had already separated.
Info :
Place the band over the head and sew it on, then tie the band at the back. To simulate the dreadlocks we can tie a long strand of thread and wrap it around the lock of hair a few times, hiding the excess thread inside the hair strand to give it a better finish. Put a few beads on the strands in the front to give it that characteristic character look.
This Jack Sparrow amigurumi pattern brings a beloved pirate to life in tiny, handcrafted detail. Follow the step-by-step rounds and assembly notes for a satisfying multi-day project. Add beads, wraps and color changes to personalize your own pirate companion. 🧵🧶