🧶 Beautiful ✨ Detailed 💝 Adorable

Building Blocks Crochet Cardigan Pattern

Building Blocks Crochet Cardigan Pattern
4.7★ Rating
8-10 Hours Time Needed
2.2K Made This
✂️

Beginner Friendly Level

Perfect for those just starting their crochet journey, with clear instructions and simple techniques

⏱️

All-Day Adventure

Requires 8-10 hours, ideal for a full day of immersive crocheting.

👕

Casual Chic

Relaxed style with a modern twist, perfect for everyday wear while maintaining that handcrafted uniqueness.

About This Building Blocks Crochet Cardigan Pattern

This pattern creates a relaxed, open-front crochet cardigan worked in a simple sc/ch-1 pattern that produces a reversible textured fabric. You will make Back, two Fronts and two Sleeves, then sew pieces together using the mattress stitch for neat seams. The design includes a shaped neck extension and optional folded sleeve cuffs for a finished look.

Building Blocks Crochet Cardigan Pattern crochet pattern - detailed view of completed project

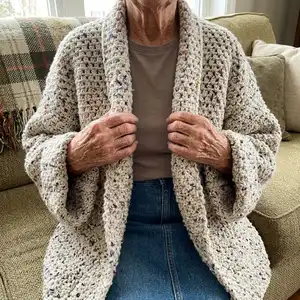
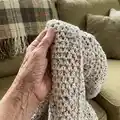
Worked in Bernat Forever Fleece Tweeds, the cardigan is plush and cozy with a tweed flecked texture. Clear row-by-row instructions and schematic diagrams help you achieve the correct measurements for each size.

Why You'll Love This Building Blocks Crochet Cardigan Pattern

I absolutely love this pattern because the simple sc/ch-1 stitch pattern creates an interesting textured fabric while keeping the stitches easy and repetitive. I enjoy that the cardigan is fully reversible, meaning both sides look great and it is forgiving during assembly. The oversized, relaxed shape makes it comfortable to wear and versatile for layering, which I find perfect for chilly days. Sewing the pieces together with the mattress stitch gives a professional finish that I always take pride in.

Building Blocks Crochet Cardigan Pattern step 1 - construction progress Building Blocks Crochet Cardigan Pattern step 2 - assembly progress Building Blocks Crochet Cardigan Pattern step 3 - details and accessories Building Blocks Crochet Cardigan Pattern step 4 - final assembly and finishing

Switch Things Up

I love experimenting with yarn color to change the mood of this cardigan; try a solid neutral for a minimalist look or a bold color for a standout piece.

To make a shorter or longer version, simply work fewer or more pattern repeats until you reach the desired length, measuring against the Back as you go.

If you want a slimmer fit, reduce the starting chain counts by the stitch multiple and sample your gauge to calculate the correct width before proceeding.

Use a lighter bulb yarn and smaller hook to create a less bulky, drapier version suitable for spring or early fall layering.

Add embroidery or surface crochet details to the fronts or cuffs to personalize the cardigan with initials, florals, or geometric accents.

Make the sleeve cuffs extra long and fold them back more for a cozy, cuffed look or leave them full length for a modern straight sleeve.

I sometimes substitute wooden or statement buttons and add buttonhole rows along one front edge for a different style; you can also leave it open as designed for an effortless look.

For a fitted shoulder, try decreasing a stitch at the shoulder edge over a few rows to create gentle shaping, keeping the rest of the body rectangular.

Consider lining the collar area with a soft fabric or adding a narrow ribbed trim worked in single crochet for more definition around the neck.

When gifting, coordinate the yarn color with the recipient’s wardrobe and include care instructions for Bernat Forever Fleece Tweeds to ensure the cardigan keeps its texture and softness.

Common Mistakes & How to Fix Them

✗ Skipping the initial chain count will make the piece too narrow or wide; always chain the exact number for your chosen size and recount before proceeding. ✗ Working sc into the chain instead of the ch-1 space creates a tight edge and incorrect stitch count; insert your hook into the space created right under the ch-1 as instructed. ✗ Not placing shoulder markers causes misaligned shoulders at assembly; place markers the exact number of stitches in from each side as written for accurate shoulder placement. ✗ Failing to measure pieces to match the Back will produce uneven fronts or sleeves; use the gauge and measure your pieces to the specified lengths before fastening off for seams.

Building Blocks Crochet Cardigan Pattern

Make a cozy, textured cardigan using Bernat Forever Fleece Tweeds. This beginner-friendly pattern guides you through simple single crochet and chain-1 stitch patterning to create a comfortable, reversible jacket with optional folded sleeve cuffs. Perfect for gifting or treating yourself, the cardigan is worked in pieces and seamed for a polished finish.

Beginner Friendly 8-10 Hours

Materials Needed for Building Blocks Crochet Cardigan Pattern

— Main Fabric

  • 01
    Bernat Forever Fleece Tweeds (super bulky/6) 8.8 oz/250 g; 158 yds/145 m per ball
  • 02
    Color: Balsam Tweed (79001)
  • 03
    Quantity: XS/S - 6 balls (approx. 930 yds / 846 m); M/L - 7 balls (approx. 1050 yds / 956 m); XL - 8 balls (approx. 1200 yds / 1092 m); 2/3XL - 9 balls (approx. 1320 yds / 1201 m); 4/5XL - 10 balls (approx. 1450 yds / 1320 m)

— Tools Required

  • 01
    Crochet hook size U.S. N/15 (10 mm) Susan Bates® or size needed to obtain gauge
  • 02
    Susan Bates® stitch markers
  • 03
    Susan Bates® yarn needle
  • 04
    Tape measure
  • 05
    Scissors

Progress Tracker

0% Complete

— Back :

Chain :

Chain (Ch) 50 (58-64-68-74).

1st row :

[Right Side (RS)]. 1 single crochet (sc) in 2nd ch from hook. *Ch 1. Skip next ch. 1 sc in next ch. Repeat (Rep) from * to end of chain. Turn. 49 (57-63-67-73) stitches (sts) – count sc and ch-1 spaces (sps) as sts.

2nd row :

Ch 1. 1 sc in first sc. *Ch 1. Skip next sc. 1 sc in next ch-1 sp. Rep from * to last 2 sts. 1 sc in next ch-1 sp. 1 sc in last sc. Turn.

Info :

*1 sc in next ch-1 space (sp). Ch 1. Skip next sc. Rep from * to last 2 sts. 1 sc in next ch-1 sp. 1 sc in last sc. Turn.

Note :

Insert hook into the space created right under the ch-1 when working sc. Do not work sc into the actual chain.

3rd row :

Ch 1. 1 sc in first sc. *Ch 1. Skip next sc. 1 sc in next ch-1 sp. Rep from * to last 2 sts. Ch 1. Skip next sc. 1 sc in last sc. Turn.

Pattern repeat :

Rep last 2 rows for Sc/Ch-1 pattern (pat) until piece measures 25 (25-26-26-27)" [63.5 (63.5-66-66-68.5) cm], ending on a RS row.

Fasten off :

Fasten off leaving a 16" [40.5 cm] end for seams.

Info :

Place markers 16 (20-22-24-26) sts in from each side for shoulders.

— Fronts :

Info :

Note: Make 2 pieces alike, noting RS and WS will reverse to create Left and Right Front. Fabric is reversible.

Chain :

Ch 32 (36-38-40-42).

1st row :

(RS). 1 sc in 2nd ch from hook. *Ch 1. Skip next ch. 1 sc in next ch. Rep from * to end of chain. Turn. 31 (35-37-39-41) sts – count sc and ch-1 spaces (sps) as sts.

2nd row :

Ch 1. 1 sc in first sc. *1 sc in next ch-1 sp. Ch 1. Skip next sc. Rep from * to last 2 sts. 1 sc in next ch-1 sp. 1 sc in last sc. Turn.

3rd row :

Ch 1. 1 sc in first sc. *Ch 1. Skip next sc. 1 sc in next ch-1 sp. Rep from * to last 2 sts. Ch 1. Skip next sc. 1 sc in last sc. Turn.

Pattern repeat :

Rep last 2 rows for Sc/Ch-1 pat until piece measures same length as Back, ending on a RS row.

Shape Neck Extension - Next row :

Ch 1. 1 sc in first sc. (1 sc in next ch-1 sp. Ch 1. Skip next sc) 6 times. 1 sc in next ch-1 sp. 1 sc in next sc. Turn. Leave remaining (rem) sts unworked for shoulder.

Continue :

Continue working across 15 sts in Sc/Ch-1 pat as follows:

Next row :

Ch 1. 1 sc in first sc. (Ch 1. Skip next sc. 1 sc in next ch-1 sp) 6 times. Ch 1. Skip next sc. 1 sc in last sc. Turn.

Next row :

Ch 1. 1 sc in first sc. (1 sc in next ch-1 sp. Ch 1. Skip next sc) 6 times. 1 sc in next ch-1 sp. 1 sc in next sc. Turn.

Repeat :

Rep last 2 rows until Neck Extension measures 3¾ (3¾-4¼-4¼-4¼)" [9.5 (9.5-11-11-11) cm]. Fasten off leaving a 16" [40.5 cm] end for seams.

— Sleeves :

Chain :

Ch 40 (42-42-44-46).

1st row :

(RS). 1 sc in 2nd ch from hook. *Ch 1. Skip next ch. 1 sc in next ch. Rep from * to end of chain. Turn. 39 (41-41-43-45) sts – count sc and ch-1 spaces (sps) as sts.

2nd row :

Ch 1. 1 sc in first sc. *1 sc in next ch-1 sp. Ch 1. Skip next sc. Rep from * to last 2 sts. 1 sc in next ch-1 sp. 1 sc in last sc. Turn.

3rd row :

Ch 1. 1 sc in first sc. *Ch 1. Skip next sc. 1 sc in next ch-1 sp. Rep from * to last 2 sts. Ch 1. Skip next sc. 1 sc in last sc. Turn.

Pattern repeat :

Rep last 2 rows for Sc/Ch-1 pat until Sleeve measures 17 (18-18-17-16)" [43 (45.5-45.5-43-40.5) cm] ending on a RS row.

Fasten off :

Fasten off leaving a 16" [40.5 cm] end for seams.

— Finishing :

Info :

Note: Sew all seams using mattress stitch technique.

Finishing :

Use fasten off yarn ends where applicable to sew seams. Sew shoulder seams to markers using mattress stitch.

Neck :

With Wrong Side (WS) facing, sew center back seam of neck extension.

Neck attachment :

With Right Side (RS) facing, sew sides of neck extensions to back neck edge, having neck extension seam at center back.

Assembly placement :

Place markers 16 (20-22-24-26) sts in from each side for shoulders and place markers on side edges of Body pieces 8½ (9-9-9½-10)" [21.5 (23-23-24.5-25.5) cm] down from shoulders for sleeve placement.

Sew sleeves :

Sew top of Sleeves to Body pieces between markers. Sew side and sleeve seams. Weave in ends. Fold back Sleeve cuffs as desired.

Info :

Weave in ends securely and press lightly if desired to settle stitches.

Assembly Instructions

  • Place shoulder markers 16 (20-22-24-26) sts in from each side and sew shoulder seams to markers using mattress stitch for an even shoulder join.
  • Place markers on side edges of Body pieces 8½ (9-9-9½-10)" [21.5 (23-23-24.5-25.5) cm] down from shoulders, then align sleeve tops within those markers and sew the sleeve caps to the body between markers.
  • Sew side seams and sleeve seams from hem to cuff using mattress stitch or preferred seaming technique, ensuring seams are neat and alignment is even.
  • With WS facing, sew center back seam of the neck extension; with RS facing, sew sides of neck extensions to back neck edge, aligning neck extension seam at center back.
  • Fasten off yarn ends where applicable as you sew to secure seams and reduce bulk; weave in all ends neatly on the wrong side after sewing seams.

Important Notes

  • 💡Use stitch markers to mark shoulder placement and sleeve attachment points so pieces align correctly during seaming.
  • 💡Insert hook into the ch-1 space created under the ch-1 when working sc to maintain the correct stitch pattern and avoid stitching into the chain.
  • 💡Measure each finished piece against the Back measurement to ensure fronts and sleeves reach the correct length before fastening off for seams.
  • 💡Leave a long yarn tail (16"/40.5 cm) when fastening off to provide enough yarn for sewing seams without joining additional yarn.

This cosy Building Blocks Crochet Cardigan is designed to be a wardrobe staple with a comfy, oversized fit and a lovely tweed texture. It’s easy to make and wonderfully cozy for layering during cooler days. Try it in Balsam Tweed for a soft neutral look that pairs beautifully with everything. 🧶✨

You ask,

we answer.

FAQs

What size will the finished piece be?

Finished chest measurements range by size: XS/S finished chest 44" [112 cm], M/L 50" [101.5 cm], XL 56" [119.5 cm], 2/3XL 60" [137 cm], 4/5XL 64" [155 cm]. Refer to 'Measurements' for to-fit chest ranges.

Can I use different yarn weights for this pattern?

Yes, but changing yarn weight will affect the final size and drape; use an appropriate hook to maintain the gauge of 9 sts and 8 rows = 4" [10 cm] in single crochet/ch-1 pattern or adjust pattern measurements accordingly.

Do I need prior crochet experience for this pattern?

This pattern is labelled Beginner Friendly, so basic knowledge of single crochet, chain, and following a simple repeat pattern is recommended for best results.

How long does this project typically take to complete?

Most crocheters will finish this cardigan in approximately 8-10 hours, depending on size, experience, and sewing time.