🧢 Beautiful ✨ Detailed πŸ’ Adorable

Ice Cream Turtle Amigurumi Pattern

Ice Cream Turtle Amigurumi Pattern
4.4β˜… Rating
5-7 Hours Time Needed
2.6K Made This
βœ‚οΈ

Intermediate Level

Ideal for those with basic crochet experience, featuring slightly more advanced stitches and techniques to expand your skills.

⏱️

Weekend Treat

Takes 5-7 hours, making it an enjoyable project to finish over a couple of days.

🧸

Cute Companion

An adorable friend to cherish, handcrafted with love to bring comfort and joy for years to come.

About This Ice Cream Turtle Amigurumi Pattern

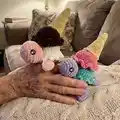
This pattern creates a charming plush Ice Cream Turtle amigurumi with stacked ice cream scoops for the shell and a waffle cone hat. It uses bulky chenille-style yarn for a cuddly texture and simple shaping to form legs, tail, head, and cone. The instructions include round-by-round stitch counts and helpful notes on assembly and placement of eyes and pieces.

Ice Cream Turtle Amigurumi Pattern crochet pattern - detailed view of completed project

Perfect for makers who enjoy playful character designs, this pattern blends basic amigurumi techniques with small details like ruffles and a cone. Photos and placement tips are included to guide you through assembly.

Why You'll Love This Ice Cream Turtle Amigurumi Pattern

I absolutely love this pattern because it combines two delightful themesβ€”turtles and ice creamβ€”into one charming amigurumi that always makes me smile. I enjoy the texture created by bulky chenille yarn; it makes the finished toy feel extra soft and huggable. The step-by-step rounds are satisfying to work through and the assembly feels like putting together a tiny edible world. I also love how customizable it isβ€”change the scoop colors and cone placement to create many different personalities.

Ice Cream Turtle Amigurumi Pattern step 1 - construction progress Ice Cream Turtle Amigurumi Pattern step 2 - assembly progress Ice Cream Turtle Amigurumi Pattern step 3 - details and accessories Ice Cream Turtle Amigurumi Pattern step 4 - final assembly and finishing

Switch Things Up

I love customizing this pattern by switching the scoop colors to create different flavors β€” try pastel sherbet shades for a soft look or bold neon for a playful toy.

You can change the yarn weight and hook size to make a tiny keychain version or a giant cuddly plush; using a thinner yarn and smaller hook will make a much smaller turtle.

I often embroider small sprinkles or a smile onto the top scoop for more personality; embroidery floss or a contrasting yarn works well for tiny details.

Swap safety eyes for embroidered eyes if you plan to give the toy to young children, keeping it fully soft and safe.

Experiment with cone placement and orientation β€” sew the cone slightly forward, off to the side, or even upside-down for a quirky look.

Try crocheting the ruffle rows using a different stitch (like single crochet bumps) to vary the texture of the scoop edge.

Use variegated or gradient yarn for the scoops to create an ombre effect without changing colors between rounds.

I sometimes add a tiny crocheted cherry or leaf on top of the cone as a finishing touch β€” a small circle or chain and slip stitch stem work great.

Add wire inside the legs in case you want them poseable, or keep them soft for a classic plush look depending on how you plan to display your turtle.

Make a whole collection in different colorways β€” beachy pastels, autumn tones, or neon dessert themes β€” and display them as a playful set or gift individually.

Common Mistakes & How to Fix Them

βœ— Not using stitch markers when working with fluffy or chenille yarn can make it hard to find the first stitch; place a marker at the start of every round and move it as you work to stay oriented. βœ— Forgetting to stuff between color changes can flatten the scoops and cause uneven shaping; add stuffing to the first scoop before continuing and stuff gradually for an even shape. βœ— Failing to leave a long tail when fastening off the head or cone makes sewing difficult; leave an 8-9 inch tail so you have enough yarn for secure sewing and finishing. βœ— Skipping the back-loop or front-loop instructions changes the ruffle and shell details; follow the FLO/BLO directions exactly to achieve the textured rows and scoops.

Ice Cream Turtle Amigurumi Pattern

Make a whimsical Ice Cream Turtle amigurumi with layered scoops, a sleepy head, four little legs, a tail, and a cute ice cream cone hat. This pattern uses bulky chenille-style yarn for a plush, squishy finish and clear step-by-step rounds so you can follow along easily. You will enjoy working with simple rounds, some back-loop/ front-loop techniques, and creative assembly to bring this adorable toy to life. Perfect for gifting or decorating a nursery with a handmade touch.

Intermediate 5-7 Hours

Materials Needed for Ice Cream Turtle Amigurumi Pattern

β€” Main Fabric

  • 01
    Size 5-6 Bulky Yarn (general recommendation for the whole project)
  • 02
    Premier Just Chenille - White (Neapolitan scheme, Size 6)
  • 03
    Premier Just Chenille - Pink (Neapolitan scheme, Size 6)
  • 04
    Estako Velvet - Brown (Neapolitan shell scoop, no size listed but similar to other yarns used)
  • 05
    Premier Just Chenille - Aqua (Cotton Candy scheme, Size 6)
  • 06
    Premier Just Chenille - Lavender (Cotton Candy scheme, Size 6)
  • 07
    Premier Just Chenille - Flamingo (Cotton Candy scheme, Size 6)
  • 08
    Bernat Velvet - Soft Sunshine (tan cone color, Size 5)

β€” Tools Required

  • 01
    Crochet hook size 3.5mm (E)
  • 02
    Safety eyes 12mm (2 pieces)
  • 03
    Tapestry needle for sewing and weaving ends
  • 04
    Scissors
  • 05
    Poly-fil stuffing
  • 06
    Stitch markers (recommended for fluffy yarn and keeping track of rounds)
  • 07
    Pins for blocking and placement (optional)

Progress Tracker

0% Complete

β€” Front Legs :

Info :

Using Pink (Neapolitan) or Lavendar (Cotton Candy). (Make 2)

Round 1 :

8 SC in MR (8)

Round 2 :

Inc (16)

Round 3 :

SC, Inc (24)

Round 4 :

3SC, Inc (30)

Info :

SlSt into next St. Fold your circle in half to make a half circle, SC around the half circle through both stitches. BO, there is no need to leave a tail for sewing, you will SC the legs into a round of the body.

β€” Back Legs :

Info :

Using Pink (Neapolitan) or Lavendar (Cotton Candy). (Make 2)

Round 1 :

8 SC in MR (8)

Round 2 :

Inc (16)

Round 3 :

SC, Inc (24)

Info :

SlSt into next St. Fold your circle in half to make a half circle, SC around the half circle through both stitches. BO, there is no need to leave a tail for sewing, you will SC the legs into a round of the body.

β€” Tail :

Info :

Using Pink (Neapolitan) or Lavendar (Cotton Candy)

Round 1 :

3 SC in MR (3)

Round 2 :

Inc (6)

Round 3-5 :

SC (6)

Info :

SlSt, BO, there is no need to leave a tail for sewing, you will SC the tail piece into a round of the body.

β€” Head :

Info :

Using Pink (Neapolitan) or Lavendar (Cotton Candy)

Round 1 :

8 SC in MR (8)

Round 2 :

Inc (16)

Round 3 :

SC, Inc (24)

Round 4 :

3SC, Inc (30)

Round 5-8 :

SC (30)

Round 9 :

SC, Dec (20)

Round 10 :

2SC, Dec (15)

Info :

SlSt, leave a long tail for sewing. I leave about 8-9 inches to be safe, but I usually have a lot left over.

Info :

Add eyes and stuff the head. I added my eyes at around rows 5-6 and about 9-10 stitches apart.

β€” Shell/Body :

Info :

Begin with the top ice cream scoop color. Brown (Neapolitan) or Flamingo (Cotton Candy)

Round 1 :

8 SC in MR (8)

Round 2 :

Inc (16)

Round 3 :

SC, Inc (24)

Round 4 :

3SC, Inc (30)

Round 5-9 :

SC (30)

Round 10 :

Working in FLO, 3HDC in each stitch, SlSt into the first HDC and BO (90) *You will not touch this row again*

Round 11 :

Attach the same color yarn with a SC into the first stitch of the BLO of R9 and SC around in the rest of the back loops (30)

Round 12 :

SC, Dec (20)

Info :

Color change to the second ice cream scoop color using your preferred method. White (Neapolitan) or Aqua (Cotton Candy). Add stuffing to the first scoop.

Round 13 :

SC (20)

Round 14 :

SC, Inc (30)

Round 15-19 :

SC (30)

Round 20 :

Working in FLO, 3HDC in each stitch, SlSt into the first HDC and BO

Round 21 :

Attach the same color yarn with a SC into the first stitch of the BLO of R19 and SC around in the rest of the back loops (30)

Round 22 :

Grab your legs and tail, this is the row you will SC your pieces into. You place your pieces in front of the stitches of the body, pushing your hook through the leg/tail first then through the body stitch. When crocheting the legs on, looking down at your work, you want the curve of the leg on your right for the first two legs and on your left for the second two. See photos to help with placement.

Round 22 - Attach Sequence :

3SC. Grab a front leg, attach with 3SC. 4SC. Grab a back leg, attach with 2SC. 1SC. Grab the tail, attach with 4SC. 1SC. Grab the second back leg, attach with 2SC. 4SC. Grab the second front leg, attach with 3SC. 3SC. (30)

Round 23 :

SC, Dec (20)

Info :

Add stuffing

Round 24 :

2SC, Dec (15)

Round 25 :

3SC, Dec (12)

Info :

Add any additional stuffing as desired

Round 26 :

Dec (6)

Info :

SlSt, cut yarn leaving a short tail to sew the hole closed. Weave the yarn tail back and forth into the stitches around then pull tight to close. Tie to secure and weave the rest of the yarn tail into the body.

Info :

Sew the head onto the body. I placed the head on the bottom ice cream scoop, underneath the ruffle of the top scoop and evenly in between the two front legs.

β€” Cone :

Info :

Using tan color (Bernat - Soft Sunshine)

Round 1 :

6SC in MR (6)

Round 2-3 :

SC (6)

Round 4 :

SC, Inc (9)

Info :

Begin lightly stuffing as you go

Round 5-7 :

SC (9)

Round 8 :

2SC, Inc (12)

Round 9-10 :

SC (12)

Round 11 :

2SC, Inc (16)

Round 12-15 :

SC (16)

Round 16 :

SC, Inc (24)

Round 17 :

SC in FLO (24)

Info :

SlSt, BO, leave a long tail for sewing. I leave about 8-9 inches to be safe, but I usually have a lot left over. Add any additional stuffing desired.

Info :

Sew the cone onto the top ice cream scoop slightly off to the side or wherever you prefer. I sew into row 16, so that row 17 is a lip on the cone to add a little more detail; however, feel free to sew into the last row (row 17) if that is your preference.

Assembly Instructions

  • Sew the head onto the bottom ice cream scoop, placing it underneath the ruffle of the top scoop and centered evenly between the two front legs.
  • Attach the legs and tail in Round 22 by positioning the pieces in front of the body stitches and pushing your hook through the leg/tail first then through the body stitch, following the attach sequence provided.
  • Sew the cone onto the top ice cream scoop slightly off to the side, sewing into row 16 to create a lip (row 17) or into row 17 if you prefer a different placement.
  • Weave the short tails used to close holes back and forth through the surrounding stitches, pull tight to close, tie to secure and weave remaining tail into the body for a neat finish.
  • Place safety eyes at around rows 5-6 of the head, spacing them about 9-10 stitches apart before stuffing and closing the head.
  • Pin all pieces in place before final sewing to check symmetry and adjust placement as needed for a balanced finished toy.

Important Notes

  • πŸ’‘If you are not used to using fluffy/chunky yarn, use stitch markers to help you find your stitches and/or rows until you feel comfortable.
  • πŸ’‘Stuff firmly but graduallyβ€”add stuffing before closing scoops and again during body shaping so your toy retains a nice, even shape.
  • πŸ’‘Leave long tails (about 8-9 inches) when fastening off key pieces like the head and cone to make sewing easier and more secure.
  • πŸ’‘Work the 3HDC ridge rows in front or back loops exactly as written to create the ruffled scoop details and textured shell.
  • πŸ’‘When attaching legs, pay attention to the curve direction so the legs sit naturally: curve on the right for the first two legs and curve on the left for the second two.

This adorable Ice Cream Turtle is a delightful mix of plush texture and playful design, perfect for nurseries and handmade gifts. The layered scoops and tiny cone hat give so much character in a small bundle of yarn. Make one in bright cotton candy colors or a classic neapolitan palette to match your style. 🧢🍨🧡

You ask,

we answer.

FAQs

What size will the finished piece be?

The finished amigurumi measures approximately 6 inches long, 6 inches wide, and 7 inches tall when using the recommended bulky yarn and 3.5mm hook.

Can I use different yarn weights for this pattern?

Yes, you can use different yarn weights, but the final size will change; choose an appropriate hook for your yarn and expect differences in texture and size.

Do I need prior crochet experience for this pattern?

This project is intermediate level and uses basic amigurumi techniques plus FLO/BLO and HDC clusters, so familiarity with single crochet, increases, and decreases is helpful.

How long does this project typically take to complete?

Most crocheters complete this project in 5-7 hours, though time may vary depending on familiarity with chunky yarn and assembly experience.