🧢 Beautiful ✨ Detailed πŸ’ Adorable

Harry Potter Amigurumi Pattern

Harry Potter Amigurumi Pattern
4.6β˜… Rating
5-7 Hours Time Needed
1.6K Made This
βœ‚οΈ

Intermediate Level

Ideal for those with basic crochet experience, featuring slightly more advanced stitches and techniques to expand your skills.

⏱️

Weekend Treat

Takes 5-7 hours, making it an enjoyable project to finish over a couple of days.

🧸

Cute Companion

An adorable friend to cherish, handcrafted with love to bring comfort and joy for years to come.

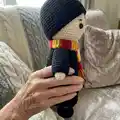
About This Harry Potter Amigurumi Pattern

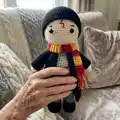
This pattern teaches you how to crochet a Harry Potter inspired amigurumi complete with cloak, striped scarf and embroidered lightning scar. It includes full round-by-round instructions for arms, legs, body, hair, scarf and cloak. The pattern uses DK/light worsted yarn and small hooks to create a neat, dense fabric for stuffing and shaping.

Harry Potter Amigurumi Pattern crochet pattern - detailed view of completed project

You'll find clear color-change notes and placement tips for safety eyes and features. The pattern is designed so you can stuff as you go and assemble with confidence.

Why You'll Love This Harry Potter Amigurumi Pattern

I absolutely love this pattern because it brings a beloved character to life in a compact, huggable form. I enjoy the mix of simple amigurumi shaping with a few fun details like the striped scarf and tiny cloak. Sewing the hair and embroidering the lightning scar always feels rewarding and personal to me. I particularly enjoy the way the color changes and post stitches on the jersey add authentic costume details.

Harry Potter Amigurumi Pattern step 1 - construction progress Harry Potter Amigurumi Pattern step 2 - assembly progress Harry Potter Amigurumi Pattern step 3 - details and accessories Harry Potter Amigurumi Pattern step 4 - final assembly and finishing

Switch Things Up

I love how easy it is to customise this pattern by swapping colours; try pastel stripes or neutral tones for a different look.

You can change yarn weight and hook to make the doll larger or smaller; bulky yarn makes a cuddly version, while fingering yarn makes a tiny collector piece.

I often add embroidery details like glasses frames or tiny patches to personalise each doll even more.

Try using felt for the cloak lining or adding a tiny crocheted wand as an accessory for more character.

If you want posable limbs, insert thin wire into arms and legs before stuffing to create gentle posing ability.

I recommend experimenting with different eye types: safety eyes for durability, or embroidered eyes for baby-safe toys.

To make a set, crochet several dolls with different scarf colours to represent houses or personalised gifts.

Swap the textured stitch for the sweater section to create a ribbed jumper or cable effect if you enjoy surface detail work.

For a weathered look, use a heathered or variegated yarn for the cloak and trousers to add subtle depth.

I sometimes attach a small keyring to the scarf loop to make a mini keychain version of this pattern for market stalls or gifts.

Common Mistakes & How to Fix Them

βœ— Skipping stitch markers during rounds with increases and decreases can make it hard to track stitch counts; use a marker at the start of each round to stay aligned. βœ— Forgetting to stuff gradually will create lumps and uneven shaping; stuff little by little and shape as you go to maintain smooth curves. βœ— Changing yarn color without securing ends can cause loose tails and unraveling; fasten off and weave in ends neatly or carry yarn securely inside the piece. βœ— Not checking safety eye placement before stuffing may ruin facial symmetry; place eyes between the recommended rounds and check spacing before securing.

Harry Potter Amigurumi Pattern

Make your own Harry Potter amigurumi with this complete crochet pattern. You will get clear step-by-step rounds, color changes and assembly notes so you can recreate his cloak, scarf and lightning scar. Perfect for gifting or adding to your handmade collection, this pattern walks you through each piece for a charming finished toy.

Intermediate 5-7 Hours

Materials Needed for Harry Potter Amigurumi Pattern

β€” Main Fabric

  • 01
    DK/Light Worsted Weight yarn (3) acrylic yarn - main choice used in pattern (approx. amounts depend on colours used)
  • 02
    Worsted weight yarn (for larger version) - shown option
  • 03
    Color A: Flesh (skin tone) - small amount for head and hands
  • 04
    Color B: Black - for hair, cloak and boots
  • 05
    Color C: Light grey - for sweater details and jersey work
  • 06
    Color D: Dark grey - for trousers
  • 07
    Color E: Yellow - for scarf stripes and jersey detail
  • 08
    Color F: Red - for scarf stripes and lightning scar

β€” Tools Required

  • 01
    Crochet hook size 3.0 mm
  • 02
    Crochet hook size 2.75 mm (optional for smaller tension)
  • 03
    Safety eyes (optional - can be embroidered instead)
  • 04
    Glasses (prop)
  • 05
    Stuffing (polyester fibrefill)

Progress Tracker

0% Complete

β€” ARMS :

Info :

Using flesh coloured yarn:

Round 1 :

4 sc into magic ring (4)

Round 2 :

4 inc (8)

Round 3-4 :

8 sc (2 rounds)

Info :

Change to light grey coloured yarn:

Round 5 :

8 sl

Round 6 :

8 sc blo

Round 7-14 :

8 sc (8 rounds)

Info :

Fasten off.

β€” BODY STARTING AT FEET, STUFFING AS YOU GO :

Section :

Legs: Using black coloured yarn:

Round 1 :

6 sc into magic ring (6)

Round 2 :

6 inc (12)

Round 3 :

(3 sc, 3 inc) 2 times (18)

Round 4 :

18 sc blo (18)

Round 5 :

18 sc

Round 6 :

2 sc, 7 dec, 2 sc (11)

Info :

Change to dark grey coloured yarn:

Round 7 :

11 sl

Round 8 :

11 sc blo

Round 9-18 :

11 sc (10 rounds)

Info :

Fasten off. Make second leg, but do not fasten off.

Info :

If you are not already at the side of leg with foot facing forward, sc until there. Chain 1 stitch.

Section :

Body

Round 1 :

11 sc around leg that you fastened off (so legs are then attached to each other), 1 sc in ch, 11 sc around second leg, 1 sc in ch (24)

Round 2 :

10 sc, dec, 10 sc, dec (22)

Round 3 :

22 sc

Info :

Sc until at centre of back

Info :

Change to light grey coloured yarn:

Round 4 :

22 sl

Round 5 :

22 sc blo

Info :

Change to yellow coloured yarn:

Round 6 :

22 sc

Info :

Change to light grey coloured yarn:

Round 7-8 :

22 sc (2 rounds)

Round 9 :

5 sc, 1 dec, 9 sc, 1 dec, 4 sc (20)

Round 10-11 :

20 sc (2 rounds)

Info :

Sc to side of body with feet facing forward if not already there

Round 12 :

8 sc around arm, 10 sc on body, 8 sc around other arm, 10 sc on body (36)

Round 13 :

(1 sc, 1 dec) x 12 (24)

Round 14 :

12 dec (12)

Info :

Change to flesh coloured yarn:

Round 15 :

12 sl

Round 16 :

12 sc blo

Round 17 :

12 inc (24)

Round 18 :

24 inc (48)

Round 19-26 :

48 sc (8 rounds)

Info :

Place safety eyes between rounds 24 and 25, making sure they are centre on face and 8 stitches apart.

Round 27 :

(6 sc, 1 dec) x 6 (42)

Round 28 :

(5 sc, 1 dec) x 6 (36)

Round 29 :

(4 sc, 1 dec) x 6 (30)

Round 30 :

(3 sc, 1 dec) x 6 (24)

Round 31 :

(2 sc, 1 dec) x 6 (18)

Round 32 :

(1 sc, 1 dec) x 6 (12)

Round 33 :

dec x 6 (6)

Info :

Fasten off, gather around fasten off stitches and pull tight to close hole at top of head.

β€” HAIR :

Info :

Using black coloured yarn:

Round 1 :

7 sc into magic ring

Round 2 :

7 inc (14)

Round 3 :

(1 sc, 1 inc) (21)

Round 4 :

(2 sc, 1 inc) (28)

Round 5 :

(3 sc, 1 inc) (35)

Round 6 :

(4 sc, 1 inc) (42)

Round 7 :

(5 sc, 1 inc) (49)

Round 8-13 :

49 sc (6 rounds)

Round 14 :

(1 sc, 1 dc, 1 dc, 1 tr, 1 dc, 1 dc, 1 sc) x 7

Info :

Fasten off. Pin hair to head and then sew into place.

Info :

Using red yarn, embroider lightning bolt scar on forehead.

Info :

Working around posts of yellow stitches on jersey, 20 sl stitches in red.

β€” SCARF :

Info :

Using red coloured yarn:

Round 1 :

8 ch and join in a loop

Round 2-5 :

8 sc (4 rounds)

Info :

Using yellow coloured yarn:

Round 6-9 :

8 sc (4 rounds)

Info :

Using red coloured yarn:

Round 10-13 :

8 sc (4 rounds)

Info :

Repeat the previous 8 rounds until you have 13 stripes in total. Fasten off.

Info :

Fold scarf flat, sew together cast on stitches, sew together cast off stitches. Cut eight 10 cm lengths of yellow yarn and eight 10 cm lengths of red yarn. Using one length of red and one length of yellow, fold lengths in half, draw loop through scarf and then pull cut ends through loop.

β€” CLOAK :

Section :

Sleeves (make two): Using black colour yarn

Round 1 :

12 ch and join in a loop

Round 2-11 :

12 sc (10 rounds)

Section :

Main body of cloak: Using black coloured yarn

Row 1 :

21 ch

Row 2 :

starting in second chain from hook 20 sc

Row 3-24 :

1 ch, starting in second chain from hook 20 sc (22 rows)

Row 25 :

1 ch 5 sc, 12 sc around arm, 10 sc, 12 sc around other arm, 5 sc (44)

Row 26 :

1 ch, 22 dec (22)

Row 27-28 :

1 ch, 22 sc (2 rounds)

Row 29 :

1 ch, 11 dec (11)

Info :

Fasten off. Weave in yarn ends.

Assembly Instructions

  • Pin the hair piece to the head to check placement, then sew the hair to the head edge using matching yarn and a yarn needle to secure neatly.
  • Attach safety eyes between rounds 24 and 25, making sure they are centered on the face and 8 stitches apart before securing the backs.
  • Fold the scarf flat and sew the cast-on edges together and the cast-off edges together to create a loop; add fringes by folding pairs of red and yellow lengths and pulling through at each end.
  • Sew sleeves into the cloak arm openings by aligning sleeve stitches with the armhole rows, then sew the cloak to the body along the neckline and shoulders as desired.
  • Weave in all yarn ends and close the top of the head by gathering the remaining stitches and pulling tight, then secure and hide the tail inside the head.

Important Notes

  • πŸ’‘Use a hook two sizes smaller than the yarn label or a 3.0 mm hook to get the firm tension needed for amigurumi shaping.
  • πŸ’‘Stuff pieces gradually as you crochet the body and limbs to ensure smooth, even shaping and avoid lumps.
  • πŸ’‘Place safety eyes before heavy stuffing so you can position them correctly and maintain facial symmetry.
  • πŸ’‘Pin parts together for placement checks before sewing to ensure accurate alignment and a neat finish.

This Harry Potter amigurumi pattern is a delightful project that combines classic amigurumi shaping with charming costume details. The striped scarf, tiny cloak and embroidered lightning scar make it instantly recognizable and full of personality. Whether you make one as a gift or add it to your collection, it will be a treasured handmade keepsake. 🧢✨🧡

You ask,

we answer.

FAQs

What size will the finished piece be?

Approximately 30 cm (12 inches) tall using worsted weight yarn and a 3 mm hook; sizes vary with yarn and hook choice.

Can I use different yarn weights for this pattern?

Yes, you can use different yarn weights, but this will affect final size; adjust your hook size accordingly to maintain the correct tension.

Do I need prior crochet experience for this pattern?

This pattern is rated intermediate, so basic amigurumi experience and familiarity with increases, decreases and colour changes is recommended.

How long does this project typically take to complete?

Most crocheters complete this project in 5-7 hours, though time may vary based on experience level and working pace.