🧢 Beautiful ✨ Detailed πŸ’ Adorable

Granny Square Clutch Pattern

Granny Square Clutch Pattern
4.9β˜… Rating
2-3 Hours Time Needed
3.7K Made This
βœ‚οΈ

Beginner Friendly Level

Perfect for those just starting their crochet journey, with clear instructions and simple techniques

⏱️

Bite-Sized Project

Finishes in 2-4 hoursβ€”perfect for an afternoon of creative relaxation.

✨

Stylish Touch

An elegant detail to elevate any look, combining traditional techniques with contemporary design sensibilities.

About This Granny Square Clutch Pattern

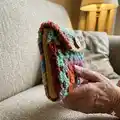
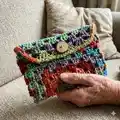
This pattern creates a compact granny-square clutch made from bulky Sutton yarn for a textured, colorful finish. You will crochet a granny square, fold and join it to form the clutch, add a flap, and optionally line it for carrying small items. The instructions include stitch by stitch directions and a stitch chart to guide you.

Granny Square Clutch Pattern crochet pattern - detailed view of completed project

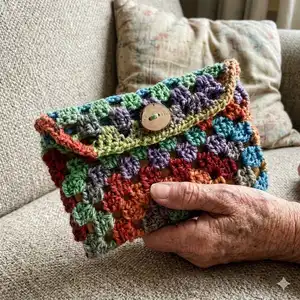
Perfect sized to take to a concert, festival, or anywhere really. The pattern includes assembly notes, a stitch legend, and optional lining instructions.

Why You'll Love This Granny Square Clutch Pattern

I absolutely love this pattern because it turns a classic granny square into a practical, stylish clutch that is quick to make. I enjoy the way bulky yarn highlights each cluster and makes the texture pop with very little effort. It is satisfying to fold and finish the square into a finished bag β€” the transformation always feels like a small magic trick. I also love that the pattern is flexible: you can make the square larger or smaller, add a lining, or choose buttons and trims to personalize it.

Granny Square Clutch Pattern step 1 - construction progress Granny Square Clutch Pattern step 2 - assembly progress Granny Square Clutch Pattern step 3 - details and accessories Granny Square Clutch Pattern step 4 - final assembly and finishing

Switch Things Up

I love experimenting with color sequences; try repeating a two-color striping pattern to give the clutch a bold, modern look.

I often use different yarn weights to change the scale β€” a bulky yarn makes this clutch quick and squishy while a DK yarn will make a finer, daintier version.

I recommend switching hook sizes to alter the drape and final size; going up a hook size creates a looser, slightly larger clutch.

I sometimes add a wrist strap by crocheting a narrow chain strap and sewing it to a corner for hands-free carrying.

If you want a more structured bag, try interfacing the fabric lining or using a heavier cotton fabric for the lining piece.

I like to swap the button for a magnetic snap closure for a sleeker look and faster opening and closing.

Try changing the flap shape β€” make it pointed, curved, or longer for different style effects and closure options.

I enjoy embellishing the flap with embroidery or a small crocheted flower to personalize the clutch.

For a set, make multiple granny squares in coordinating colors and join them to create a larger tote or matching coin pouch.

I often edge the finished clutch with a contrasting single crochet round to frame the colors and give a neat finished look.

Common Mistakes & How to Fix Them

βœ— Skipping stitch markers or not counting clusters can cause uneven sides; mark your starting point and count clusters after each round to keep the square even. βœ— Not making a gauge swatch may result in a clutch that is too large or too small; check the gauge of 3 rows and 9 (3-cluster groups) = 2" and adjust hook size if necessary. βœ— Overstuffing the finished clutch when sewing on the lining will distort seams; insert the lining and pin it, then sew slowly using small stitches for a neat finish. βœ— Pulling chains or stitches too tight when joining rounds can warp the square; maintain an even, relaxed tension and join with a slip stitch without pulling tightly. βœ— Forgetting to fold the square with the right side in can show seams on the outside; always fold with the good side in and turn the clutch inside out after sewing. βœ— Using a button that is too large for the 3-dc cluster gap will not fit; check the space between clusters and choose a button that fits comfortably.

Granny Square Clutch Pattern

Make a colorful, handmade clutch using a classic granny square technique and bulky Sutton yarn. This pattern walks you through creating the square, folding it into a clutch, adding a flap, and optionally lining it for extra durability. Perfect for gifting or taking out for festivals β€” a quick, satisfying project to brighten your day.

Beginner Friendly 2-3 Hours

Materials Needed for Granny Square Clutch Pattern

β€” Main Fabric

  • 01
    Bulky yarn - Sutton by Fair Isle in the color Gummi Bear (as shown)
  • 02
    Bulky weight yarn (substitute any bulky #5 yarn if desired)
  • 03
    Fabric for lining (optional) - cut to size of finished clutch
  • 04
    One button to secure the flap (size should fit between 3-dc clusters)

β€” Tools Required

  • 01
    Crochet hook J/10 - 6 mm
  • 02
    Tapestry needle
  • 03
    Scissors
  • 04
    Sewing needle and sewing thread in a matching color (optional, for lining)
  • 05
    Pins for assembly (optional)

Progress Tracker

0% Complete

β€” Materials :

Info :

Bulky yarn. Sutton by Fair Isle in the color Gummi Bear. Crochet hook: J/10 - 6 mm*. One button. Tapestry needle. Scissors. Fabric (optional). Sewing needle and sewing thread in a matching color (optional).

Info :

Gauge: 3 rows and 9 (3 clusters, 3 dc each) stiches = 2"

Info :

Finished size: This clutch is approximately 9" wide by 5" tall. Your finished clutch might turn out bigger or smaller than this depending on the type of yarn and size of crochet hook you use.

Info :

Abbreviations: ch= chain. st=stitch. sl st = slip stitch. trc = triple crochet. sc = single crochet. dc = double crochet. [ ] repeat from [ to ] as many times as indicated.

Info :

Notes: The foundation of this clutch is a granny square. You can crochet your granny square as big or small as you want your clutch to be. You can find a chart for the granny square in the next page.

β€” Granny square :

Info :

Create a magic ring or adjustable ring.

Round 1 :

Ch 3, 2 dc + ch 2 + 3 dc + ch 2 + 3 dc + ch 2. Join round with a sl st.

Round 2 :

Ch 3, 2 dc into the same place you chained 3 + [ch 1 + (3 dc + ch 2 + 3 dc) into the ch 2 space from the previous round] repeat 3 times + ch 1 + 3 dc into the last ch-2 space from the previous round + ch 2. Join with a sl st.

Round 3 :

Ch 3, 2 dc into the same place you chained 3 + ch 1. Crochet 3 dc into each ch-1 space from the previous round, followed by a ch 1, and (3dc + ch 2 + 3 dc + ch 1) into each corner (a total of 3 times), 3 dc + ch 2 into the last space. Join round with a sl st.

Round 4 to 7 :

You can make the granny square as big as you wish, I made mine 7 rounds big. You only need to remember this: Crochet 3 dc into each ch-1 space. You can use the table as a visual help; Separate the 3-dc clusters with a chain 1 (unless you are working a corner – see next step); Crochet [3 dc + ch 2 + 3 dc] into each corner. The chain 2 is what creates the corners and makes granny 'square'.

Info :

Once you reach the desire size fold the granny square in half (good side in). Slip stitch or sew the shorter sides of the clutch together. Finish off. Weave in ends. Turn clutch inside out.

Round 8 :

For this round, we are going to crochet [3 dc + ch 1] into each ch-1 space from the round below. The edges/folds of the clutch are worked a little bit different (see the two images above). Start the round with a ch 3 and dc into the same space, ch 1, [3 dc into the next space, ch 1]. Repeat until you reach the corner/seam. Crochet 1 dc into the next 3 stitches, ch 1, [3 dc + ch 1] repeat until the end of the round. Finish round with a dc. Join with a sl st.

Round 9 :

Ch 1, sc into each stitch. Join round with a slip stitch. Do not finish off.

β€” Flap :

Row 1 :

Slip stitch into the next stitch, ch 3 + dc into the next 2 stitches + ch 1 + 3 dc into the gap + from the round below + ch 1. Continue crocheting 3-dc clusters + ch 1 (in my case a total of 7 times) until you reach the end of the row. Double crochet into the last 3 stitches.

Row 2 :

Ch 4, turn, [3 dc + ch 1] repeat 5 times, 3 dc, trc into the beginning of row 1.

Row 3 :

Ch 4, turn, [3 dc + ch 1] repeat 4 times, 3 dc, trc into the beginning of row 2.

Row 4 :

Ch 4, turn, [3 dc + ch 1] repeat 3 times, 3 dc, trc into the beginning of row 3.

Row 5 :

(Optional) Single crochet all around the clutch opening and flap. Finish off. Weave in ends.

Info :

With yarn and a tapestry needle sew on a button. Note: You don't need to create a hole for the button. Choose a button size that fits the space between the 3-dc clusters.

β€” Stitch Chart & Legend :

Info :

Stitch Legend: 2 dc in 1 st - 2 double crochet in 1 stitch. 3dc v - 3 double crochet. adjustable ring - adjustable ring. ch - chain. sl st - slip stitch. t-ch3 - triple turning chain.

β€” Lining :

Info :

This step is optional but it is recommended if you intend to carry small items. Fold a piece of fabric in half (good side in), measure and cut a piece as big as your finished clutch. Sew the shorter sides of the fabric by hand or using a sewing machine. Fold over and sew the top edge (opening) to give the lining a finished look. Insert the lining inside of the clutch. Sew the top edge of the lining onto the bag using an invisible stitch.

Assembly Instructions

  • Fold the finished granny square in half with the right side in, align shorter sides and either slip stitch or sew them together to form the clutch body.
  • Turn the clutch inside out after sewing so the good side is on the outside and weave in all loose ends for a neat finish.
  • Crochet the flap following the Row 1-4 instructions, then optionally single crochet around the opening and flap for a tidy edge before finishing off.
  • Position and sew a button on the flap using a tapestry needle and matching yarn; ensure the button size fits the space between the 3-dc clusters so it fastens securely.
  • If adding a lining, fold a piece of fabric (good side in), sew the shorter sides, finish the top edge, insert the lining into the clutch, then sew the top edge of the lining to the bag using an invisible stitch.
  • Pin the lining in place inside the clutch before stitching to ensure even placement and a professional finish.

Important Notes

  • πŸ’‘Use stitch markers or a contrasting stitch to mark the beginning of rounds to keep track of your progress.
  • πŸ’‘Stuff the opening and seam areas lightly with fabric or press flat before sewing to avoid bulky seams when turning the clutch inside out.
  • πŸ’‘Work with consistent tension and test your gauge to ensure the finished clutch measures approximately 9" by 5" as shown.
  • πŸ’‘Choose a button that comfortably fits the gap between the 3-dc clusters so you do not need to cut a hole through the crochet fabric.

This granny square clutch pattern turns a classic motif into a chic, wearable accessory you can make in an afternoon. The bulky yarn shows off each cluster and gives the bag a beautiful texture and structure. Add a lining and a button to make it ready for everyday use. 🧢✨

You ask,

we answer.

FAQs

What size will the finished piece be?

The clutch is approximately 9" wide by 5" tall when made with the recommended bulky yarn and a J/10 - 6 mm hook.

Can I use a different yarn weight for this pattern?

Yes, you can substitute yarn weights, but this will change the finished size; make a gauge swatch and adjust the hook size to match the intended dimensions.

Do I need prior crochet experience to make this clutch?

This pattern is beginner friendly, but familiarity with basic stitches (chain, double crochet, slip stitch) and reading a simple chart will help you follow the instructions easily.

How long does this project typically take to complete?

Most crocheters finish this clutch in about 2-3 hours, depending on experience and whether you choose to add a lining or additional finishing details.

Is the lining necessary?

The lining is optional but recommended if you plan to carry small items; it provides extra durability and prevents things from slipping through the granny clusters.