🧢 Beautiful ✨ Detailed πŸ’ Adorable

Ginanita Bag Pattern

Ginanita Bag Pattern
4.1β˜… Rating
5-7 Hours Time Needed
2.5K Made This
βœ‚οΈ

Intermediate Level

Ideal for those with basic crochet experience, featuring slightly more advanced stitches and techniques to expand your skills.

⏱️

Weekend Treat

Takes 5-7 hours, making it an enjoyable project to finish over a couple of days.

✨

Stylish Touch

An elegant detail to elevate any look, combining traditional techniques with contemporary design sensibilities.

About This Ginanita Bag Pattern

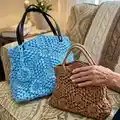
This pattern creates the Ginanita Bag, a crochet handbag made from combining 11 granny hexagon motifs. The motif uses popcorn stitches, double crochet clusters and chain spaces to create a floral hexagon that joins into a bag body. The instructions include every hexagon round, measurements for a handbag size, joining sequence, edging and full handle instructions.

Ginanita Bag Pattern crochet pattern - detailed view of completed project

You can follow the written rounds and photos to make each hexagon, then join them in the specified 1-2-5-2-1 layout. The guide includes two yarn/hook size options for handbag or tote outcomes and attachment methods for handles.

Why You'll Love This Ginanita Bag Pattern

I absolutely love this pattern because the hexagon motif is both decorative and structural, giving the bag a beautiful textured surface that feels substantial without being heavy. I enjoy the rhythm of working the popcorn clusters and watching each motif bloom into a hexagon. The joining layout is clever β€” arranging 11 motifs into a wearable bag is so satisfying and gives a lovely finished silhouette. I also love that you can make a small handbag or scale up to a tote simply by choosing a different yarn weight and hook.

Ginanita Bag Pattern step 1 - construction progress Ginanita Bag Pattern step 2 - assembly progress Ginanita Bag Pattern step 3 - details and accessories Ginanita Bag Pattern step 4 - final assembly and finishing

Switch Things Up

I love how easy it is to customize this pattern by changing yarn and hook size β€” using DK yarn with a 5/0 (3.0mm) hook gives you a roomier tote version.

If you want a mini keychain version, use fingering yarn and a smaller hook to create tiny motifs that still show the popcorn texture.

Try alternating two colors every other round for a striped hexagon look, or make each hexagon a different color for a mosaic bag effect.

I often add a fabric lining and an inside pocket to make the bag more functional and to protect small items from slipping through the motif holes.

Swap the crocheted handles for leather or wooden handles for a more polished, shop-ready bag β€” just be sure to reinforce the attachment points well.

Consider adding beads or embroidery to the center of each hexagon for a subtle sparkle or personalized detail.

Adjust the number of hexagons or the joining layout to change the bag shape β€” for example make a longer rectangle or a square panel by adding or removing motifs.

Use different edging options: a simple SC border for a clean look, or a decorative picot or scallop edge for a feminine finish.

I also like to experiment with joining methods β€” whip stitch gives a neat seam, but mattress stitch or join-as-you-go can make different textures and reduce sewing.

If you want more structure, add a thin interfacing or sew in a fabric base before attaching handles to improve stability for heavier contents.

Common Mistakes & How to Fix Them

βœ— Not counting stitches after each round can cause the hexagon shape to distort; always verify the stitch count at the end of each round and correct any missing or extra stitches before proceeding. βœ— Skipping the slip stitch placement when joining rounds leads to uneven pattern flow; place your slip stitch exactly as written to align popcorn clusters and chain spaces correctly. βœ— Working popcorn stitches too tightly will make them small and hard to form; keep moderate tension and drop the loop as instructed, then pick up the dropped loop to close the popcorn gently. βœ— Joining hexagons with different tension results in gaps or puckering when assembled; use the same yarn and consistent tension and pin pieces before whip stitching to ensure even joins. βœ— Attaching handles without checking placement can result in an off-balance bag; mark and measure handle positions before sewing and sew securely with back-and-forth stitches.

Ginanita Bag Pattern

Make a beautiful Ginanita Bag using 11 joined granny hexagons and a textured popcorn stitch motif. This pattern walks you through every hexagon round, joining layout, edging and handle construction so you can create a sturdy handbag or tote. Clear photos and step-by-step instructions make it easy to follow whether you want a compact handbag or a larger tote.

Intermediate 5-7 Hours

Materials Needed for Ginanita Bag Pattern

β€” Main Fabric

  • 01
    Fine weight yarn for handbag: Hazelnut (approx. 560 yards / 510 meters per skein) - use Hook 4/0 (2.5mm)
  • 02
    Double Knit (DK) weight yarn for tote size: Stylecraft Special DK (approx. 560 yards / 510 meters per skein) - use Hook 5/0 (3.0mm)
  • 03
    Additional small amounts of contrasting yarn for decorative tassels or motifs (optional)

β€” Tools Required

  • 01
    Crochet hook size 4/0 (2.5mm) for fine-weight handbag
  • 02
    Crochet hook size 5/0 (3.0mm) for DK-weight tote
  • 03
    Scissors
  • 04
    Tapestry needles for sewing and weaving ends
  • 05
    Stitch markers (optional)
  • 06
    Measuring tape or ruler
  • 07
    Needle for whip stitch joining (sewing needle)
  • 08
    Handles (crocheted handles, leather, wood or metal handles) or materials to make handles
  • 09
    Pins for positioning pieces during assembly

Progress Tracker

0% Complete

β€” Written Pattern :

Round 1 :

MR + 12 SC (12 sts)

Round 2 :

5 CH + (1 DC + 2 CH) x 11 (36 sts)

Round 3 :

Slip Stitch to 2CH space + {(1 Popcorn + 1 DC in 2CH space) + 2 CH } x 12 (48 sts)

Round 4 :

Slip Stitch to 2CH space + (1 SC in 2CH space + 5 CH) x 12 (72 sts)

Round 5 :

Slip Stitch to 5CH space + {(1 Popcorn + 1 DC in 5CH space) + 2 CH + (Corner : 3DC + 2CH + 3DC in next 5CH space) + 2 CH } x 6 (84 sts)

Round 6 :

Slip Stitch to 2CH space + {(1 Popcorn + 1 DC in 2CH space) + 2 CH + (3DC + 2CH + 3DC in corner space) + 2 CH + (1 Popcorn + 1 DC in 2CH space + 1 CH)} x 6 (102 sts)

Round 7 :

Slip Stitch to 2CH space + {(1 Popcorn + 1 DC in 2CH space) + 2 CH + (3DC + 2CH + 3DC in corner space) + 2 CH + (1 Popcorn + 1 DC in 1CH space) + 1 CH) x2} x 6 (120 sts)

Info :

Diagram pattern is provided in the PDF for visual reference to rounds and stitch placement. Use the diagram along with the written rounds for clarity.

β€” Hexagon Measurement :

Info :

Hexagon measurement for handbag: Size corner to corner is 14cm. Size side to side is 12cm. These measurements correspond to the 7-round hexagon when worked with the recommended yarn and hook (handbag size).

β€” How To Form the Bag :

Step 1 :

Make 11 hexagons according to the pattern (complete rounds 1-7).

Step 2 :

Arrange them like this picture layout: (1-2-5-2-1) to form the bag panel.

Step 3 :

Combine 11 hexagons with needle and the same color yarn using a whip stitch technique. Combine the sides starting from the bottom, in number order (1-1, 2-2, 3-3) as shown in the joining sequence diagram.

Info :

Whip stitch in sequence based on the joining picture provided; top of front and back side is tapered, top of right and left sides are straight. Pin pieces first to ensure correct alignment.

Step 4 :

After joining all hexagons, you will have a single panel ready to fold and seam to form the bag body; the finished combined piece is shown in the photos (wrong side and right side views provided).

β€” How To Make an Edge :

Step 1 :

Make 2 rows of SC at the top of bag as you want to create a neat top edge.

Step 2 :

Make a row of Crab Stitch (reverse single crochet) for a firm finished edge.

β€” How To Make Handle :

Diagram :

Follow the handle diagram pattern provided: chain the desired length (60-80 CH recommended) then work HDC rows with increases at the oval ends to create a thick rounded handle. The legend includes CH and HDC and 2 HDC increases.

How To Attach Handle :

1) Make 2 pieces of crochet handle according to pattern (like making an oval base). You can make 60-80 CH or your desired length. 2) Sew the ends of the handles to the bag using matching yarn and secure stitching; look at picture for placement. 3) Do the same to the second piece on the other side of the bag.

Info :

*PS: You also can use any handle made of wood, leather, iron or other materials. You can create a spiral model handle as shown in the photos. Video tutorials for spiral handles and the full Ginanita Bag are linked in the pattern.

Assembly Instructions

  • Make 11 hexagons following the 7-round written motif, then arrange them in the layout 1-2-5-2-1 before joining.
  • Combine hexagons using a whip stitch with the same color yarn, starting from the bottom and joining sides in the numbered order (1-1, 2-2, 3-3) to match the joining diagram.
  • Fold and seam the joined panel to form the bag body, then add two rows of single crochet along the top opening and finish with a crab stitch edging.
  • Make two crocheted handles (or prepare purchased handles), measure and mark handle placement, then sew the handle ends securely to the bag with matching yarn using back-and-forth stitches.

Important Notes

  • πŸ’‘Use the same yarn and consistent tension across all 11 hexagons to ensure even size and proper matching when joining.
  • πŸ’‘Pin hexagons in place and check alignment before whip-stitching to avoid misaligned seams or gaps between motifs.
  • πŸ’‘Measure a finished hexagon (corner-to-corner and side-to-side) early to confirm tension and gauge; adjust hook size if necessary for correct bag dimensions.
  • πŸ’‘Work popcorn clusters with moderate tension and follow the drop-and-pick-up step so popcorns close neatly and stay visible.
  • πŸ’‘Sew handles firmly and reinforce attachment points with extra stitches for durability, especially if the bag will carry weight.

This Ginanita Bag pattern guides you from the first magic ring to a fully assembled handbag made from 11 granny hexagons, with clear photos and diagrams to help every step. Whether you make the small handbag with fine yarn or scale up to a tote with DK yarn, the popcorn hexagon gives a lovely textured finish. Enjoy crafting this unique bag and make it your own with color and handle choices! πŸ§ΆπŸ‘œ

You ask,

we answer.

FAQs

What size will the finished piece be?

Using fine weight yarn and hook 4/0 (2.5mm) the finished hexagon measures approximately 14cm corner-to-corner and 12cm side-to-side; 11 hexagons joined as instructed make a handbag roughly the size shown in photos.

Can I use different yarn weights for this pattern?

Yes, you can use DK weight yarn with hook 5/0 (3.0mm) to make a larger tote; be aware that the hexagon measurements and final bag size will change, so adjust motif count or handle length accordingly.

Do I need prior crochet experience for this pattern?

This pattern is rated intermediate because it uses popcorn stitches, cluster shaping and careful joining of motifs; comfortable knowledge of basic stitches (SC, DC, CH, SL ST) is recommended.

How long does this project typically take to complete?

Most crocheters complete this project in 5-7 hours for a handbag (varies by experience and yarn choice); making and joining 11 motifs plus edging and handles fits well into a weekend project.