🧢 Beautiful ✨ Detailed πŸ’ Adorable

The Camera Crochet Bag & Purse Pattern

The Camera Crochet Bag & Purse Pattern
4.3β˜… Rating
5-7 Hours Time Needed
3.8K Made This
βœ‚οΈ

Intermediate Level

Ideal for those with basic crochet experience, featuring slightly more advanced stitches and techniques to expand your skills.

⏱️

Weekend Treat

Takes 5-7 hours, making it an enjoyable project to finish over a couple of days.

✨

Stylish Touch

An elegant detail to elevate any look, combining traditional techniques with contemporary design sensibilities.

About This The Camera Crochet Bag & Purse Pattern

This pattern teaches you how to crochet a camera-shaped bag and matching cover with a realistic lens and viewfinder. It includes instructions for the bag body, removable cover, strap, two-part lens, and felt viewfinder pieces. The design is worked mostly in single crochet in joined rounds for a neat, dense fabric.

The Camera Crochet Bag & Purse Pattern crochet pattern - detailed view of completed project

Finished size is approximately 21 cm x 21 cm (8 x 8 inches) using DK/light worsted yarn. The pattern uses simple shaping and clear round-by-round instructions to achieve the camera look.

Why You'll Love This The Camera Crochet Bag & Purse Pattern

I absolutely love this pattern because it turns everyday crochet stitches into a playful, wearable accessory that sparks compliments. I enjoy how quickly the bag comes together while still offering fun details like a layered felt viewfinder and two-part lens. I love that you can customize colors and strap width to match your wardrobe or give it as a thoughtful handmade gift. I find the assembly steps satisfying β€” placing the lens, sewing on the cover and buttons transforms the flat pieces into a finished statement piece.

The Camera Crochet Bag & Purse Pattern step 1 - construction progress The Camera Crochet Bag & Purse Pattern step 2 - assembly progress The Camera Crochet Bag & Purse Pattern step 3 - details and accessories The Camera Crochet Bag & Purse Pattern step 4 - final assembly and finishing

Switch Things Up

I love personalizing this camera bag by changing the color palette to match my wardrobe; switching Color A to a neutral or a bright pop color completely alters the vibe.

I sometimes make the bag larger by using worsted or aran weight yarn and a larger hook β€” that creates a roomier purse perfect for daily essentials.

I like to add a lining for extra structure; sew a simple fabric lining with pockets before attaching the zipper for a clean interior finish.

Try substituting the zipper with magnetic snaps or a button closure for a different look and easier opening depending on your needs.

I often change the strap style: use a wider strap worked in single crochet rows for comfort, or make a thin braided strap for a delicate look.

Embroidery can add personality β€” stitch a small name, date, or initials on the back or inside the cover to personalize each bag.

Mix and match felt colors for the viewfinder to create a retro or modern camera aesthetic; contrast stitching in a bright color makes the details pop.

For a more rugged or vintage look, use cotton rope or faux leather for the strap and stitch it securely to the bag ends.

I recommend experimenting with different button styles β€” wooden, metal or decorative β€” to complete the bag’s character.

When I give these as gifts, I tailor the strap length and color to the recipient and add a small crocheted charm that coordinates with the bag for a special finishing touch.

Common Mistakes & How to Fix Them

βœ— Skipping the foundation chain count can cause uneven edges and mismatch when joining; count your chains carefully and recount before starting the first round. βœ— Not turning and working around the base chain correctly will change your stitch count and shape; follow the instruction to turn sideways and work along the other side of the chain to reach the correct stitch total. βœ— Cutting yarn tails too short makes sewing pieces together difficult; leave the recommended long tail (30–50 cm) to sew secure joins and attachments neatly. βœ— Forgetting to change color neatly when switching to the cover color creates visible gaps; finish the last stitch of the old color and pull through the new color on the final yarn over to secure a tidy join. βœ— Sewing felt pieces without pinning first can lead to misaligned viewfinder details; pin or baste the felt layers to the cover before stitching to ensure correct placement. βœ— Not testing strap width or length may result in an uncomfortable fit; crochet a small sample strap and try it on to adjust rows and width before finishing the full strap.

The Camera Crochet Bag & Purse Pattern

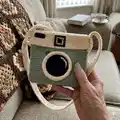
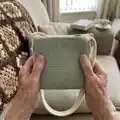
Make a charming camera-shaped crochet bag and purse that doubles as a stylish accessory. This pattern guides you through a textured bag body, removable cover, strap, and realistic lens details. You will love the small details like the felt viewfinder and wooden button that finish the look. Perfect for gifting or making a statement with your handmade style.

Intermediate 5-7 Hours

Materials Needed for The Camera Crochet Bag & Purse Pattern

β€” Main Fabric

  • 01
    100% acrylic DK / Light Worsted yarn (main yarn weight)
  • 02
    Color A - approx. 80g (main body color, shown as green in sample)
  • 03
    Color B - approx. 60g (cover and trim color, shown as cream in sample)
  • 04
    Black - approx. 20g (lens center and small details)
  • 05
    Black and white felt for viewfinder details (sizes shown in pattern: 01, 02, 03, 04)
  • 06
    Black plastic zipper ~9 inch (or magnetic snaps as an alternative)
  • 07
    Wood button approx. 15-20 mm
  • 08
    Embroidery thread (black and white) for stitching felt and details

β€” Tools Required

  • 01
    Crochet hook 3.75 - 4.5 mm (US F-5, G-6, 7)
  • 02
    Felt (black and white) for viewfinder pieces
  • 03
    Black plastic zipper ~9 inch (or magnetic snaps sew on)
  • 04
    Wood button ~15-20 mm
  • 05
    Embroidery thread (black and white)
  • 06
    Yarn needle for sewing and finishing
  • 07
    Embroidery needle for felt details
  • 08
    Scissors

Progress Tracker

0% Complete

β€” Bag :

Info :

Color A, Start from base, Base chain – sl knot, chain 35.

Round 1 :

sc 2 into 2nd chain from hook, sc each ch on next 32 sts, sc 3 on next ch (the first ch of the base chain). Turn sideways and continue along another side of the base chain, sc each ch on next 33 sts, slst to the ch st at the beginning round. (70)

Round 2 :

ch 1, [*sc on next st, sc 2 on next st, sc each on next 32 sts, sc 2 on next st,] * 2 times, slst, then sl st(slip stitch) around, slst to the sc st at the beginning round. (74)

Round 3-21 :

ch1, sc around ,slst, then slst around, slst to the sc st at the beginning round. (74)

Round 22 :

Color B, blsc around , slst. (74)

Round 23-24 :

ch1, sc around , slst. (74)

Info :

Fasten off, weave the yarn end.

β€” Camera Lens #1 :

Round 1 :

Black, 9 sc in Magic Ring, slst. (9)

Round 2 :

ch 1, (inc) *9 times, slst. (18)

Round 3 :

ch 1, (sc 1, inc) *9 times, slst. (27)

Round 4 :

ch 1, (sc 2, inc) *9 times, slst. (36)

Round 5 :

ch 1, Black (sc 3, inc) *2 times, White (sc 3, inc) *2 times, Black (sc 3, inc) *5 times, slst. (45)

Round 6 :

ch 1, (sc 4, inc) *9 times, slst. (54)

Round 7 :

White, ch 1, sc around, slst. (54)

Info :

Fasten off, weave the yarn end. Leave the back yarn ~30cm.

β€” Camera Lens #2 :

Info :

White, Start from chains 54, slst to close circle. (54)

Round 1 :

ch 1, sc around, slst. (54)

Info :

Fasten off, leave the yarn ~30 cm. Sew to the lens #1.

β€” Strap :

Info :

Color B, sl knot, chain 4. (leave the yarn ~25-30 cm.)

Row 1 :

sc into 2nd chain from hook, sc each ch on next 2 sts, turn. (3)

Row 2-200 :

Ch1, sc across, turn. (3)

Info :

Fasten off, leave the yarn ~25-30 cm. You can adjust the wide strap from sc 3 - sc 5. The length also you can adjust the row form your body.

β€” Cover :

Info :

Color B, Start from base, Base chain – sl knot, chain 35. (35)

Round 1 :

sc 2 into 2nd chain from hook, sc each ch on next 32 sts, sc 3 on next ch (the first ch of the base chain). Turn sideways and continue along another side of the base chain, sc each ch on next 33 sts, slst to the ch st at the beginning round. (70)

Round 2 :

ch 1, [*sc on next st, sc 2 on next st, sc each on next 32 sts, sc 2 on next st,] * 2 times, slst, then sl st(slip stitch) around, slst to the sc st at the beginning round. (74)

Round 3-8 :

ch1, sc around ,slst, then slst around, slst to the sc st at the beginning round. (74)

Info :

Fasten off, leave yarn ~50 cm. Sew to the bag.
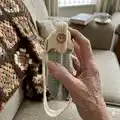
β€” Viewfinder felts :

Infos :

Cut felt pieces as follows: 01: 3.7x3.7 cm (black square). 02: 2.4x2.4 cm (white square). 03: 1.5x1.5 cm (black square). 04: 3.7x1.5 cm (black rounded rectangle). Layer and stitch the pieces as shown in the photos to form the viewfinder and sew onto the centre of the cover.

β€” Assembly :

Step 1 :

Color A, start from the base, Rnd.2, then slst around.

Step 2 :

Crochet follow the pattern.

Step 3 :

Finished rnd.21.

Step 4 :

Color B, Crochet follow the pattern (rnd.22-24).

Step 5 :

Sew the viewfinder felts onto the cover (middle).

Step 6 :

The cover.

Step 7 :

Sew the zippers.

Step 8 :

Mark the lens into the right position.

Step 9 :

Sew the lens.

Step 10 :

Sew the cover.

Step 11 :

Sew the strap left and right side.

Step 12 :

Last, sew the wood button into the left lens position.

Assembly Instructions

  • Attach the cover to the front of the bag by aligning the cover edge with the bag opening and sewing with the long tail left from the cover (leave ~50 cm) using a whipstitch for an even seam.
  • Position the layered felt viewfinder pieces at the middle of the cover and secure with pins, then sew the felt pieces in place with contrasting embroidery thread using small neat stitches.
  • Place the two-part camera lens (lens #1 and lens #2) together, align them on the bag front and sew through the back yarn tails (~30 cm) to secure the layered lens firmly to the bag.
  • Sew the zipper into the top opening of the bag or attach magnetic snaps as an alternative, ensuring the zipper tape sits behind the top edge and is evenly aligned.
  • Fold and sew the strap ends to the left and right side edges of the bag, reinforcing with several passes of thread to make a strong attachment able to carry the bag weight.
  • Sew the wooden button into the small left-side felt lens position as the final decorative detail, using a short tail of yarn and secure knots.
  • Weave in all ends and press felt pieces flat after stitching for a neat, finished look.

Important Notes

  • πŸ’‘Work with consistent tension to produce an even fabric; inconsistent tension will change final measurements and fit.
  • πŸ’‘Leave long yarn tails where instructed (30-50 cm) to make sewing parts together easier and neater.
  • πŸ’‘Pin all decorative felt pieces and the cover before sewing to check placement and symmetry on the finished bag.
  • πŸ’‘Adjust strap width (sc 3 to sc 5) and the number of strap rows to fit your body height and wearing preference.

This Camera Crochet Bag & Purse Pattern combines playful design with practical function, perfect for handmade gifting or a unique everyday accessory. The layered lens, felt viewfinder and tiny details such as the wood button make it charming and personalized. Finish it in your favorite colorway and enjoy a one-of-a-kind piece that turns heads. 🧢✨

You ask,

we answer.

FAQs

What size will the finished piece be?

The finished bag measures approximately 21 cm (8 inches) wide by 21 cm (8 inches) high when using the recommended DK/light worsted yarn and specified hook size.

Can I use different yarn weights for this pattern?

Yes, you can use different yarn weights, but the finished size and stitch counts will change; choose an appropriate hook size for your yarn and adjust chain counts as needed.

Do I need prior crochet experience for this pattern?

This pattern is rated intermediate and assumes you are comfortable with single crochet, increases, slip stitch joins and changing colors.

How long does this project typically take to complete?

Most crocheters complete this project in 5-7 hours, though time may vary based on experience level, customization and assembly time.

How should I attach the felt viewfinder securely?

Pin the felt layers in place, then stitch through all layers with embroidery thread using small running stitches around the edges to secure them to the cover.