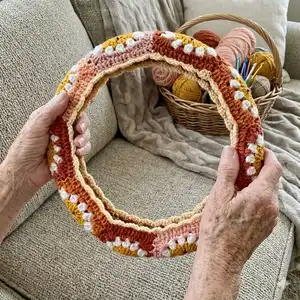
Make a bright, cheerful crocheted steering wheel cover and matching seat belt cover that add personality to your car. This pattern uses small daisy squares joined into a stretchy band to fit most 14.5-15" steering wheels. You will enjoy joining-as-you-go squares, a ruffled trim, and embroidered smiley faces for a playful finish. Perfect for gifting or personalizing your ride with color and texture.
Progress Tracker
0% Complete
— Materials :
Info :
Required - US 3.5mm crochet hook. US 5mm crochet hook. 275 yards of 4 medium weight yarn. Tapestry needle
Info :
Optional – 3, ¾ Inch buttons if making a seatbelt cover (3 buttons per cover). Thread. Sewing needle
Info :
Gauge (one square) = 3.5 x 3.5"
Info :
**Made to fit a steering wheel with a 14.5-15 inch diameter.
— Stitches and Abbreviations Used :
Info :
*Pattern is written in US terms Chain – Ch Stitch or Stitches – st or sts Single Crochet – SC Half Double Crochet - HDC
Info :
Double Crochet – DC Slip Stitch – Sl or Sl st Cluster Stitch – Cluster Magic Circle
— Special Stitches :
Infos :
Cluster Stitch: It will start like you are going to work a DC into a stitch. Yarn over, insert hook into the stitch, yarn over, pull through, yarn over, pull through the first 2 loops on your hook. Instead of yarning over again and pulling through the last two loops like a normal DC, you will yarn over again and insert your hook into the stitch. Yarn over, pull through. Then you will yarn over again and pull through the first two loops on your hook. Leaving you with 3 loops on your hook. You will repeat this again 2 more times until there are 5 loops total on your hook. When you have 5 loops on your hook, yarn over and pull through all 5 loops. Ch 1 to secure the cluster st. Further explained:
Info :
1. Yarn over, insert hook into st, yarn over, pull through, yarn over pull through first two loops on your hook (2 loops left on hook)
Info :
2. Yarn over, insert hook into st, yarn over, pull through, yarn over pull through first two loops on your hook (3 loops left on hook)
Info :
3. Yarn over, insert hook into st, yarn over, pull through, yarn over pull through first two loops on your hook (4 loops left on hook)
Info :
4. Yarn over, insert hook into st, yarn over, pull through, yarn over pull through first two loops on your hook (5 loops left on hook)
Info :
5. Yarn over and pull through all 5 loops on hook
Info :
6. Ch 1 to secure the cluster st.
— Steering Wheel Cover :
Info :
I like to draw out the order or the colors I want to use before I start so that I do not get confused with the order. So for example, this is the color pattern I will be following for the steering wheel cover in this pattern.
— First Square :
Info :
Note: This part is worked in the round. After the first square, we will start joining as we go so it will be slightly different.
Info :
To make the steering wheel cover you will make a total of 10 flowers.
Round R1 :
R1(starting with the color you would like the smiley faces) - With a 3.5 mm hook (or whatever size you need to meet the gauge size), start a magic circle. From the circle Ch up 3, this will count as your first DC. Then in the circle work 11 DC. Leaving you with a total of 12 DC including your first ch 3. Finish the circle by slip stitching on to the top of the ch 3.
Round R2 :
R2 – Ch up 3 and in the same st work a DC. Then in the remaining 11 sts work 2 DC in each. Leaving you with 24 sts total including the ch 3. Sl st into the top of the ch 3. Cut yarn and fasten off.
Round R3 :
R3 (this is the daisy part of the square, pictured in white) - Join the new yarn color in any st, and you are going to start a cluster st. The first cluster st will be different then the following 11. For the first cluster st, Ch 3, *yarn over, insert hook into the space, yarn over pull through, yarn over, then pull through the first 2 loops on the hook*, repeat 2 more times. There should be 4 loops on your hook. Yarn over, pull through all 4 loops, then ch 2. For every cluster st after the first one you will do the same process until you have 5 loops on your hook instead of 4.
Info :
Skip the next st, then in the following st place another cluster st.
Info :
You will continue by working a cluster stitch in every other st around the circle and chaining 2 in between each one. (12 Cluster sts in total). Sl into the top of the first cluster st, cut yarn, and fasten off.
Info :
You will make 10 of these total.
Round R4 :
R4 (This will be the base color of the square) - Join new color yarn In a ch 2 space in between cluster sts. ch up 3, then work 2 DC in the same space. This will be the start of the corner of the square. *Moving on to the next space work 3 HDC. In the following space you work 3 more HDC. In the next space you will start the second corner by working 3 DC, ch 2, and work 3 more DC, leaving you with 6 DC total in the corner. * Repeat until you reach the final space where you placed the first 3 DC. In that space add 3 more DC, ch 2, and sl st into the top of the ch 3. Cut yarn and fasten off.
Info :
Each square follows the pattern of 3DC, 3HDC, 3HDC, 3DC, ch 2, 3DC in the same space, 3HDC, 3HDC, 3DC, ch 2, 3DC in the same space, 3HDC, 3HDC, 3DC, ch 2, sl st into first DC.
— Attaching the Squares :
Info :
Note: Alternatively, instead of using the “join as you go” method of attaching the squares you can sl st your squares together, sc them together, or use any method you prefer for joining squares. The reason I like to use the “join as you go” method is because not every stitch is attached, it gives some stretch at the end to the steering wheel cover, making it fit easier.
Info :
Adding New Squares:* In the top left corner of your first finished square join your yarn and pull up a loop.
Instruction :
Grab one of the completed daisies. You will then place 3 DC in between 2 of the cluster sts on the new daisy.
Instruction :
Then going back to your finished square, you will sl st on to the space inbetween the corner and the set of 3 HDC. This is how you will connect the 2 squares.
Instruction :
HDC 3 in the next space on the new daisy, then sl st into the next space of the original square. Repeat once more by working 3 HDC in between the next 2 cluster sts, then sl st into the next space of your original square.
Instruction :
Finish the side by working 3 DC in between the next cluster sts, then slip st into the ch 2 space in the corner of the original square.
Info :
* Repeat this process until you get to the last square (the 10th square).
— Joining the Final Square :
Info :
Joining the Final Square: You will start the exact same way as all the other squares.
Instruction :
In the top left corner of your finished square join your yarn and pull up a loop. Grab the final daisy. You will then place 3 DC in between 2 of the cluster sts on the new daisy.
Instruction :
Then going back to your finished square, you will sl st on to the space inbetween the corner and the set of 3 HDC.
Instruction :
Place 3 HDC in the next space on the new daisy, then sl st into the next space of the original square. Repeat once more by working 3 HDC in between the next 2 cluster sts, then sl st into the next space of your original square.
Instruction :
Finish the side by working 3 DC in between the next cluster sts, then slip st into the ch 2 space in the corner of the original square.
Instruction :
Continue with the next side as normal - 3DC, 3HDC, 3HDC, 3DC. Once you are on the top side of the square it will be the same process you have been doing to join the squares, but you will be joining the top of your new square to the bottom of your very first square.
Info :
Finish the final side as normal: 3DC, 3HDC, 3HDC, 3DC, then sl st into the corner of the square to the left. Now all your squares should be a continuous circle!
— Trim :
Info :
Trim: Note - You can choose to do this one solid color or match the color of each of your squares. I decided to change colors each square to match, but you could do just one color all the way around if you would like.
Instruction :
With a 5mm hook, Starting anywhere on one of the sides of the wheel cover you will attach your yarn then ch 3.
Instruction :
In every st all the way around place a DC. When you get to the corners/ch 2 space of every square place 1 DC. After you return to your start, sl st into the top of the ch 2.
Info :
CHANGING COLORS - If you are wanting to change the color for each square you will DC in each st as normal, then when you get to the end of the square/ch2 space you will START a DC by yarning over, inserting your hook into the ch 2 space, yarning over and pulling through, yarn over and pull through the first 2 loops on your hook. Then you will not finish it as normal, but you will pick up the color of the next square over and pull through. Then place a DC with the new color.
— Ruffle :
Instruction :
Ruffle: Join new yarn color (or continue up from your trim color), ch 1, sc in the same st, *skip 1 st, then in the following st work 3 dc.
Instruction :
Then skip a st, in the next st work a sc.*
Instruction :
You will repeat all the way around by skipping a st, working 3 DC in the same st, skipping a st, then in the next st placing a sc.
Instruction :
Once you return to the start, sl st into the first ch you made, cut yarn, and fasten off. Repeat for the opposite side. Weave in any loose ends to finish.
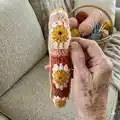
— Seat Belt Cover :
Instruction :
Step 1: With your 3.5mm hook, make 2 daisies (yellow center + petals), then attach them together just like you did previously in step of ‘attaching the squares’.
Instruction :
Step 2: Switch to your 5mm hook and work one DC in every st around the steering wheel cover. For every corner/ch 2 spaces you will place 2 DC, ch 2, then place 2 DC in the same space.
Instruction :
Step 3: With the seatbelt cover laying horizontally, start in the top right corner of the right square and work a row of ruffles, just like on the steering wheel cover. Do so by chaining 1 in the corner, sc in the same space, skip a st, then place 3 DC in the same st. repeat until you get to the end of the side.
Instruction :
Once you reach the end of the side, finish off your ruffle by placing your sc in the corner. Continue on by placing a sc in each st around the seat belt cover. In each corner/ch 2 place 2 scs.
Instruction :
Step 4: Sew on your 3 buttons with a sewing needle and thread. Make sure they are very Secure. I typically loop my thread through my button about 10 times just to be safe. You will sew on a button on the top left corner of your top square, a button in between the 2 squares on the left side, and then one on the bottom left corner of the bottom square. The buttons are able to fit through the gaps of the ruffles on the opposite side to put on your Seatbelt.
Instruction :
Step 5: Weave in any loose ends and you are done!
— Adding the Smiley Faces :
Info :
Adding the Smiley Faces: To add the smiley faces you will need a tapestry needle. I like to add them as the very last step, but it is totally up to you.
Instruction :
To start the face, you will insert the tapestry needle with black yarn from the back side of the circle through the front. You will do so in between the cluster sts pictured, about half way down the outside row of DCs Then insert your needle back through to the other side just below the top of the middle circle. This is your first eye.
Instruction :
To then start the smile lines, insert your needle about a centimeter down from the eye, half way through the middle circle. Then st across to half way through the outside dc.
Instruction :
Start the second smile line the same way as the first by mirroring it. Starting a centimeter down from the eye, half way through the middle circle. Then across to half way through the outside dc.
Instruction :
Moving on you will start stitching the mouth. The mouth will follow the line in between the rows of double crochets. Going in and out around each DC. You will come back later with a pass to cover the gaps.
Instruction :
Once your mouth has reached half way through the middle circle on the other side, you will move up to start the second eye. Mirror the first side by starting in between the opposite cluster sts, about half way down the second row of DCs Then insert your needle back through to the other side just below the top of the middle circle.
Instruction :
Start the second smile line the same way as the first by mirroring it. Starting a centimeter down from the eye, half way through the middle circle. Then across to half way through the outside dc. Cover the gaps by going in and out following the line inbetween the rows of DCs.
Instruction :
Follow back through the mouth line, stitching over the gaps, until you return to the side of the mouth you started with. Once the face is complete you will weave in the loose ends with the tapestry needle.
— Final Reinforcement :
Info :
You are now done! Woohoo! It is strongly recommended to reinforce the steering wheel cover by sewing it on in some way. You can do so by sewing it all the way around in every st which can look somewhat like the picture below. To do sew you simply thread your yarn through the steering wheel cover on both sides with a tapestry needle and tie a knot. Then you weave your yarn back and forth through stitches. When you get to the sides where you cannot go through both the front and the back (sides and bottom of the wheel) carry your yarn through on the backside then continue. When you are done tie it off and weave in your end.
This colorful Smiley Face Steering Wheel Cover pattern brings sunshine to every drive with cheerful daisies and playful ruffled edges. Create a matching seat belt cover and add button closures for a practical, handmade touch. Perfect for gifting or brightening your own car—happy crocheting! 🧶😊