🧢 Beautiful ✨ Detailed πŸ’ Adorable

Giada Crochet Bag Pattern

Giada Crochet Bag Pattern
4.3β˜… Rating
5-7 Hours Time Needed
3.5K Made This
βœ‚οΈ

Intermediate Level

Ideal for those with basic crochet experience, featuring slightly more advanced stitches and techniques to expand your skills.

⏱️

Weekend Treat

Takes 5-7 hours, making it an enjoyable project to finish over a couple of days.

✨

Stylish Touch

An elegant detail to elevate any look, combining traditional techniques with contemporary design sensibilities.

About This Giada Crochet Bag Pattern

This pattern creates the Giada Crochet Bagβ€”a structured, textured handbag with a reinforced base and optional lining. The design features v-stitch texture, a woven belt strap, and detachable chain hardware to give it a polished finish. Youll find clear instructions for the base, body, belt, handles, and optional lining so you can customize details like color and closures.

Giada Crochet Bag Pattern crochet pattern - detailed view of completed project

Made with macrame cord and a US E (3.5mm) hook, the bag is durable and wearable for everyday use. Optional plastic canvas and lining add structure while the pattern remains adaptable for yarn substitutions.

Why You'll Love This Giada Crochet Bag Pattern

I absolutely love this pattern because it transforms simple stitches into a refined, structured bag that looks designer-made. I enjoy how the v-stitch creates a delicate textured fabric while the plastic canvas option gives the finished bag professional stability. I also love that it is customizable β€” you can change colors, add different hardware, or omit the lining to suit your style. Making the belt strap and woven detail always feels rewarding and adds a charming accent to the bag.

Giada Crochet Bag Pattern step 1 - construction progress Giada Crochet Bag Pattern step 2 - assembly progress Giada Crochet Bag Pattern step 3 - details and accessories Giada Crochet Bag Pattern step 4 - final assembly and finishing

Switch Things Up

I love how easy it is to customize this bag by changing yarn colors; try a neutral body with a bright belt for contrast.

You can swap the macrame cord for a cotton #4 yarn to soften the bag if you prefer a less rigid finish.

I often replace the chain with a leather strap for a more polished, sophisticated look that pairs well with casual outfits.

If you want a smaller bag, reduce the Base chain length and adjust rounds proportionally while keeping the plastic canvas sized to match.

Make a mini keychain version by using thinner yarn and a smaller hook; a 2-3 hour mini project makes a great gift.

Try adding decorative embroidery or appliques on the front panel to personalize your bag with initials or floral motifs.

I sometimes switch the belt stitch to a simple sc strap and add a snap closure instead of a button to change the bag silhouette.

For a boho vibe, alternate two body colors every few rounds to create subtle stripes without changing the stitch pattern.

If youre worried about structure, use heavier plastic canvas or add an internal cardboard panel wrapped in fabric to reinforce the bottom further.

I recommend testing different hardware like lobster clasps or D-rings to make the shoulder strap removable and versatile.

Finally, try lining the bag with a waterproof fabric for everyday weather protection; I often add a small internal pocket for keys and cards.

Common Mistakes & How to Fix Them

βœ— Skipping the gauge check before starting can lead to a bag with incorrect dimensions; check your gauge and adjust hook size to match the pattern. βœ— Not cutting and fitting the plastic canvas correctly can distort the bag shape; cut canvas to the exact Base and side dimensions and test-fit before sewing. βœ— Forgetting that beginning ch-1 does NOT count as a stitch can throw off your counts; always follow the pattern notes and count actual stitches after the ch-1. βœ— Failing to work through both bag and plastic canvas when instructed will leave gaps; when the pattern says working through both, insert your hook through both layers and complete the stitch. βœ— Overstuffing or uneven stuffing of lining or reinforced areas can warp the bag structure; sew and insert lining carefully and press/shape to distribute fabric evenly.

Giada Crochet Bag Pattern

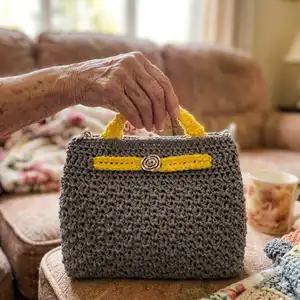
Make a stylish, structured Giada Crochet Bag using macrame cord and simple stitch patterns. This pattern guides you through creating a reinforced base with optional plastic canvas, a textured body made with v-stitches, a woven belt strap, and sturdy handles. Youll enjoy a modern accessory that is both functional and customizable for color and hardware choices.

Intermediate 5-7 Hours

Materials Needed for Giada Crochet Bag Pattern

β€” Main Fabric

  • 01
    Ice Yarns Macrame Cord, worsted weight #4 yarn (100% polyester; 175 yds/160 m per 3.5 oz/100 g skein)
  • 02
    Color A: Grey - 2 skeins
  • 03
    Color B: Yellow - 1 skein

β€” Tools Required

  • 01
    US Size E (3.5mm) crochet hook
  • 02
    Plastic canvas (optional)
  • 03
    43" chain
  • 04
    2 round keyrings
  • 05
    Fabric for lining (optional)
  • 06
    Sewing thread & needle
  • 07
    Button (optional)
  • 08
    Magnetic button (optional)
  • 09
    Yarn needle
  • 10
    Scissors
  • 11
    Stitch markers (recommended)
  • 12
    Pins for assembly

Progress Tracker

0% Complete

β€” Notes :

Infos :

1. Similar #4 weight yarns may be substituted; please check gauge. Yarn substitutes include Red Heart Yarns Nylon Crochet Thread and Lion Brand 24/7 Cotton. 2. Beginning ch-1 does NOT count as stitch. 3. Sl st to 1st stitch of each round to join.

Info :

SPECIAL STITCHES: v-st (v-stitch) = (dc, ch 1, dc) in same

β€” Base :

Row 1 (RS) :

With A, ch 17, sc in 2nd ch from hook and in each across, turnβ€”16 sc.

Row 2 :

Ch 1, sc in each across, turn.

Rows 3-38 :

Repeat Row 2, after Row 38, do NOT turn, do NOT fasten off.

Info :

Cut plastic canvases to fit Base dimensions.

Round 1 :

Place plastic canvas on WS, working through both Base and plastic canvas, ch 1, *sc in each across to corner, ch 1; repeat from * around, join, do NOT turnβ€”108 sc, 4 ch-1 sps.

Round 2 :

Working in BLO, sl st in next, ch 1, *sc in each across to next ch-1 sp, (sc, ch 1, sc) in next ch-1 sp, skip 1; repeat from * around, joinβ€”112 sc, 4 ch-1 sps.

β€” Body :

Round 1 :

Skipping all corner ch-1 sps, ch 4 (counts as (dc, ch 1)), dc in same (v-st made), skip 1, sc in next, skip 1, *v-st in next, skip 1, sc in next, skip 1; repeat from * around, join, turnβ€”28 v-sts, 28 sc.

Round 2 :

Sl st in next ch-1 sp, (ch 1, sc) in same ch-1 sp, skip 1, v-st in next sc, *sc in next ch-1 sp, skip 1, v-st in next sc; repeat from * around, join, turn.

Round 3 :

Ch 4 (counts as (dc, ch 1)), dc in same (v-st made), skip 1, sc in next, skip 1, *v-st in next, skip 1, sc in next, skip 1; repeat from * around, join, turn.

Rounds 4-15 :

Repeat Rounds 2-3, do NOT turn after Round 15.

Round 16 :

Ch 1, hdc in each around, skipping all ch-1 sps, joinβ€”84 hdc.

Round 17 :

Ch 1, hdc in each around.

Round 18 :

Ch 4 (counts as tr), tr in each around, joinβ€”84 tr.

Info :

Cut plastic canvas to fit side dimensions. With A, sew pieces together. Insert plastic canvas in bag.

β€” Side & Finishing Rounds :

Round 19 :

Ch 1, working through both bag and plastic canvas, hdc in each around, joinβ€”84 hdc.

Round 20 :

Ch 1, hdc in each around, join.

Round 21 :

Ch 1, sc in each around, join with invisible join.

Info :

Fasten off, weave in ends.

β€” Belt Strap :

Belt Strap (P1) :

With B, ch 68, sc in 2nd ch from hook and in each across to last, 3 sc in last, rotate to work other side of starting ch, sc in each across to last, 2 sc in last, joinβ€”138 sc.

Info :

Fasten off.

Info :

Working from WS of back, starting in back center, weave Belt Strap through Round 17 around as desired, sew ends together. Sew button to center of Belt.

β€” Handle :

Handle (make 2) Row 1 :

With B, ch 4, sc in 2nd ch from hook and in each across, turnβ€”3 sc.

Handle Row 2 :

Ch 1, sc in each across, turn.

Handle Rows 3-30 :

Repeat Row 2.

Info :

Fasten off, weave in ends.

Info :

Sew Handles to bag as desired.

β€” Lining (optional) :

Info :

With fabric of choice, cut 2 pieces following outline of Panels, hand sew together, insert in bag, secure Lining to bag. Sew magnetic button at center top edge of Lining if desired.

Info :

Attach 1 keyring to each side of bag, attach chain as desired.

Assembly Instructions

  • Insert plastic canvas pieces into the Base and sides after cutting them to fit the Base and side dimensions, then sew bag panels together with A and secure canvas inside before finishing rounds.
  • Weave the Belt Strap through Round 17 from the WS starting at the back center, position as desired, then sew the belt ends together and add the decorative button to the belt center.
  • Sew the two handles (make 2) to the top edges of the bag at locations you prefer for balance and comfort; make sure handles are symmetrically placed and securely stitched.
  • If using lining, cut two fabric panels to the panel outlines, hand sew them together, insert into the bag, secure the lining along the top edge, and optionally sew a magnetic button at the center top of the lining.
  • Attach one keyring to each side of the bag, then attach the 43" chain to the keyrings for the shoulder strap or use the chain as desired.

Important Notes

  • πŸ’‘Use stitch markers at the start of rounds to keep track when joining rounds with sl st or when turning after joins.
  • πŸ’‘Adjust hook size if necessary to obtain gauge; consistent tension is important for the bag to fit the plastic canvas correctly.
  • πŸ’‘Do NOT turn after Round 38 of the Base; follow the instruction to work around the plastic canvas as described to achieve correct shaping.
  • πŸ’‘Weave in ends and secure sewn pieces firmly to prevent hardware or handles from loosening with use.

Create a chic, durable Giada Crochet Bag that truly stands out with textured stitches and custom color accents. The reinforced base and optional lining make this bag practical for everyday use while the belt strap and chain add a stylish flair. Enjoy personalizing colors and hardware to make it uniquely yours. 🧢✨

You ask,

we answer.

FAQs

What size will the finished piece be?

The finished bag measures approximately 8" high x 4" deep x 9 1/2" long when using the recommended macrame cord and hook size.

Can I substitute the yarn for another fiber or weight?

Yes, similar #4 weight yarns may be substituted but you should check gauge; suggested substitutes include Red Heart Nylon Crochet Thread and Lion Brand 24/7 Cotton.

Is the plastic canvas required?

Plastic canvas is optional but recommended for structure; if omitted the bag will be softer and less rigid.

Do I need to know any special stitches?

This pattern uses standard stitches and the v-stitch (dc, ch 1, dc); basic knowledge of sc, hdc, dc, tr, and working in BLO is needed.

How long does this project typically take to complete?

Most crocheters complete this bag in about 5-7 hours, depending on experience and whether you add lining or extra hardware.