Make playful animal earflap hats with whimsical features — perfect for babies, kids and playful adults. This pattern collection walks you through a basic beanie foundation and adds character with ears, scales, snouts and facial details so you can create dinosaurs, bears, puppies, wolves, pandas and giraffes. Youll enjoy the clear step-by-step rounds and flexible sizing so you can customize each hat to your recipient.
Progress Tracker
0% Complete
— General Instructions :
Info :
Exact gauge is essential for proper size. Before beginning, make a sample swatch with hook specified to ensure you don't need to go up or down a hook. If gauge is too small, go up a hook. If too big go down a hook. Continue until you find the hook that works best for you.
Info :
With 'H' hook (5.0mm) 4 SC rows of 4 SC = 1" square.
Info :
Markers are used to help distinguish the beginning of each round being worked. Place a 2" scrap piece of yarn before the first stitch of each round, moving after each round is complete. Remove marker when no longer needed.
— Basic Beanie :
Round 1 :
With Main Color (from table on page 3) and 'H' hook, CH 2, 6 SC in 2nd CH from hook. (6 SC)
Round 2 :
2 SC in each SC around. (12 SC)
Round 3 :
*1 SC in next SC, 2 SC in next SC*, repeat from * to * around. (18 SC)
Round 4 :
*1 SC in each of the next 2 SC, 2 SC in next SC*, repeat from * to * around. (24 SC)
Round 5 :
*1 SC in each of the next 3 SC, 2 SC in next SC*, repeat from * to * around. (30 SC)
Round 6 :
*1 SC in each of the next 4 SC, 2 SC in next SC*, repeat from * to * around. (36 SC)
Round 7 :
*1 SC in each of the next 5 SC, 2 SC in next SC*, repeat from * to * around. (42 SC)
Round 8 :
*1 SC in each of the next 6 SC, 2 SC in next SC*, repeat from * to * around. (48 SC)
Info :
Proceed to the section of choice for the size hat you wish to make.
— Size: 14" - 16" (0-3 month) :
Round 9 :
1 SC in each SC around. (48 SC)
Info :
Repeat Round 9 until hat measures approximately 5" from top to bottom, SLST to join, fasten off.
Info :
Option 1: If you do not want earflaps, continue with the trim round below.
Info :
Option 2: If you want earflaps, continue on to the earflaps section.
Info :
Trim: With Trim Color (from table on page 3), join with SC in back of hat, 1 SC in each SC around, SLST to join, fasten off. (48 SC)
— Size: 16" - 18" (3 - 6 month) :
Round 9 :
*1 SC in each of the next 7 SC, 2 SC in next SC*, repeat from * to * around. (54 SC)
Round 10 :
1 SC in each SC around. (54 SC)
Info :
Repeat Round 10 until hat measures approximately 6" from top to bottom, SLST to join, fasten off.
Info :
Option 1: If you do not want earflaps, continue with the trim round below.
Info :
Option 2: If you want earflaps, continue on to the earflaps section.
Info :
Trim: With Trim Color (from table on page 3), join with SC in back of hat, 1 SC in each SC around, SLST to join, fasten off. (54 SC)
— Size: 18" - 20" (Toddler, Child) :
Round 9 :
*1 SC in each of the next 7 SC, 2 SC in next SC*, repeat from * to * around. (54 SC)
Round 10 :
*1 SC in each of the next 8 SC, 2 SC in next SC*, repeat from * to * around. (60 SC)
Round 11 :
1 SC in each SC around. (60 SC)
Info :
Repeat Round 11 until hat measures approximately 7" from top to bottom, SLST to join, fasten off.
Info :
Option 1: If you do not want earflaps, continue with the trim round below.
Info :
Option 2: If you want earflaps, continue on to the earflaps section.
Info :
Trim: With Trim Color (from table on page 3), join SC in back of hat, 1 SC in each SC around, SLST to join, fasten off. (60 SC)
— Size: 20" - 22" (Child, Pre-Teen, Adult) :
Round 9 :
*1 SC in each of the next 7 SC, 2 SC in next SC*, repeat from * to * around. (54 SC)
Round 10 :
*1 SC in each of the next 8 SC, 2 SC in next SC*, repeat from * to * around. (60 SC)
Round 11 :
*1 SC in each of the next 9 SC, 2 SC in next SC*, repeat from * to * around. (66 SC)
Round 12 :
1 SC in each SC around. (66 SC)
Info :
Repeat Round 12 until hat measures approximately 8" from top to bottom, SLST to join, fasten off.
Info :
Option 1: If you do not want earflaps, continue with the trim round below.
Info :
Option 2: If you want earflaps, continue on to the earflaps section.
Info :
Trim: With Trim Color (from table on page 3), join SC in back of hat, 1 SC in each SC around, SLST to join, fasten off. (66 SC)
— Size: 22" - 24" (Large Teen / Adult) :
Round 9 :
*1 SC in each of the next 7 SC, 2 SC in next SC*, repeat from * to * around. (54 SC)
Round 10 :
*1 SC in each of the next 8 SC, 2 SC in next SC*, repeat from * to * around. (60 SC)
Round 11 :
*1 SC in each of the next 9 SC, 2 SC in next SC*, repeat from * to * around. (66 SC)
Round 12 :
*1 SC in each of the next 10 SC, 2 SC in next SC*, repeat from * to * around. (72 SC)
Round 13 :
1 SC in each SC around. (72 SC)
Info :
Repeat Round 13 until hat measures approximately 9" from top to bottom, SLST to join, fasten off.
— Earflaps :
Info :
Lay hat flat on hard surface with the tie off in the center of the back of the hat. Count 3 stitches in from the left side and place a marker. Count 3 stitches in from the right side and place a marker. If you don't have stitch markers, you can use a piece of yarn.
Left earflap :
With right side facing, opening at the top, attach main color (from table on page 3) with a SC in the same SC the stitch marker is in.
Row 1 :
14" - 16" SC in next 7 SC, CH 1, turn. (8 SC) 16" - 18" SC in next 7 SC, CH 1, turn. (8 SC) 18" - 20" SC in next 9 SC, CH 1, turn. (10 SC) 20" - 22" SC in next 11 SC, CH 1, turn. (12 SC) 22" - 24" SC in next 11 SC, CH 1, turn. (12 SC)
Row 2 :
Row 2 is the same for all sizes. Skip first SC, SC in each SC across, CH 1, turn. Repeat Row 2 until only 1 SC remains. Fasten off. Remove marker.
Right earflap :
With right side facing, opening at the top, count to the right of the remaining stitch marker the number of stitches that will be needed to work the earflap for desired size and attach yarn with a SC. The space the stitch marker occupies is counted as the first stitch.
Row 1 :
14" - 16" SC in next 7 SC, CH 1, turn. (8 SC) 16" - 18" SC in next 7 SC, CH 1, turn. (8 SC) 18" - 20" SC in next 9 SC, CH 1, turn. (10 SC) 20" - 22" SC in next 11 SC, CH 1, turn. (12 SC) 22" - 24" SC in next 11 SC, CH 1, turn. (12 SC)
Row 2 :
Row 2 is the same for all sizes. Skip first SC, SC in each SC across, CH 1, turn. Repeat Row 2 until only 1 SC remains. Fasten off. Remove marker.
— Trim :
Info :
Attach Trim Color (from table on page 3) to the back of the hat in the same stitch where hat was fastened off. CH 1, SC in each stitch and row end around the hat. Do 3 SC in the tip of each earflap. SLST to join, fasten off.
Info :
Continue on to the animal hat of choice for the facial features.
— Dinosaur :
Large Scale (make 1) :
Rnd 1: With Trim Color (from table on page 3) and an 'H' hook, CH 2, 4 SC in 2nd CH from hook. Use a stitch marker as needed. (4 SC)
Round 2 :
2 SC in each SC around. (8 SC)
Rounds 3-4 :
SC in each SC around. (8 SC)
Round 5 :
*2 SC in next SC, SC in next SC*, repeat from * to * around. (12 SC)
Rounds 6-7 :
SC in each SC around. (12 SC)
Round 8 :
*2 SC in next SC, SC in next 2 SC*, repeat from * to * around. (16 SC)
Rounds 9-11 :
SC in each SC around. (16 SC)
Round 12 :
SC in each SC around, SLST in next SC, fasten off leaving an 8" tail for sewing. (16 SC)
Medium Scale (make 1 or more) :
Rnd 1: With Trim Color (from table on page 3) and an 'H' hook, CH 2, 4 SC in 2nd CH from hook. Use a stitch marker as needed. (4 SC)
Round 2 :
2 SC in each SC around. (8 SC)
Rounds 3-4 :
SC in each SC around. (8 SC)
Round 5 :
*2 SC in next SC, SC in next SC*, repeat from * to * around. (12 SC)
Rounds 6-7 :
SC in each SC around. (12 SC)
Round 8 :
*2 SC in next SC, SC in next 2 SC*, repeat from * to * around. (16 SC)
Round 9 :
SC in each SC around, SLST in next SC, fasten off leaving an 8" tail for sewing. (16 SC)
Small Scales (make 2 or more) :
Rnd 1: With Trim Color (from table on page 3) and an 'H' hook, CH 2, 4 SC in 2nd CH from hook. Use a stitch marker as needed. (4 SC)
Round 2 :
2 SC in each SC around. (8 SC)
Round 3 :
SC in each SC around. (8 SC)
Round 4 :
*2 SC in next SC, SC in next SC*, repeat from * to * around. (12 SC)
Round 5 :
SC in each SC around. (12 SC)
Round 6 :
*2 SC in next SC, SC in next 2 SC*, repeat from * to * around. (16 SC)
Round 7 :
SC in each SC around, SLST in next SC, fasten off leaving an 8" tail for sewing. (16 SC)
Teeth (Make 2 or more) :
Rnd 1: With White and 'F' hook, CH 2, 3 SC in 2nd CH from hook. Do not join. (3 SC)
Round 2 :
2 SC in first SC, 1 SC in next 2 SC. (4 SC)
Round 3 :
1 SC in each SC around, SLST to join. Fasten off leaving small tail to sew. (4 SC)
Nostrils (Make 2) :
Rnd 1: With Black and 'F' hook, CH 2, 3 SC in 2nd CH from hook, SLST to join, fasten off leaving a small tail to sew with.
— Facial Features / Notes :
Info :
Proceed to the Facial Features section to determine what type of eyes you want your hat to have! It can have cartoon eyes, serious eyes, or mix and match the eyelids from the serious eyes with the cartoon eyes or give it the serious eyes without the eyelids! This is your chance to make your hat unique!
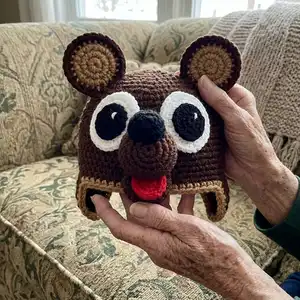
— Bear :
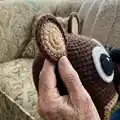
Inside Ears - Make 2 :
Rnd 1: With Trim Color (from table on page 3) and an 'H' hook, CH 2, 6 SC in 2nd CH from hook, SLST to join, CH 1. (6 SC)
Round 2 :
2 SC in each SC around, SLST to join, CH 1. (12 SC)
Round 3 :
2 SC in each SC around, SLST to join, fasten off and set aside. (24 SC)
Outside Ears - Make 2 :
Rnd 1: With Main Color (from table on page 3) and an 'H' hook, CH 2, 6 SC in 2nd CH from hook, SLST to join, CH 1. (6 SC)
Round 2 :
2 SC in each SC around, SLST to join, CH 1. (12 SC)
Round 3 :
2 SC in each SC around, SLST to join, CH 1, turn. (24 SC)
Round 4 :
Pick up inside ear and with wrong sides facing each other, working through both thicknesses, 1 SC in each SC around, SLST to join, fasten off leaving a tail to sew with. (24 SC)
Info :
Proceed to the Facial Features section to determine eye and nose placement then assemble parts accordingly.
This Crochet Hatimals collection turns beanies into playful animals with personality and charm. Make dinosaur spikes, bear ears, puppy snouts, panda markings, wolf features, and giraffe horns with clear rounds and easy assembly. Choose your favorite colors, mix and match features, and create a set for the family or as a special handmade gift. 🧶✨