🧢 Beautiful ✨ Detailed πŸ’ Adorable

Daisy The Duck Amigurumi Pattern

Daisy The Duck Amigurumi Pattern
4.5β˜… Rating
2-3 Hours Time Needed
2.2K Made This
βœ‚οΈ

Beginner Friendly Level

Perfect for those just starting their crochet journey, with clear instructions and simple techniques

⏱️

Bite-Sized Project

Finishes in 2-4 hoursβ€”perfect for an afternoon of creative relaxation.

🎁

Tiny Treasure

Small, sweet, and gift-worthy creations that fit perfectly in the palm of your hand with detailed charm.

About This Daisy The Duck Amigurumi Pattern

This pattern creates a tiny, adorable Daisy the Duck amigurumi using 4ply yarn and a 3.5mm hook. You will crochet a small stuffed body and a separate beak, then assemble and shape the duck to sit nicely. The pattern emphasizes simple single crochet shaping so you can finish quickly and confidently.
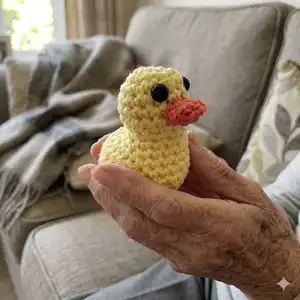
Daisy The Duck Amigurumi Pattern crochet pattern - detailed view of completed project

Perfect for gifts, keychains, or tiny decor, Daisy finishes at roughly 4cm x 3cm x 4cm. Photographs and shaping tips are included to help you get the best result.

Why You'll Love This Daisy The Duck Amigurumi Pattern

I absolutely love this pattern because it turns a few simple stitches into a charming little character you can finish in an afternoon. I enjoy how quickly the body grows round by round and how a small amount of stuffing and gentle shaping brings Daisy to life. I love that it uses basic techniques so crocheters of many levels can achieve a great result. I also enjoy the tiny beak detail β€” it adds so much personality with only a couple of rows.

Daisy The Duck Amigurumi Pattern step 1 - construction progress Daisy The Duck Amigurumi Pattern step 2 - assembly progress Daisy The Duck Amigurumi Pattern step 3 - details and accessories Daisy The Duck Amigurumi Pattern step 4 - final assembly and finishing

Switch Things Up

I love customizing this little duck by changing yarn color and texture; try pastel shades for a softer look or variegated yarn for fun results.

I sometimes make Daisy larger by using a bulkier yarn and a bigger hook to create a plush tabletop friend.

I also make tiny keychains by using finer yarn and a smaller hook, then adding a keyring before closing the body.

I like to replace safety eyes with embroidered eyes for baby-safe toys or to change the expression.

Try different beak colors or embroider a smile to personalize Daisy's face and personality.

I occasionally add a small crocheted bow or scarf to create themed versions or seasonal variations.

For posable display pieces I insert thin wire into the body or limbs (if you add them) to allow gentle shaping.

I recommend testing eye placement with pins and photos before securing β€” small shifts change the whole expression.

Use felt or tiny buttons for accessories like a hat or wing detail if you prefer mixed-media embellishments.

If you want a set, I make a family of ducks in matching or complementary colors to give as a trio of gifts.

I also experiment with stitch tension to slightly alter the final size without changing yarn weight when I need a precise finished measurement.

Common Mistakes & How to Fix Them

βœ— Not counting stitches after increases and decreases; count at the end of each round to keep your stitch totals accurate and avoid shaping problems. βœ— Placing safety eyes too close together or too high; place safety eyes between rows 4 and 5 and space them 4-5 stitches apart for correct proportions. βœ— Understuffing the back end causes the duck to overbalance; add extra stuffing into the back end to provide stability while shaping. βœ— Sewing the beak in the wrong position can look off-center; pin the beak in place and align the bottom edge with the join of rows 7/8 before sewing to ensure correct placement.
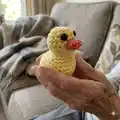
Daisy The Duck Amigurumi Pattern

Make a tiny, travel-ready Daisy the Duck amigurumi with clear, friendly instructions. This small duck is perfect for gifting or keeping as a pocket-sized companion. You will enjoy quick rounds and simple shaping that bring lots of personality to this little crochet toy. Ideal for those who love quick, satisfying projects.

Beginner Friendly 2-3 Hours

Materials Needed for Daisy The Duck Amigurumi Pattern

β€” Main Fabric

  • 01
    King Cole Giza 4ply yarn in yellow (A) - 1x ball
  • 02
    King Cole Giza 4ply yarn in orange (B) - 1x ball
  • 03
    End size approximately 4cm by 3cm by 4cm

β€” Tools Required

  • 01
    Crochet hook size 3.5mm
  • 02
    Plastic safety eyes 0.3cm (2 pieces)
  • 03
    Polyester stuffing
  • 04
    Needle and thread (I sew the beak on using the 4ply yarn)
  • 05
    Scissors
  • 06
    Yarn needle for sewing
  • 07
    Stitch markers (optional)

Progress Tracker

0% Complete

β€” Materials :

Infos :

Yarn: King Cole giza 4ply in yellow (A) 1x ball. King Cole Giza 4ply orange (B) 1x ball. Crochet hook 3.5mm. Plastic safety eyes- 0.3cm. Polyester stuffing. Needle and thread- I sew the beak on using the 4ply yarn. End size = 4cm by 3cm by 4cm.

β€” Stitches :

Infos :

Ch= Chain stitch. Sc= Single Crochet. Inc= Increase. Single crochet into the next stitch then single crochet again into the same stitch. Dec= Decrease. Push the hook through the next stitch, yarn over and pull through then push the crochet hook into the next stitch, yarn over and pull through. Now yarn over again and pull through all three stitches.

β€” Duck body (A) :

Round 1 :

Sc 6 into a magic ring

Round 2 :

Inc into each stitch (12)

Round 3 :

[Sc, inc into next stitch] x6 (18)

Round 4-7 :

Sc into each stitch round (18)

Round 8 :

Dec into each stitch (9)

Round 9 :

Inc 3, sc 6 (12)

Round 10 :

Inc 6, sc 6 (18)

Round 11 :

[Sc, inc] x6, sc 6 (24)

Round 12 :

Sc 7, inc 4, sc 13 (28)

Round 13 :

Sc 11, dec, sc 15 (27)

Round 14+15 :

Sc into each stitch round (27)

Round 16 :

Sc 9, dec 4, sc 10 (23)

Info :

Insert the safety eyes between row 4+5, 4/5 stitches apart.

Info :

Now stuff the body.

Info :

To ensure the duck does not overbalance, make sure you add a lot of stuffing to the back end.

Round 17 :

Dec 12, sc (12)

Round 18 :

Dec into each stitch (6)

Info :

Close the hole and cast off

Info :

In order for it to be shaped like a duck, you may have to squeeze it and re-shape it a little.

Info :

If it is not sitting flat: turn the duck over and push both of your thumbs in from the bottom up towards the head. This re-adjustment should help it to sit flat.

β€” Duck beak (B) :

Item :

Chain 5

Row 1 :

Starting from the 2nd chain from the hook, sc into each stitch along the chain (4)

Row 2 :

Chain 1, sc into each stitch along the row (4)

Info :

Cast off

Info :

This has now formed a rectangle.

Info :

Fold in half and stitch the two shorter edges shut.

Info :

Stitch along the bottom edge of the beak so it is in-line with the join of row 7/8.

Info :

Stitch along the edge of the mouth then along the top of the mouth so it lines up with the join between row 6/7.

Assembly Instructions

  • Insert safety eyes between rows 4 and 5, spacing them 4-5 stitches apart and secure the backs tightly.
  • Stuff the body firmly, adding extra stuffing to the back end to prevent the duck from overbalancing, then close the opening and cast off.
  • Fold the beak rectangle in half and stitch the two shorter edges shut, then position the beak so the bottom edge aligns with the join of rows 7/8 and sew along the bottom edge.
  • Stitch along the edge and top of the mouth so it lines up with the join between rows 6/7, checking placement before securing.
  • Pin all pieces in place before sewing to ensure correct symmetry and use a yarn needle to sew parts with small neat stitches.
  • After assembly, gently squeeze and re-shape the body to create the rounded duck profile and adjust stuffing if necessary.

Important Notes

  • πŸ’‘Place safety eyes between row 4 and row 5 and leave 4-5 stitches between them for correct placement.
  • πŸ’‘Stuff the back end generously to keep the duck balanced; under-stuffing can cause tipping.
  • πŸ’‘Pin the beak in place and align it with the join of rows 7/8 before sewing to avoid misplacement.
  • πŸ’‘Work consistent tension and count stitches after rounds with increases or decreases to maintain shape and stitch totals.

This tiny Daisy the Duck is a pocket-sized charm that brings a smile wherever she goes. Perfect for gifts, keychains, or little collections, she is quick to make and endlessly adorable. Share your finished Daisy and bring a little handcrafted joy to someone today! 🧢✨

You ask,

we answer.

FAQs

What size will the finished piece be?

The finished amigurumi measures approximately 4cm by 3cm by 4cm when using the recommended 4ply yarn and 3.5mm hook.

Can I use different yarn weights for this pattern?

Yes, you can use different yarn weights but the final size will change β€” use an appropriate hook for your chosen yarn and expect different proportions.

Do I need advanced crochet skills for this pattern?

No, this pattern is beginner friendly and uses basic stitches (single crochet, increase, decrease) with clear shaping instructions.

How should I attach the beak and eyes for best results?

Pin the beak in place aligning the bottom edge with the join of rows 7/8 and sew before fixing the safety eyes between rows 4 and 5, spaced 4-5 stitches apart.