🧢 Beautiful ✨ Detailed πŸ’ Adorable

Garden Path Throw Pattern

Garden Path Throw Pattern
4.7β˜… Rating
12-15 Hours Time Needed
1.5K Made This
βœ‚οΈ

Intermediate Level

Ideal for those with basic crochet experience, featuring slightly more advanced stitches and techniques to expand your skills.

⏱️

Multi-Day Project

A rewarding 12+ hour journeyβ€”perfect for dedicated crafters who love detailed work.

πŸ€—

Soft Hug

Gentle, plush, and full of warmth, creating a sense of comfort and coziness wherever they find a home.

About This Garden Path Throw Pattern

This pattern creates a 46x46" throw with a repeating open lace diamond motif separated by sweet little bobbles and bordered in seed stitch. The design uses bulky weight merino yarn for a soft, lofty finished texture and a feminine fringe at top and bottom. The written instructions and chart make it easy to follow the repeated pattern sections.

Garden Path Throw Pattern crochet pattern - detailed view of completed project

Includes full written rows for the chart, bobble instructions, finishing and fringe assembly steps. Perfect for making a gift-worthy blanket or a cozy home accent.

Why You'll Love This Garden Path Throw Pattern

I absolutely love this pattern because the combination of open lace diamonds and textured bobbles creates a beautiful contrast that reads sophisticated yet cozy. I enjoy the rhythm of the repeat β€” once you get going the pattern becomes soothing to knit. The bulky yarn makes the blanket work up relatively quickly while still feeling substantial and luxurious. The fringe finishing gives the throw a handmade, bohemian edge that I find irresistibly charming.

Garden Path Throw Pattern step 1 - construction progress Garden Path Throw Pattern step 2 - assembly progress Garden Path Throw Pattern step 3 - details and accessories Garden Path Throw Pattern step 4 - final assembly and finishing

Switch Things Up

I love customizing this throw by changing the color palette; try tonal neutrals for a subtle look or jewel tones for a bold statement.

I often alter the size by adding or subtracting repeats from the pattern: increase the number of chart repeats for a wider throw or work fewer repeats for a cozy lapghan.

If you want a lighter, more delicate version, switch to aran or DK weight yarn and smaller needles, remembering to re-swatch for gauge.

For a chunkier, more rustic finish, use a bulky or super-bulky yarn and larger needles to get a plush, quicker-to-knit blanket.

I sometimes skip the fringe for a cleaner, modern edge or replace it with a simple i-cord border for a polished finish.

Try substituting the bobbles with small knit flowers or embroidered dots to create a different texture while preserving the lace diamonds.

I like to knit this pattern in two contrasting colors, using a darker main color for the lace and a light border to highlight the seed stitch edges.

Make matching cushion covers by adapting the pattern to smaller square dimensions and using the same chart repeat for a coordinated set.

I recommend blocking variations: steam-block lightly for a more relaxed drape or wet-block well to open up the lace without flattening the bobbles.

Experiment with fringe length and grouping: longer fringe feels bohemian, while short, neat fringe looks contemporaryβ€”try doubled or singled strand groups for different looks.

Common Mistakes & How to Fix Them

βœ— Skipping markers between seed-stitch border and lace sections can cause the pattern to shift; place stitch markers at the boundaries to maintain correct stitch counts. βœ— Working bobbles too tightly makes them hard to shape and may distort the lace diamonds; keep a relaxed tension and shape bobbles gently after blocking. βœ— Not counting stitches after lace decreases often leads to misplaced pattern repeats; count your stitches at the end of each chart repeat to verify accuracy. βœ— Attaching fringe strands unevenly can make the edges look sloppy; measure and group strands consistently and trim to match lengths before knotting. βœ— Failing to block the throw will leave bobbles flat and the lace uneven; wash and block to finished measurements, shaping bobbles so they appear on the right side.

Garden Path Throw Pattern

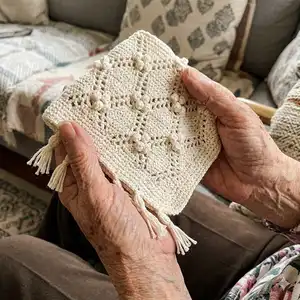
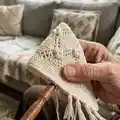
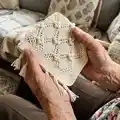
Create a warm, elegant throw with a delicate open lace diamond pattern and playful bobble accents. This pattern guides you through a repeatable chart and written instructions so you can knit a 46x46" throw with a charming fringe. You will enjoy shaping bobbles, working seed stitch borders, and assembling a cozy handcrafted piece for your home.

Intermediate 12-15 Hours

Materials Needed for Garden Path Throw Pattern

β€” Main Fabric

  • 01
    Knit Picks Bare Swish Bulky (100% Superwash Merino Wool), 137 yards (125 m) per 100g hank - Natural 24389, 9 hanks (main color)
  • 02
    Gauge: 12 sts and 18 rows = 4" in Seed Stitch, blocked

β€” Tools Required

  • 01
    US 11 (8mm) 40" or longer circular needle (or size to obtain gauge)
  • 02
    Size I (5.5mm) crochet hook, for attaching fringe
  • 03
    Yarn needle
  • 04
    Stitch markers (optional)
  • 05
    12" blocking mat or picture frame, for wrapping fringe strands
  • 06
    Scissors

Progress Tracker

0% Complete

β€” Notes :

Info :

This pretty throw is knit up in a simple and easy to memorize stitch pattern. Sweet little bobbles are made on both right and wrong sides of the throw and separate the staggered eyelet-diamonds. The open lace pattern creates a lightweight yet warm accessory for your home. A feminine fringe decorates the top and bottom edges. Read RS chart rows from right to left, and WS rows from left to right. Work the red-outlined pattern repeat 6 times. Stitch markers may be placed if desired, for separating seed stitch sections from lace pattern.

β€” Seed Stitch :

Info :

Seed Stitch (worked over an odd number of sts). All Rows: (K1, P1) to last st, K1.

β€” CDD :

Info :

CDD: Sl 2 sts K-wise, K next st, pass 2 slipped sts over K st. 2 sts dec.

β€” Make Bobble (MB) :

Info :

Make Bobble (MB). RS Row: (K1, YO, K1, YO, K1) in the same st, drop all sts from LH needle, turn, K5, turn, K5, pass second st on RH needle over first st 4 times. 1 st left on RH needle. Place this st P-wise back onto LH needle and knit it. Bobble is now on RH needle and completed.

Info :

WS Row: (P1, YO, P1, YO, P1) in the same st, drop all sts from LH needle, turn, P5, turn, P5, pass second st on RH needle over first st 4 times. 1 st left on RH needle. Place this st P-wise back onto LH needle and purl it. Bobble is now on RH needle and completed.

β€” Directions :

Info :

Loosely CO 127 sts.

Round 1 :

Rows 1-11: Work Seed Stitch for 11 rows.

Round 2 :

Rows 12-155: Work Rows 1-24 of the chart or written instructions six times.

Round 3 :

Rows 156-172: Work Rows 1-17 of the chart or written instructions once.

Round 4 :

Rows 173-183: Work Seed Stitch for 11 rows, finishing with a WS row.

Round 5 :

Final Row (RS): BO K-wise, loosely.

β€” Written Instructions for Chart :

Round 1 :

Row 1 (RS): (K1, P1) x 3, K4, (K2tog, YO) x 2, K1, *K2, (YO, SSK) x 2, K4, (P1, K1) x 3.

Round 2 :

Rows 2, 4, 6, 8 (WS): (K1, P1) x 3, K1, P to last 7 sts, (K1, P1) x 3, K1.

Round 3 :

Row 3: (K1, P1) x 3, K3, (K2tog, YO) x 2, K2, *K3, (YO, SSK) x 2, K2, (P1, K1) x 3.

Round 4 :

Row 5: (K1, P1) x 3, K2, (K2tog, YO) x 2, K3, *K4, (YO, SSK) x 2, K1, (P1, K1) x 3.

Round 5 :

Row 7: (K1, P1) x 3, K1, (K2tog, YO) x 2, K4, *K5, (YO, SSK) x 2, (K1, P1) x 3, K1.

Round 6 :

Row 9: (K1, P1) x 3, K1, (YO, SSK) x 2, K4, *K5, (YO, SSK) x 2, K2, (K2tog, YO) x 2, K4, (P1, K1) x 3.

Round 7 :

Row 10: (K1, P1) x 3, K1, P9, *P6, MB, P1, MB, P7; rep from * a total of 6 times, P8, (K1, P1) x 3, K1.

Round 8 :

Row 11: (K1, P1) x 3, K2, (YO, SSK) x 2, K3, *K4, (K2tog, YO) x 2, MB, (YO, SSK) x 2, K3; rep from * a total of 6 times, K4, (K2tog, YO) x 2, K2, (P1, K1) x 3.

Round 9 :

Rows 12, 14, 16, 18, 20: Repeat Row 2.

Round 10 :

Row 13: (K1, P1) x 3, K3, (YO, SSK) x 2, K2, *K3, (K2tog, YO) x 2, K2; rep from * a total of 6 times, K3, (K2tog, YO) x 2, K2, (P1, K1) x 3.

Round 11 :

Row 15: (K1, P1) x 3, K4, (YO, SSK) x 2, K1, *K2, (K2tog, YO) x 2, K5, (YO, SSK) x 2, K1; rep from * a total of 6 times, K2, (K2tog, YO) x 2, K4, (P1, K1) x 3.

Round 12 :

Row 17: (K1, P1) x 3, K5, (YO, SSK) x 2, *K1, (K2tog, YO) x 2, K7, (YO, SSK) x 2; rep from * a total of 6 times, K1, (K2tog, YO) x 2, K5, (P1, K1) x 3.

Round 13 :

Row 19: (K1, P1) x 3, K6, YO, SSK, YO, *CDD, YO, K2tog, YO, K9, YO, SSK, YO; rep from * a total of 6 times, CDD, YO, K2tog, YO, K6, (P1, K1) x 3.

Round 14 :

Row 21: (K1, P1) x 3, K6, K2tog, YO, K1, *MB, K1, YO, SSK, K9, K2tog, YO, K1; rep from * a total of 6 times, MB, K1, YO, SSK, K6, (P1, K1) x 3.

Round 15 :

Row 22: (K1, P1) x 3, K1, P7, MB, P1, MB, P1, *MB, P13, MB, P1; rep from * a total of 6 times, MB, P7, (K1, P1) x 3, K1.

Round 16 :

Row 23: (K1, P1) x 3, K5, (K2tog, YO) x 2, *MB, (YO, SSK) x 2, K7, (K2tog, YO) x 2; rep from * a total of 6 times, MB, (YO, SSK) x 2, K5, (P1, K1) x 3.

Round 17 :

Row 24: Rep Row 2.

β€” Finishing :

Info :

Weave in ends, wash and block to Finished Measurements, twisting and shaping all bobbles so that they appear on the right side of the throw.

β€” Fringe :

Info :

Wrap yarn loosely around a 12" blocking mat or 12" picture frame 64 times. Wrap a few extra more times to be sure you have enough strands. Note: Do not wrap your yarn too tightly or your fringe will be too short. Cut yarn. Cut across the bottom of all the strands. You will have 64 strands of yarn, each measuring 24" long. Repeat this once more, so that you have a total of 128 strands of yarn. Gather 4 strands of yarn for each group of edge fringe. There will be 16 groups along the bottom and 16 along the top. Gather 2 strands of yarn for each group of corner fringe. There will be 4 groups total, 2 for top 2 corners, 2 for bottom 2 corners. Using crochet hook, insert hook from back to front, through CO or BO row, fold the group of strands in half and pull through to the front to the back. Insert thumb and index finger through the center of the loop just made, grab the doubled strands and pull them through the loop. Pull tightly to make a knot and secure strands. Place all 32 groups of fringe all along the top and bottom edges. Each group should be centered in the middle of a diamond shape, with the 4 corner groups being attached at the first or last cast on/bind off st of the row. All corner fringe will now have 4 strands hanging below the knot. All edging fringe will have 8 strands.

β€” Blanket Chart & Legend :

Info :

Blanket Chart: The chart shows 24 rows and 47 stitches across with a red-outlined pattern repeat. Read RS chart rows right to left and WS chart rows left to right. Legend: knit (RS: knit stitch, WS: purl stitch), purl (RS: purl stitch, WS: knit stitch), k2tog (knit two stitches together), yo (yarn over), ssk (slip one stitch as if to knit, slip another stitch as if to knit. Insert left-hand needle into front of these 2 stitches and knit them together), Central Double Dec (Slip first and second stitches together as if to knit. Knit 1 stitch. Pass two slipped stitches over the knit stitch), bobble (see MB instructions above), pattern repeat indicated by red box.

Assembly Instructions

  • Weave in all loose yarn ends and block the throw to the finished measurements, arranging and shaping bobbles so they sit on the right side of the throw.
  • Prepare fringe by wrapping yarn around a 12" frame 64 times twice to create 128 strands; cut and group strands as instructed to make edge and corner fringe.
  • Attach fringe groups with a crochet hook by folding each group in half, pulling the loop through the edge row, and pulling the ends through the loop to secure a knot; space groups evenly at the center of each diamond.
  • Trim fringe to a consistent length (about 2" ends after knotting), and use scissors to even the ends for a neat finish.
  • Use blocking pins or a mat to square the throw and ensure diamonds and seed stitch borders are even before final trimming and finishing.

Important Notes

  • πŸ’‘Place stitch markers to separate seed-stitch borders from the lace-panel repeats so you can track the start and end of the chart repeats.
  • πŸ’‘Work bobbles with a relaxed tension and shape them after blocking for best dimensional appearance and consistent size across the throw.
  • πŸ’‘Count your stitches at the end of each chart repeat and after any decrease rows to keep the lace diamonds aligned and balanced.
  • πŸ’‘When making fringe, do not wrap yarn too tightly on the frame or your fringe will be too short and uneven.

This Garden Path Throw is an elegant statement piece that combines airy lace diamonds with playful bobbles and a soft, tactile fringe. It knits up in cozy bulky merino for a luxurious feel and a quick, satisfying make. Whether for gifting or keeping, it brings handcrafted warmth and texture to any room. 🧢✨

You ask,

we answer.

FAQs

What size will the finished piece be?

The finished throw measures approximately 46x46" not including fringe when blocked to gauge using the recommended yarn and needle size.

Can I use a different yarn weight for this pattern?

Yes, you can substitute yarn weights, but you must swatch and adjust needle size to match the gauge; different yarns will change the finished size and drape.

Do I need prior knitting experience for this pattern?

This pattern is intermediate; basic knowledge of lace techniques, decreases (K2tog, SSK), and bobble construction is recommended for best results.

How long does this project typically take to complete?

Most knitters will spend approximately 12-15 hours on this throw depending on experience and knitting speed; fringe and blocking add additional finishing time.