🧢 Beautiful ✨ Detailed πŸ’ Adorable

Bumble Blossom Amigurumi Pattern

Bumble Blossom Amigurumi Pattern
4.3β˜… Rating
5-7 Hours Time Needed
2.2K Made This
βœ‚οΈ

Intermediate Level

Ideal for those with basic crochet experience, featuring slightly more advanced stitches and techniques to expand your skills.

⏱️

Weekend Treat

Takes 5-7 hours, making it an enjoyable project to finish over a couple of days.

🧸

Cute Companion

An adorable friend to cherish, handcrafted with love to bring comfort and joy for years to come.

About This Bumble Blossom Amigurumi Pattern

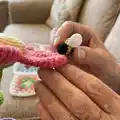
This pattern creates a charming crocheted potted flower with six petals, a textured center, a stem with optional wire reinforcement, leaves, dirt, and a tiny bumblebee. The design uses sport weight yarn and a small hook for tight stitches and good shaping. The project includes clear rounds, seaming tips, and photographic assembly references to help you place pieces accurately.

Bumble Blossom Amigurumi Pattern crochet pattern - detailed view of completed project

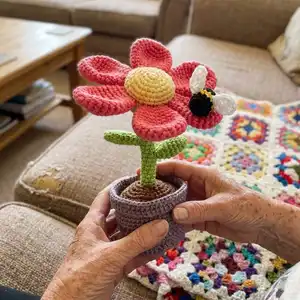
Perfect as a cheerful desktop decoration or a thoughtful handmade gift, the finished flower stands upright when assembled carefully. The pattern is written in US terms and works best with firm tension.

Why You'll Love This Bumble Blossom Amigurumi Pattern

I absolutely love this pattern because it combines simple amigurumi techniques to create a playful and decorative piece that brightens any space. I enjoy the way the petals shape individually, giving the flower a lot of personality with minimal finishing. The optional stem reinforcement makes it practical and poseable, so you can display the flower proudly. Sewing the pieces together is satisfying and the included bumblebee adds a delightful finishing touch.

Bumble Blossom Amigurumi Pattern step 1 - construction progress Bumble Blossom Amigurumi Pattern step 2 - assembly progress Bumble Blossom Amigurumi Pattern step 3 - details and accessories Bumble Blossom Amigurumi Pattern step 4 - final assembly and finishing

Switch Things Up

I love how versatile this pattern is β€” you can change the color palette to create spring pastels or bold summer tones to match your decor.

Try using DK or worsted yarn with a larger hook for a chunkier, more tactile version; note that the pot and dirt may need larger cardboard for support.

I often add thin floral wire inside the stem for extra poseability so I can bend the flower to face different directions on a shelf.

Make a whole bouquet by increasing the size of the center and petals or by creating multiple stems and arranging them in one larger pot.

I like to experiment with embroidered details on the petals or a tiny felt face on the flower center for added personality.

To make a keychain or bag charm, use finer yarn and a smaller hook to scale down the pattern and add a keyring to the top of the stem.

You can adapt the bumblebee by making more stripes, changing wing shapes, or adding tiny safety eyes for a different look.

Consider making seasonal variations β€” autumn colors for warm decor or red and white for a festive holiday accent.

If you prefer less assembly, sew petals in pairs first and then attach pairs to the center to speed up finishing time.

I also like to line the pot with decorative paper or fabric over the cardboard base to give a polished, finished appearance.

Common Mistakes & How to Fix Them

βœ— Skipping stitch markers during long straight sections like the stem can lead to lost stitch counts; use a marker every 10 rounds to keep your place and count regularly. βœ— Not stuffing the stem firmly causes the finished flower to flop over; add stuffing gradually and consider inserting wire for extra support as suggested in the pattern. βœ— Forgetting to work in BLO or FLO where specified will change the shape of pieces like the pot rim; double-check each round instruction before crocheting to maintain intended structure. βœ— Attaching petals without pinning can create uneven spacing; pin all petals in place first and sew them carefully to ensure consistent placement and a neat finish.

Bumble Blossom Amigurumi Pattern

Make a cheerful crocheted flower with a posable stem, petals, a textured center, and a tiny bumblebee companion. This pattern gives you step-by-step instructions to create a decorative amigurumi plant perfect for desks, windowsills, or as a heartfelt handmade gift. You will enjoy shaping the petals and assembling the pot and dirt to create a stable, display-ready piece. Suitable for crocheters who enjoy multi-piece projects and simple assembly.

Intermediate 5-7 Hours

Materials Needed for Bumble Blossom Amigurumi Pattern

β€” Main Fabric

  • 01
    Sport weight yarn (Schachenmayr Catania recommended)
  • 02
    Kamelie 00252 - pink (petals)
  • 03
    Honig 00206 - light yellow (flower center)
  • 04
    Greenery 00418 - green (stem, leaves, sepal)
  • 05
    Teddy 00161 - light brown (pot interior/top of dirt details)
  • 06
    Marone 00157 - brown (dirt and pot base)
  • 07
    Sonne 00208 - yellow (bumblebee stripes)
  • 08
    Schwarz 00110 - black (bumblebee body)
  • 09
    Weiss 00106 - white (bumblebee wings)
  • 10
    Small amounts of each color are sufficient for one potted flower and bumblebee (use scraps or small skeins)

β€” Tools Required

  • 01
    Crochet hook 2mm
  • 02
    Sewing needle
  • 03
    Stitch marker
  • 04
    Scissors
  • 05
    Yarn needle for sewing and weaving ends
  • 06
    Polyester stuffing
  • 07
    Cardboard for the pot base
  • 08
    Optional wire for the stem (for reinforcement)

Progress Tracker

0% Complete

β€” PETALS (MAKE 6) :

Round 1 :

6 sc in mr (6)

Round 2 :

6 inc (12)

Round 3 :

(1 sc, 1 inc) x 6 (18)

Round 4 :

(2 sc, 1 inc) x 6 (24)

Round 5-7 :

24 sc (24) (3 rounds)

Round 8 :

(2 sc, 1 dec) x 6 (18)

Round 9-11 :

18 sc (18) (3 rounds)

Round 12 :

(1 sc, 1 dec) x 6 (12)

Round 13 :

12 sc (12)

Info :

Cut the yarn and fasten off, leaving a long tail for sewing. Do not add stuffing.

β€” STEM (MAKE 1) :

Round 1 :

8 sc in mr (8)

Round 2-30 :

8 sc (8) (29 rounds)

Info :

Add stuffing material to the stem as you go along. It is important to stuff the stem very firmly to make sure the finished project stands up. Adding wire is encouraged to help the flower stand up, especially if your stitches tend to be looser.

Round 31 :

BLO (1 sc, 1 inc) x 4 (12)

Round 32 :

12 inc (24)

Round 33 :

(3 sc, 1 inc) x 6 (30)

Round 34 :

(9 sc, 1 inc) x 3 (33)

Round 35 :

33 sc (33)

Info :

Cut the yarn and fasten off invisibly.

Item Name (Sepal Attachment) :

Add the sepal to the stem. Holding the flower with the stem facing up, insert the hook into the last stitch of the remaining loops of round 31 and attach green yarn (pic 1). ch 4, 3-ch picot, ch 1, slst into the next loop in the row (pics 2-3). Repeat 7 more times in the remaining loops for a total of 8 sepal (pic 4). Cut yarn and fasten off invisibly.

β€” FLOWER CENTER (MAKE 1) :

Round 1 :

6 sc in mr (6)

Round 2 :

6 inc (12)

Round 3 :

(1 sc, 1 inc) x 6 (18)

Round 4 :

(2 sc, 1 inc) x 6 (24)

Round 5 :

(3 sc, 1 inc) x 6 (30)

Round 6 :

(9 sc, 1 inc) x 3 (33)

Round 7-8 :

33 sc (33) (2 rounds)

Info :

Cut the yarn and fasten off, leaving a long tail for sewing.

β€” LEAVES (MAKE 2) :

Round 1 :

5 sc in mr (5)

Round 2 :

(1 sc, 1 inc) x 2, 1 sc (7)

Round 3 :

(2 sc, 1 inc) x 2, 1 sc (9)

Round 4 :

(2 sc, 1 inc) x 3 (12)

Round 5-7 :

12 sc (12) (3 rounds)

Round 8 :

(2 sc, 1 dec) x 3 (9)

Round 9 :

(1 sc, 1 dec) x 3 (6)

Info :

Cut the yarn and fasten off, leaving a long tail for sewing. Do not add stuffing.

β€” POT (MAKE 1) :

Round 1 :

6 sc in mr (6)

Round 2 :

6 inc (12)

Round 3 :

(1 sc, 1 inc) x 6 (18)

Round 4 :

(2 sc, 1 inc) x 6 (24)

Round 5 :

(3 sc, 1 inc) x 6 (30)

Round 6 :

(4 sc, 1 inc) x 6 (36)

Round 7 :

(5 sc, 1 inc) x 6 (42)

Round 8 :

BLO 42 sc (42)

Round 9-11 :

42 sc (42) (3 rounds)

Round 12 :

(13 sc, 1 inc) x 3 (45)

Round 13-15 :

45 sc (45) (3 rounds)

Round 16 :

(14 sc, 1 inc) x 3 (48)

Round 17-19 :

48 sc (48) (3 rounds)

Round 20 :

FLO (7 dc, 1 dcinc) x 6 (54)

Round 21 :

54 sc (54)

Info :

Cut the yarn and fasten off invisibly.

β€” DIRT (MAKE 1) :

Info :

Using brown yarn. The dirt will go inside the pot and is created in two parts: the hole in which the flower will be inserted and the top of the dirt. Begin by crocheting the hole.

Round 1 :

6 sc in mr (6)

Round 2 :

6 inc (12)

Round 3-14 :

12 sc (12) (12 rounds)

Info :

Cut the yarn and fasten off invisibly.

Info :

Begin to crochet the top of the dirt. Holding the hole with the opening facing up, insert the hook from the inside of the hole going out (pic 5). Re-attach the yarn and continue to crochet the dirt top (pics 6-7). Make sure the "wrong side" of the stitches is on the bottom of the dirt when you are finished.

Round 15 :

(1 sc, 1 inc) x 6 (18)

Round 16 :

(2 sc, 1 inc) x 6 (24)

Round 17 :

(3 sc, 1 inc) x 6 (30)

Round 18 :

(4 sc, 1 inc) x 6 (36)

Round 19 :

(5 sc, 1 inc) x 6 (42)

Round 20 :

(6 sc, 1 inc) x 6 (48)

Info :

Cut the yarn and fasten off, leaving a long tail for sewing.

β€” BUMBLEBEE WING (MAKE 2) :

Info :

Using white yarn, ch 4. Starting in the 2nd chain from the hook and working into both sides of the chain.

Round 1 :

1 sc, 1 hdc, 5 dc in the same stitch, 1 hdc, 1 sc (9)

Info :

Cut the yarn and fasten off, leaving a long tail for sewing.

β€” BUMBLEBEE BODY (MAKE 1) :

Round 1 :

6 sc in mr (6)

Round 2 :

6 inc (12)

Round 3 :

12 sc (12)

Info :

Switch to yellow yarn.

Round 4-5 :

12 sc (12) (2 rounds)

Info :

Switch to black yarn.

Round 6-7 :

12 sc (12) (2 rounds)

Info :

Begin to add stuffing material, adding more as you go along if needed.

Info :

Switch to yellow yarn.

Round 8 :

6 dec (6)

Info :

Cut the yarn and use the yarn tail to close the remaining stitches.

β€” ASSEMBLY :

Info :

Begin to assemble the flower by attaching the stem to the center piece. Place the center piece on the stem and sew the pieces together using the yarn tail of the center piece (pics 8-9). Add stuffing before sewing the last remaining stitches closed (pics 10-11).

Info :

Attach the petals by sewing along the rounds where the stem and center piece were connected (pic 12). The petals will fit closely next to one another when attached, with very little space between one another (pic 13).

Info :

Position the leaves on either side of the stem and sew in place using the long yarn tails (pic 14).

Info :

Before assembling the pot, cut out a piece of cardboard and add to the bottom of the pot for added stability (pic 15).

Info :

Attach the dirt to the pot by sewing into the remaining loops of round 20 of the pot (pics 16-18). Add stuffing before sewing the last remaining loops closed (pic 19).

Info :

Take your time adding the stuffing and make sure the hole is centered in the pot. This will help the flower stand up without falling over (pics 18-19).

Info :

Sew the wings to the bumblebee body between rounds 4 and 5 of the body using the long yarn tails (pic 20).

Assembly Instructions

  • Place the center piece on the stem and sew them together using the yarn tail of the center piece, adding stuffing before closing the last stitches (use photos 8-11 as reference).
  • Attach each of the six petals by sewing along the rounds where the stem and center piece were connected, arranging them closely so there is very little space between petals.
  • Position the two leaves on either side of the stem and sew in place using the long yarn tails for secure attachment.
  • Cut a circle of cardboard to fit inside the pot and insert it at the bottom for added stability before attaching the dirt.
  • Sew the dirt piece into the remaining loops of round 20 of the pot, add stuffing to center the hole, and then sew the final loops closed.
  • Sew the bumblebee wings to the bumblebee body between rounds 4 and 5 and close the bumblebee using the yarn tail to finish.

Important Notes

  • πŸ’‘Use stitch markers to keep track of your rounds, especially during long straight sections and when creating the stem.
  • πŸ’‘Stuff firmly but gradually; overstuffing can distort the shape while under stuffing can cause the flower to flop over.
  • πŸ’‘The stem may be reinforced by adding wire for extra stability, which is especially helpful if your tension is loose.
  • πŸ’‘Each round is worked in a spiral and does not need to be joined unless otherwise specified in the instruction.
  • πŸ’‘Pattern is written in US terms; you may use yarn-under or yarn-over techniques, but photos were made using yarn-under.

This Bumble Blossom is designed to bring a little handmade joy to your windowsill or desk, combining playful petals, a sturdy stem, and a tiny bumblebee for character. Make one in bright colors or soft pastels to match your home β€” it makes a wonderful gift or cheerful decor. Enjoy the finishing and assembly steps; a little patience creates a lovely potted flower! 🌸🧢

You ask,

we answer.

FAQs

What size will the finished piece be?

The finished project will be approximately 12 cm tall by 8.5 cm wide when using the recommended sport weight yarn and 2mm hook.

Can I use different yarn weights for this pattern?

Yes, you can use different yarn weights, but the finished size will change; choose an appropriate hook for your yarn and expect to adjust stuffing and possibly the pot base size.

Do I need prior crochet experience for this pattern?

This pattern is rated intermediate, so a basic familiarity with amigurumi techniques, increases, decreases, and working in spirals is recommended.

How long does this project typically take to complete?

Most crocheters complete this project in 5-7 hours, depending on experience, assembly time, and whether optional reinforcement like wire is added.