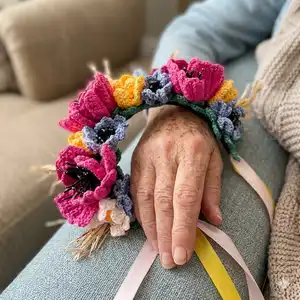
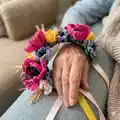
Create a beautiful floral headband using raffia yarn and simple crochet techniques. This pattern walks you through poppies, camomiles, cornflowers and decorative centres so you can craft a unique wearable bouquet. Perfect for gifts, photoshoots, or special occasions — you can customize colors and embellishments to match your style.
Progress Tracker
0% Complete
— Crochet the camomile :
Corolla (base) :
Crochet 2 CH.
Round 1 :
1 row. Crochet 6 SC in the 2nd loop from the hook.
Round 2 :
2 row. 1 Inc*6 = 12, SlSt.
Round 3 :
3 row. (6 CH, 3 DC from the 3rd loop of the hook, 1 SC, skip one loop of the 2nd row, SlSt)*6.
Info :
Cut the thread, pull out the end. Tighten the end in the 1st CH of the row to the wrong side. Tie the knot, hide the ends.
Info :
Slightly compress the centre so that it takes the shape of a ball.
Info :
Steam the corolla with an iron. Glue on the centre with the PVA glue.
Info :
Crochet four more camomiles.
— Centre :
Round 1 :
1 row. 6 SC in the 2nd loop from the hook, SlSt.
Round 2 :
2 row. 1 Inc*6 in the hole (= 12).
Info :
Cut the thread, pull out the end. Close this row: Insert the hook under the 1st loop of the row, pull out the end, tighten the end back to the wrong side. Strengthen and hide the end.
Info :
Slightly compress the centre so that it takes the shape of a ball.
Info :
Steam the corolla with an iron. Glue on the centre with the PVA glue.
Info :
Crochet four more camomiles.
— Crochet the poppy :
Round 1 :
1 row. 6 SC in the 2nd loop from the hook.
Round 2 :
2 row. 1 Inc*6 = 12, SlSt.
Instruction :
3 DC from the 3rd loop of the hook, 1 SC, skip one loop of the 2nd row, SlSt)*6.
Info :
Cut the thread, pull out the end. Tighten the end in the 1st CH of the row to the wrong side. Tie the knot, hide the ends.
Round 1 :
1 row. 6 SC in the 2nd loop from the hook, SlSt.
Round 2 :
2 row. (1 SC, 1 Inc)*3 = 9, SlSt.
Round 3 :
3 row. (6 CH, 3 DC in the hole, turn, 3 CH, SlSt, 3 CH, SlSt, 3 CH, SlSt) — follow photographic layout for shape.
Petals :
7 SC on the back loop only from the 2nd loop of the hook, SlSt in the loop of the 2nd row, turn, 7 SC on the back loop only, CH, 7 SC on the back loop only, SlSt, 7 SC on the back loop only, CH, 7 SC on the back loop only, SlSt, 7 SC on the back loop only, CH, 7 SC on the back loop only, SlSt)*3. (Sequence as photographed to create petals.)
Info :
Cut the thread, pull out the end. Tighten the end in the 1st CH of the row to the wrong side. Tie the knot, hide the ends.
Assembly :
Glue on the centre in the 2nd corolla, then the 2nd corolla — in the 1st corolla with the PVA glue.
Info :
Crochet two more poppies.
— Crochet the cornflower :
Round 0 :
Connect in the circle with SlSt.
Round 1 :
1 row. (3 CH, 3 DC in the hole, turn, 3 CH, SlSt, 3 CH, SlSt, 3 CH, SlSt) — make six petals as photographed.
Round 2 :
turn, fold the petal in half and connect with SlSt, SlSt in the hole)*6.
Info :
Cut the thread, pull out the end. Tie the knot on the wrong side, hide the ends.
Centre (cornflower) :
Wrap two fingers four times with a piece of the raffia yarn. Grab in the middle with the loop. Wrap the fold with the ends. Cut the ends of the tassel and trim to shape.
Info :
Take two pieces of raffia yarn of 2 inches (5 cm) each. Straighten both pieces. Cut the fringe on both sides, leaving 10 mm uncut in the middle.
Assembly :
Glue on the pieces from below to the centre crosswise. Dip the ends in the PVA glue and immediately in the glitter. Glue the centre in the 2nd corolla, then the 2nd corolla in the 1st corolla with the PVA glue.
— Finishing & Notes :
Info :
Glue on the centre in the 2nd corolla, then the 2nd corolla — in the 1st corolla with the PVA glue. Crochet the specified number of each flower and arrange as photographed for the headband.
Info :
Steam corollas lightly and hide all ends. Use PVA glue for small details and glitter placement.
This floral headband pattern brings together delicate raffia flowers and simple finishing tricks to create a show-stopping accessory. It is perfect for weddings, photos, or special gifts and can be customized with colors and glitter. Have fun making each flower and enjoy the process — your handmade headband will be cherished! 🌸✨