🧢 Beautiful ✨ Detailed πŸ’ Adorable

Dino Family Amigurumi Pattern

Dino Family Amigurumi Pattern
4.3β˜… Rating
12-15 Hours Time Needed
3.7K Made This
βœ‚οΈ

Intermediate Level

Ideal for those with basic crochet experience, featuring slightly more advanced stitches and techniques to expand your skills.

⏱️

Multi-Day Project

A rewarding 12+ hour journeyβ€”perfect for dedicated crafters who love detailed work.

🧸

Cute Companion

An adorable friend to cherish, handcrafted with love to bring comfort and joy for years to come.

About This Dino Family Amigurumi Pattern

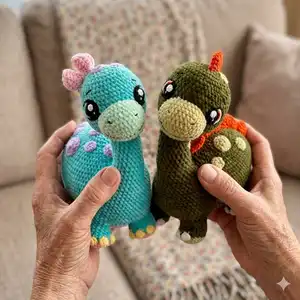
This pattern creates a soft, plush Dino Family amigurumi using plush (velvet) yarn and semi-cotton yarn for details. You will make tail, legs, body, neck and head as one seamless construction with sewn-on muzzle and decorative eyes. The pattern includes full round-by-round instructions, color changes, and guidance for strengthening the neck with a sintepon tube.

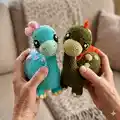
Dino Family Amigurumi Pattern crochet pattern - detailed view of completed project

Finished toy measures approximately 30 cm tall with recommended yarn and hook sizes. Instructions include stuffing guidance, placement of eyes and details for a professional finish.

Why You'll Love This Dino Family Amigurumi Pattern

I absolutely love this pattern because it combines plush texture with classic amigurumi shaping to create a cuddly, detailed dinosaur. I enjoy how the process of attaching legs and tail while crocheting keeps the construction seamless and sturdy. The sintepon tube trick for the neck gives such a clean, poseable look that makes the finished toy stand out. Sharing this pattern lets me pass on techniques I use to get smooth joins and a professional finish.

Dino Family Amigurumi Pattern step 1 - construction progress Dino Family Amigurumi Pattern step 2 - assembly progress Dino Family Amigurumi Pattern step 3 - details and accessories Dino Family Amigurumi Pattern step 4 - final assembly and finishing

Switch Things Up

I love how many ways you can customize this Dino Family pattern to make each toy unique; try switching color palettes for vintage or pastel looks.

I often change yarn weight and hook size to create different sizes β€” using bulky yarn and a larger hook gives a chunky, cuddly version while thinner yarn creates a mini companion.

I like to add embroidered freckles, eyebrows or tiny teeth to change the dinosaur's expression; these small details dramatically change personality.

You can replace the sintepon neck tube with a lightweight wire for a posable neck if you want a model that can be posed safely.

Try different spikes and spot shapes β€” crocheted spots, felt circles or surface embroidery all look great and are simple swaps.

I sometimes make detachable accessories like tiny scarves, hats or bows using the same cotton yarn as the eyes for color cohesion.

For safety and durability, consider sewing on felt eyes for baby toys or using securely embroidered details instead of safety eyes.

Make a family set by creating different sizes and colors β€” siblings, parents and a baby dino look adorable grouped together.

I recommend experimenting with texture by combining plush body yarn with cotton details; the contrast is tactile and visually appealing.

Don't be afraid to re-position eyes and muzzle before final sewing β€” slight shifts alter expression and make each dinosaur one-of-a-kind.

Common Mistakes & How to Fix Them

βœ— Skipping stitch markers during the oval body rounds can lead to misplaced legs and tail; place markers at the attachment points and at the start of rounds to keep alignment accurate. βœ— Overstuffing early causes a lumpy shape and makes it difficult to sew the head later; stuff gradually and evenly, especially around the neck base and leg areas. βœ— Changing colors without securing ends neatly may cause bulky seams; carry the yarn or weave in ends to the wrong side and secure thread tails as you go. βœ— Not reinforcing the neck area will make the head floppy; insert a sintepon tube or fabric-wrapped support and stuff around it tightly for a stable neck.

Dino Family Amigurumi Pattern

Make a charming Dino Family amigurumi with step-by-step instructions designed to guide you through each round, attachment and finishing touch. This pattern uses plush and semi-cotton yarns for a soft, cuddly texture and includes full assembly guidance. Perfect for creating a sweet handmade gift or a collectible set for your home.

Intermediate 12-15 Hours

Materials Needed for Dino Family Amigurumi Pattern

β€” Main Fabric

  • 01
    Plush velvet yarn (120 m/100 g) (131 yds/3.5 oz) - Himalaya Dolphin Baby / YarnArt Dolce - Main color consumption 1.5-2 skeins
  • 02
    Dark green (main color) - approx. 1.5-2 skeins
  • 03
    Light green (sole, tummy, muzzle, spots) - less than half a skein
  • 04
    Orange (spikes) - less than half a skein (YarnArt Dolce 778 shown)
  • 05
    White/ivory (claws, small details) - small amount
  • 06
    Cotton/semi-cotton yarn (~330 m/100 g) (361 yds/3.53 oz) - YarnArt Jeans, Alize Cotton Gold for details (colors: orange, black, white)

β€” Tools Required

  • 01
    Crochet hook 3.5 mm for the body (use 3.5-4 mm for plush depending on yarn)
  • 02
    Crochet hook 2 mm for the eyes and small details (2-2.5 mm for eyes/bow)
  • 03
    Large needle for sewing body details
  • 04
    Stitch markers
  • 05
    Pins with large head
  • 06
    Scissors
  • 07
    Fiber filling (polyester stuffing)
  • 08
    Synthetic insulation / sintepon or dense fabric to strengthen the neck (tube)
  • 09
    Fabric patch for fixation of the sintepon tube
  • 10
    Optional: wire for posable neck if using semi-cotton yarn

Progress Tracker

0% Complete

β€” Tail :

Info :

*dark green yarn. Tip: If the magic ring made of plush yarn couldn't be tightened, you can use 2 CH instead, working first 6 SC in the second chain from the hook.

Round 1 :

6 SC in MR (6)

Round 2-3 :

2 rounds 6 SC (6)

Round 4 :

2 SC, 2 INC, 2 SC (8)

Round 5 :

DEC, SC, 2 INC, SC, DEC (8)

Round 6 :

3 SC, 2 INC, 3 SC (10)

Round 7 :

DEC, 2 SC, 2 INC, 2 SC, DEC (10)

Round 8 :

4 SC, 2 INC, 4 SC (12)

Round 9 :

DEC, 3 SC, 2 INC, 3 SC, DEC (12)

Round 10 :

3 SC, (SC, INC)*3, 3 SC (15)

Round 11 :

15 SC (15)

Round 12 :

3 SC, (2 SC, INC)*3, 3 SC (18)

Round 13 :

18 SC (18)

Round 14 :

3 SC, (3 SC, INC)*3, 3 SC (21)

Round 15 :

21 SC (21)

Round 16 :

3 SC, (4 SC, INC)*3, 3 SC (24)

Info :

Fix and cut the thread.

β€” Legs :

Info :

*crochet 4 details. *start with light green yarn.

Round 1 :

7 SC in MR (7)

Round 2 :

7 INC (14)

Round 3 :

(SC, INC)*7 (21)

Info :

Change color to dark green.

Round 4 :

BLO: 7 SC, (change color to white, PS, change color to dark green, 2 SC)*3, 5 SC (21)

Round 5 :

5 SC, (DEC, 2 SC)*2, DEC, 6 SC (18)

Round 6-8 :

3 rounds 18 SC (18)

Info :

Fix and cut the thread. Make four leg details.

β€” Body-Head :

Info :

*start with light green yarn. *legs and tail are going to be attached in the process. *stuff in process. Work in spiral (without a turning CH and SS) as in all amigurumi toys (oval-shape detail).

Round 0 :

Chain 23; work in spiral (without a turning CH and SS) as in all amigurumi toys (oval-shape detail)

Round 1 :

start in the 2nd chain from the hook: 21 SC, 3 SC into the last chain from the hook, on the other side: 20 SC, INC (46)

Round 2 :

INC, 20 SC, 3 INC, 20 SC, 2 INC (52)

Round 3 :

SC, INC, 20 SC, (SC, INC)*3, 20 SC, (SC, INC)*2 (58)

Info :

In Round 4 we attach the legs; place stitch marker right in the middle on the top of the oval; mark the place of attaching on the oval: 4 areas of 6 SC at a distance of 11 SC on the sides and of 6 SC on the tops of the oval.

Round 4 :

3 SC, 6 SC with the leg, 11 SC, 6 SC with the leg, 6 SC, 6 SC with the leg, 11 SC, 6 SC with the leg, 3 SC (58)

Info :

Change color to dark green when indicated.

Round 5 :

3 SC, 12 SC on the outer leg contour, 11 SC, 12 SC on the outer leg contour, 6 SC, 12 SC on the outer leg contour, 11 SC, 12 SC on the outer leg contour, 3 SC (82)

Info :

To avoid gaps when shifting from the body to the outer leg contour, work the already worked SC in Round 4 on the inner attaching leg side with the first SC on the outer leg contour in Round 5 as a DEC. You can also sew gaps on the wrong side later.

Round 6-8 :

3 rounds 82 SC (82)

Info :

In Round 9 the tail is attached; mark the area of tail attaching: 6 SC exactly in the middle behind, between the legs; move stitch marker (red) in the next SC from the left marker of the tail attaching area.

Round 9 :

76 SC, 6 SC with the tail (82)

Round 10 :

76 SC, 18 SC on the outer tail contour (94)

Round 11-12 :

2 rounds 94 SC (94)

Round 13 :

76 SC, (DEC, 6 SC)*2, DEC (91)

Round 14 :

91 SC (91)

Round 15 :

76 SC, DEC, 5 SC, DEC, 4 SC, DEC (88)

Round 16 :

88 SC (88)

Round 17 :

76 SC, (DEC, 3 SC)*2, DEC (85)

Round 18 :

85 SC (85)

Round 19 :

76 SC, DEC, 2 SC, DEC, SC, DEC (82)

Info :

Mark 18 SC in the front in the middle (neck area); count 32 SC from the right marker and put the stitch marker in the 32nd SC.

Round 20 :

6 SC, DEC, 24 SC, 6 CH, skip 18 SC (neck area with markers), 22 SC, DEC, 6 SC, DEC (61+6 CH)

Round 21 :

5 SC, DEC, 24 SC, 6 SC on the chain, 21 SC, DEC, 5 SC, DEC (64)

Info :

If required, move stitch marker 1 SC to the left of the middle of the back so that the last DEC in the round is in the middle of the back. Don't forget to stuff legs, tail and body in process.

Round 22-33 :

12 rounds 21 SC (for a girl work 11 rounds) (21)

Info :

Prepare a sintepon/synthetic insulation tube: cut a square of sintepon one and a half neck length, wrap a tube and fix with a fabric patch. Stuff well the area of neck base and insert the sintepon tube into the neck so that it goes slightly below the neck and beyond the last round of the neck about half the length of the future head. Sintepon can be replaced by fleece or felt; if using semi-cotton yarn, a wire frame insulated with a fabric patch can be inserted into the neck.

Info :

Return to Round 19, to the neck hole. Attach the thread to the left stitch marker as shown in the photo, leave a long thread end at the beginning to sew the gap on the side later. Don't stuff the neck yet.

Round 20 (neck opening) :

18 SC on the body, SC in the loop-transition from body to chain, 6 SC on the chain, SC in the loop-transition from body to chain (26)

Round 21 (neck) :

16 SC, 5 DEC (21)

Info :

Sew the hole on the side if required, fix and hide the thread inside. If required, move stitch marker 1 SC to the left of the middle of the back.

Round 22-33 (neck tube) :

12 rounds 21 SC (21)

Info :

Stuff well the area of neck base and insert the sintepon tube into the neck so that it goes slightly below the neck and goes beyond the last round of the neck about half the length of the future head; stuff additionally around the tube so the neck and its base are tightly stuffed and keep the future head well.

Return to Round 19 :

Return to Round 19, to the neck hole, attach the thread to the left stitch marker as shown, leave a long thread end at the beginning to sew the gap on the side later; don't stuff the neck yet.

Info :

Move stitch marker in the middle of the neck behind.

Round 34 :

4 SC, 12 INC, 5 SC (33)

Round 35 :

4 SC, (SC, INC)*12, 5 SC (45)

Round 36 :

17 SC, (2 SC, INC)*3, 19 SC (48)

Round 37-48 :

12 rounds 48 SC (48)

Info :

Stuff well the area of transition from the neck to the head, continue stuffing in the process.

Round 49 :

(6 SC, DEC)*6 (42)

Round 50 :

(5 SC, DEC)*6 (36)

Round 51 :

(4 SC, DEC)*6 (30)

Round 52 :

(3 SC, DEC)*6 (24)

Round 53 :

(2 SC, DEC)*6 (18)

Round 54 :

(SC, DEC)*6 (12)

Round 55 :

6 DEC (6)

Info :

Tighten the hole, fix the thread and hide the end inside the head.

β€” Muzzle :

Info :

*light green yarn.

Round 0 :

Chain 6; work in spiral (without a turning CH and SS)

Round 1 :

start in the 2nd chain from the hook: 4 SC, 3 SC into the last chain from the hook, on the other side: 3 SC, INC (12)

Round 2 :

INC, 3 SC, 3 INC, 3 SC, 2 INC (18)

Round 3 :

SC, INC, 3 SC, (SC, INC)*3, 3 SC, (SC, INC)*2 (24)

Round 4 :

2 SC, INC, 3 SC, (2 SC, INC)*3, 3 SC, (2 SC, INC)*2 (30)

Round 5 :

3 SC, INC, 3 SC, (3 SC, INC)*3, 3 SC, (3 SC, INC)*2 (36)

Round 6-7 :

2 rounds 36 SC (36)

Info :

Fix the thread and leave a long end to sew; stuff the detail; sew it in the area of Rounds 34-42 on the head.

β€” Eyes :

Info :

*start with black semi-cotton yarn, 2 mm hook.

Round 1 :

6 SC in MR (6)

Round 2 :

6 INC (12)

Round 3 :

(SC, INC)*6 (18)

Round 4 :

(2 SC, INC)*4, change color to orange, DON'T cut the black thread, (2 SC, INC)*2 (24)

Info :

Work SS, or finish with straight line as shown; cut the orange thread, withdraw it to the wrong side and fix it; attach the white thread to the first orange SC and work the white detail.

Left eye :

3 CH, DC in the same St, DC, 2 HDC, 4 SC, SS (or finish with straight line instead of working the last SS)

Right eye :

SS, 4 SC, 2 HDC, 2 DC, 3 CH, SS in the same St

Info :

Cut the white thread, withdraw to the wrong side and fix it; attach the black thread to the last black SC and crochet the detail around with SC; work 3 SC in one St in the two lower corners of the eye; fix the thread and leave a long end to sew.

β€” Eye glares :

Item Name (P1) :

Crochet 2 eye glares of white semi-cotton yarn: 6 SC in MR; join the round and leave a long thread end to sew; sew glare on the eye and embroider additional small glare.

Info :

Sew the eyes on the head in the area of Rounds 41-45 at a distance of 10 SC between them.

Assembly Instructions

  • Attach the four legs to the body in Round 4 while crocheting: work the leg pieces into the body as indicated (6 SC with the leg at each attaching point) to secure them firmly.
  • Attach the tail in Round 9 by working 6 SC with the tail into the body at the marked middle area behind, between the legs; align stitch markers before joining.
  • Sew the muzzle to the head in the area of Rounds 34-42; stuff the muzzle and use the long tail left when finishing to sew it securely with hidden stitches.
  • Insert the sintepon tube into the neck base as instructed: wrap and fix a tube, insert into the neck so it goes slightly below the neck base and extends beyond the last neck round about half the head length, then stuff tightly around it.
  • Sew the eyes onto the head in the area of Rounds 41-45, placing them 10 SC apart; sew on the white glaries and embroider extra sparks with white thread for a finished look.
  • Move stitch markers as indicated (count 32 SC from the right marker, place marker in the 32nd SC) to locate neck and head centers for correct placement when shaping and closing.
  • Close the head by stuffing gradually, working the decrease rounds 49-55, tightening the hole and hiding the thread end inside the head for a neat finish.

Important Notes

  • πŸ’‘Use stitch markers to keep track of round starts and placement of legs, tail and neck attachments for accurate shaping and alignment.
  • πŸ’‘Stuff gradually and consistentlyβ€”overstuffing early can distort shaping and under-stuffing will make the toy floppy; stuff the neck base firmly around the sintepon tube.
  • πŸ’‘When changing colors, secure and hide ends to the wrong side to avoid bulky seams; weave ends in as you go for a clean finish.
  • πŸ’‘Place and move stitch markers as directed (for example count 32 SC to find the neck center) to ensure correct placement of head and facial features.

This Dino Family amigurumi pattern brings playful charm and plush texture together in a cuddly handmade toy you can be proud of. Whether you make a single dino or a whole family, each piece is full of personality and soft details you will love. Create one for a gift, nursery, or your own collection β€” happy stitching and joyful cuddles await! πŸ§ΆπŸ¦•

You ask,

we answer.

FAQs

What size will the finished piece be?

The finished amigurumi measures approximately 30 cm tall when using the recommended plush yarn and hooks (3.5 mm body hook).

Can I use different yarn weights for this pattern?

Yes, you can use different yarn weights but it will affect the final size and structure; adjust hook size accordingly and consider adding a wire or sintepon tube for neck support if using lighter yarns.

Do I need prior crochet experience for this pattern?

This pattern is rated intermediate and assumes familiarity with amigurumi techniques, working in spiral, increases and decreases, and attaching parts while crocheting.

How long does this project typically take to complete?

Most crocheters complete this project in 12-15 hours across multiple sessions, depending on experience level and how much time you spend on finishing and embroidery details.