🧶 Beautiful ✨ Detailed 💝 Adorable

Efflorescent Square Pattern

Efflorescent Square Pattern
4.4★ Rating
5-7 Hours Time Needed
3.1K Made This
✂️

Intermediate Level

Ideal for those with basic crochet experience, featuring slightly more advanced stitches and techniques to expand your skills.

⏱️

Weekend Treat

Takes 5-7 hours, making it an enjoyable project to finish over a couple of days.

🏡

Cozy Accent

A warm touch for your space that transforms ordinary corners into inviting nooks filled with handmade charm.

About This Efflorescent Square Pattern

Efflorescent Square is a richly textured crochet square inspired by the bloom of a flower, built round-by-round with clusters, split-puffs and decorative popcorns. The pattern uses worsted weight cottons for crisp stitch definition and beautiful drape. Photographs and stitch definitions help you through special techniques used in the design.

Efflorescent Square Pattern crochet pattern - detailed view of completed project

Designed to work as a stunning standalone square or combined into afghans and home projects. Two curated colorways are provided to inspire your color placement and finishing.

Why You'll Love This Efflorescent Square Pattern

I absolutely love this pattern because it layers familiar stitches in a fresh and floral way that always delights when it blooms into a full square. I enjoy how the split-puffs and 4-tr clusters create depth without being fussy, making the texture exciting to crochet. The colorway options let me play with contrasts and soft blends, and the finished square blocks beautifully. Sharing this pattern makes me happy because crocheters can create elegant, tactile pieces that feel both modern and timeless.

Efflorescent Square Pattern step 1 - construction progress Efflorescent Square Pattern step 2 - assembly progress Efflorescent Square Pattern step 3 - details and accessories Efflorescent Square Pattern step 4 - final assembly and finishing

Switch Things Up

I love how versatile this square is for color experiments; try a monochrome palette for a subtle textured look or high contrast for dramatic petals.

You can make a larger project by joining multiple squares into a blanket — alternate colorways or use a gradient for a bold effect.

I often switch to a bulky cotton and a larger hook to create a chunky, cozy square perfect for cushions; remember this affects gauge and size.

To make a mini version for keychains or ornaments, use fingering weight yarn and a smaller hook to shrink the motif down while keeping stitch detail.

Try embellishing with tiny beads or embroidery in the center to add a sparkle or personal touch to the floral center.

I sometimes omit the popcorns or replace them with small bobble stitches to alter the texture and ease finishing for beginners.

Experiment with a subtle variegated yarn for the rounds with clusters to give a marled floral effect without changing colors constantly.

If you want a vintage look, work the square in muted pastels and finish with a lacy join or shell border for a classic feel.

I recommend practicing the split-puff on a small swatch and adjusting how firmly you pull the loops to control puff height and appearance.

For a modern, graphic blanket, stick to two contrasting colors and alternate which color forms the petal outlines across squares to create movement.

Common Mistakes & How to Fix Them

✗ Not reading the special stitch definitions before starting; read and practice split-puff and 4tr-cluster instructions first to avoid confusion during the round. ✗ Skipping stitch markers when required causes misplacement of marked stitches; place a marker in the first stitch of rounds that instruct you to do so and move it as you progress. ✗ Tension changes between rounds create an uneven square shape; maintain consistent tension and check your gauge occasionally to keep sides even. ✗ Forgetting to fasten off and weave ends as directed leaves messy joins; fasten off at each color change and weave in ends neatly before continuing the next color. ✗ Overstuffing or hurried blocking can distort stitch definition; block gently using pins and your preferred blocking method to shape the square properly.

Efflorescent Square Pattern

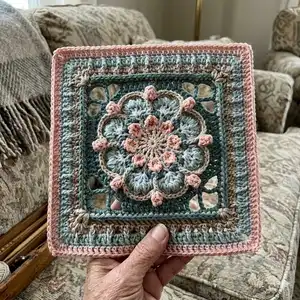
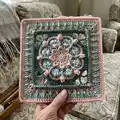
This elegant crochet square combines floral motifs, textured puff stitches and striking colorways to create a standout square for blankets, cushions or standalone displays. You will enjoy layered stitches, clear round-by-round directions, and photographic guidance to help you follow along. The pattern is versatile — customize colors and yarns to make a unique heirloom piece.

Intermediate 5-7 Hours

Materials Needed for Efflorescent Square Pattern

— Main Fabric

  • 01
    I LOVE THIS COTTON (Worsted Weight), 100% cotton (used for Colorway accents)
  • 02
    Yarn Bee Pima Suprema (Worsted Weight), 100% cotton
  • 03
    Yarn Bee ~ Cotton Et Lin (Worsted Weight), 80% cotton, 20% linen
  • 04
    Loops & Threads ~ Creme Cotton (Worsted Weight), 87% cotton, 13% nylon
  • 05
    Colorway 1: A - Bone (Yarn Bee, Pima Suprema); B - Warm Blush (I Love This Cotton); C - Serena Spa (I Love This Cotton); D - Cyan (Yarn Bee, Cotton Et Lin); E - Arctic Ice (I Love This Cotton); F - Chintz (Yarn Bee, Cotton Et Lin)
  • 06
    Colorway 2: A - Lace (Yarn Bee, Pima Suprema); B - Smokey Plum (Yarn Bee, Cotton Et Lin); C - Deep Orchid (Loops & Threads, Creme Cotton); D - Pale Orchid (Loops & Threads, Creme Cotton)

— Tools Required

  • 01
    Crochet hook size 4.5 mm (G) and 5.0 mm (H) as suggested for finished and blocked sizes
  • 02
    Scissors
  • 03
    Stitch markers
  • 04
    Yarn darning/tapestry needle for weaving ends
  • 05
    Measuring tape or ruler for blocking to size
  • 06
    Pins for blocking (optional)

Progress Tracker

0% Complete

— Efflorescent Square :

Info :

Hook Used/Finished and blocked Size: 4.5 mm, 11"; 5 mm 12". Crochet Terms: US terminology throughout. Skill Level: Ending intermediate.

Info :

All rnds begin with a standing stitch and end with an invisible join unless another option is available. Some rnds may include instructions for a slst join and if not changing colors, how to start the next rnd. When used, the ch(s) replaces the 1st st shown in the instructions of the rnd.

Round 1 :

Start in double magic circle. ch 5 (as a dc AND ch 2); [dc, ch 1; dc, ch 2] 7 times; dc, ch 1; Join: invisible join to 4th ch of rnd, fasten off. Counts: 16 dc, 8 ch-1 sp, 8 ch-2 sp (40 total)

Round 2 :

Start in any ch-2 sp, *4tr-cluster in ch-2 sp; ch 5, sk dc, ch-1 sp AND dc*; REPEAT FROM * TO * 7 MORE TIMES; Join: invisible join to 1st ch of rnd, fasten off. Counts: 8 4tr-cluster, 8 ch-5 sp (48 total)

Round 3 :

Start in any ch-1 sp of rnd 1, *fold ch-5 to the back, tr in ch-1 sp of rnd 1; ch 2, sk ch-5 sp; shallow FPsc around 4tr-cluster, ch 2*; REPEAT FROM * TO * 7 MORE TIMES; Join: invisible join to 1st ch of rnd, fasten off. Counts: 8 shallow FPsc, 8 tr, 16 ch-2 sp (48 total)

Round 4 :

Start in ch-2 sp after any shallow FPsc, *sc in ch-2 sp; long sc around same ch-2 sp AND ch-5 sp of rnd 2 as one; sc in previously worked ch-2 sp of rnd 3; ch 2, sk tr; sc in ch-2 sp; long sc around same ch-2 sp AND ch-5 sp of rnd 2 as one; sc in previously worked ch-2 sp; ch 2, sk shallow FPsc*; REPEAT FROM * TO * 7 MORE TIMES; Join: invisible join to 1st long sc of rnd, fasten off. Counts: 32 sc, 16 long sc, 16 ch-2 sp (80 total)

Round 5 :

Note: work in rnd 3 only and in front of ch-2 sps of rnd 4. Start in any tr of rnd 3, *([dc, ch 1] 4 times, dc) in tr of rnd 3; sk to next shallow FPsc of rnd 3, sc in shallow FPsc; sk to next tr of rnd 3*; REPEAT FROM * TO * 7 MORE TIMES; Join: invisible join to 1st ch of rnd, fasten off. Counts: 8 sc, 40 dc, 32 ch-1 sp (80 total)

Round 6 :

Note: read instructions for split-puff before starting this rnd. Start between any sc and dc, *split-puff - between sc and dc, and next ch-1 sp, place st marker in 1st st; [ch 1, split-puff – using previously worked ch-1 sp, and next ch-1 sp] 3 times; ch 1, split-puff - using previously worked ch-1 sp, and between next dc and sc; sk sc*; REPEAT FROM * TO * 7 MORE TIMES; Join: invisible join to 1st ch of rnd, fasten off. Counts: 40 split-puff, 32 ch-1 sp (72 total)

Round 7 :

Start in ch-1 sp after marked st of rnd 6, *[(2 hdc) in ch-1 sp, sk split-puff] 4 times - remove marker; ch 1, FPdc around sc of rnd 5 that sits between 2 split-puffs; ch 1, sk split-puff*; REPEAT FROM * TO * 7 MORE TIMES; Join: invisible join to 2nd hdc of rnd, fasten off. Counts: 64 hdc, 8 FPdc, 16 ch-1 sp (88 total)

Round 8 :

Start in any FPdc, *PC in FPdc, ch 4; sk to 3rd split-puff of rnd 6, slst in BL and 3LP of split-puff as one; ch 4, sk to next FPdc of rnd 7*; REPEAT FROM * TO * 7 MORE TIMES; Join: invisible join to 1st ch of rnd, fasten off. Counts: 8 slst, 8 PC, 16 ch-4 sp (80 total)

Round 9 :

Note: Before starting, read the information about slst join and starting the next rnd. Start in hdc of rnd 7 immediately before any PC and always in front of ch-4 sps of rnd 8, *dc in 3LP of hdc; FPsc around PC; dc in 3LP of hdc; hdc in 3LP of 3 hdc; dc in 3LP of 2 hdc; ext-dc in 3LP of hdc; tr in 3LP of hdc; FPsc around PC; tr in 3LP of hdc; ext-dc in 3LP of hdc; dc in 3LP of 2 hdc; hdc in 3LP of 3 hdc*; REPEAT FROM * TO * 3 MORE TIMES; Join: slst to dc OR invisible join to 1st FPsc of rnd, fasten off. Counts: 8 FPsc, 24 hdc, 24 dc, 8 ext-dc, 8 tr (72 total)

Round 10 :

Start in any FPsc between 2 dc OR slst into FPsc and ch 2 (as 1st hdc of rnd), *hdc in FPsc, dc AND 2 hdc; dc in hdc AND 2 dc; ch 3, sk ext-dc AND tr; (ext-tr, ch 5 as a corner; ext-tr) in FPsc; ch 3, sk tr AND ext-dc; dc in 2 dc AND hdc; hdc in 2 hdc AND dc*; REPEAT FROM * TO * 3 MORE TIMES; Join: invisible join to 2nd hdc of rnd, fasten off. Counts: 28 hdc, 24 dc, 8 ext-tr, 8 ch-3 sp, 4 ch-5 corner sp (84 total/21 per side)

Round 11 :

Start in any ch-5 corner sp, *(3 hdc, ch 2, 3 hdc) in ch-5 corner sp; hdc in ext-tr; (2 hdc) in ch-3 sp; hdc in 3 dc, 7 hdc AND next 3 dc; (2 hdc) in ch-3 sp; hdc in ext-tr*; REPEAT FROM * TO * 3 MORE TIMES; Join: invisible join to 2nd hdc of rnd, fasten off. Counts: 100 hdc, 4 ch-2 corner sp (100 total/25 per side)

Round 12 :

Start in any ch-2 corner sp, *([2loop-puff, ch 1] 3 times; BPdc around 25 hdc, ch 1)*; REPEAT FROM * TO * 3 MORE TIMES; Join: invisible join to 1st ch of rnd, fasten off. Counts: 100 BPdc, 12 2loop-puff, 16 ch-1 sp (128 total/32 per side)

Round 13 :

Start in ch-1 sp after 1st 2loop-puff of any corner, *(2loop-puff, ch 1, 2loop-puff) in ch-1 sp; ch 3 as a corner, sk 2loop-puff; (2loop-puff, ch 1, 2loop-puff) in ch-1 sp; ch 1, sk 2loop-puff; dc3tog, using ch-1 sp and next 2 BPdc, ch 2; [dc3tog using next 3 BPdc, ch 2] 7 times; dc3tog using next 2 BPdc and ch-1 sp; ch 1, sk 2loop-puff*; REPEAT FROM * TO * 3 MORE TIMES; Join: invisible join to 1st ch of rnd, fasten off. Counts: 36 dc3tog, 16 2loop-puff, 16 ch-1 sp, 32 ch-2 sp, 4 ch-3 corner sp (132 total/33 per side)

Round 14 :

Start in any ch-3 corner sp, *(2 ext-dc, ch 2, 2 ext-dc) in ch-3 corner sp; sk 2loop-puff, 2 ext-dc in ch-1 sp; sk 2loop-puff; ext-dc in ch-1 sp; FPtr around 2nd partial dc of dc3tog; (2 ext-dc) in ch-2 sp] 8 times; FPtr around 2nd partial dc of dc3tog; ext-dc in ch-1 sp; sk 2loop-puff; 2 ext-dc in ch-1 sp; sk 2loop-puff*; REPEAT FROM * TO * 3 MORE TIMES; Join: invisible join to 2nd dc of rnd, fasten off. Counts: 104 ext-dc, 36 FPtr, 4 ch-2 corner sp (140 total/35 per side)

Round 15 :

Start in any ch-2 corner sp, *(2 dc, ch 2, 2 dc) in ch-2 corner sp; dc in 35 sts*; REPEAT FROM * TO * 3 MORE TIMES; Join: invisible join to 2nd dc of rnd, fasten off. Counts: 156 dc, 4 ch-2 corner sp (156 total/39 per side)

Assembly Instructions

  • Block the finished square to the stated blocked size using pins and steam or wet-block method to even out stitches and reach final shape and size.
  • If joining multiple squares, lay out squares with matching color placement and use your preferred join method (whipstitch, join-as-you-go or slip stitch join) ensuring corners align evenly.
  • Weave in all ends securely on the backside; when changing colors multiple times, trim tails to a manageable length and hide them under nearby stitches as you weave.
  • Pin decorative elements (popcorns, puffs) into position and secure any loose loops before final blocking to keep texture intact.

Important Notes

  • 💡Use stitch markers to keep track of rounds and the special marked stitch in round 6 to maintain consistent placement throughout the square.
  • 💡Practice split-puff and 4tr-cluster techniques on a swatch before starting the main square so you are comfortable with the stitch heights and placement.
  • 💡Always fasten off and weave ends at each color change to prevent long tails from showing through later; this also helps with neat blocking and assembly.

This Efflorescent Square pattern is a labor of love that celebrates floral texture and stitch play in every round. The carefully layered stitches and colorways make each square feel like a little work of art. Whether you make one as a focal piece or join many into a blanket, it brings joy to your hands and home. 🧶✨

You ask,

we answer.

FAQs

What size will the finished piece be?

The finished square measures approximately 11" blocked using a 4.5 mm hook and worsted weight cotton; using a 5 mm hook will yield approximately 12".

Can I use different yarn weights for this pattern?

Yes, you can use different yarn weights but this will change the finished size and drape; choose an appropriate hook for the yarn and make a gauge swatch to adjust if necessary.

Do I need prior crochet experience for this pattern?

This pattern is rated intermediate — you should be comfortable with basic stitches (dc, hdc, clusters) and willing to learn special stitches like split-puff and 4tr-cluster.

How long does this project typically take to complete?

Most crocheters complete this square in about 5-7 hours depending on familiarity with special stitches and color changes.