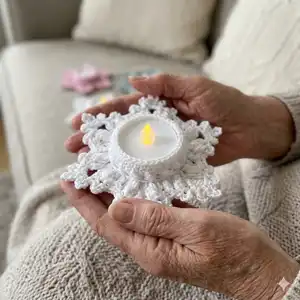
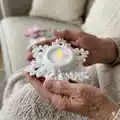
Make a delicate crocheted LED tealight holder that looks like a tiny snowflake. This pattern guides you step-by-step through a small circular base, textured puff stitches and a pretty scalloped edge so your LED tealight sits snugly and beautifully. Perfect for gifts, holiday decor or a cozy handmade touch in any room.
Progress Tracker
0% Complete
— Tealight Holder :
Info :
Use crochet hook 3.0 mm, make a magic ring. (If you crochet rather loosely, take a 2.5 mm needle here)
Round 1 :
Ch 1, 6 sc in ring. Join with slst in first stitch (= 6 sc).
Round 2 :
Ch 1, 2 sc in each stitch around. Join with slst in first stitch (= 12 sc).
Round 3 :
Ch 1, (sc in next sc, 2 sc in next sc) around. Join with slst in first stitch (= 18 sc).
Round 4 :
Ch 1, (sc in next 2 sc, 2 sc in next sc) around. Join with slst in first stitch (= 24 sc).
Round 5 :
Ch 1, (sc in next 3 sc, 2 sc in next sc) around. Join with slst in first stitch (= 30 sc).
Round 6 :
Ch 1, (sc in next 4 sc, 2 sc in next sc) around. Join with slst-blo in first stitch (= 36 sc).
Info :
All stitches of the following round are worked into the front loops/non-crocheted front loops of the previous round where specified.
Round 7 :
Ch 2, 1 dc-blo (into the same puncture site as slst), 35 puff st-blo. Join with slst in first stitch (= 36 stitches).
Round 8 :
Ch 2, 1 FPpuff st around ch2 and dc of round 7 (see also basic instruction): for this, yarn over, insert the hook around the ch2 and dc of round 7 (from front to back to front) and grab the yarn (3 loops on hook), repeat 1 more time (5 loops on hook), get the yarn and pull it through the first 4 loops, get the yarn again and pull it through the last 2 loops. Insert hook between the 1st and 2nd stitch of last round and crochet 1 puff st, ch 3, insert hook between the 2nd and 3rd stitch of last round and crochet 1 puff st, crochet in the 3rd stitch 1 FPpuff st, ch 2, skip 1 stitch, crochet 1 FPslst in next stitch, ch 2, skip 1 stitch. Crochet in the next 3 stitches as follows: 1 FPpuff st into the 1st stitch, 1 puff st between the 1st and 2nd stitch, ch 3, 1 puff st between the 2nd and 3rd stitch, 1 FPpuff st into the 3rd stitch, ch 2, skip 1 stitch, 1 FPslst, ch 2, skip 1 stitch. Repeat from this sequence 4 more times. Do not close the round here; closing is done with the 1st slst of the 9th round.
Info :
Images and step sequence show how to form FPpuff and puff stitches: gather 3 loops then 5 loops as described, pull through in stages for a neat puff.
Round 9 :
[slst, ch 3, slst] in 1st stitch, ch 1, skip 1 stitch. Crochet in first ch3-space as follows: [slst, ch 3, slst in 2nd chain from hook, ch 1, slst in ch3-space, ch 4, slst in 2nd chain from hook, ch 2, slst in ch3-space, ch 3, slst in 2nd chain from hook, ch 1, slst in ch3-space]. Ch 1, skip 1 stitch, [slst, ch 3, slst] in next stitch. Ch 1. Make 1 special slst as follows: insert between the two puff stitches of the 7th round (before the FPslst of the 8th round), yarn over and pull up a loop (2 loops on the hook), insert between the next two puff stitches of the 7th round, yarn over and pull it through the stitch and both loops on the hook. Ch 1. *[slst, ch 3, slst] in next FPpuff st, ch 1, skip 1 stitch. Crochet in next ch3-space repeating the ch3-space sequence above. Ch 1, skip 1 stitch, [slst, ch 3, slst] in next stitch, ch 1, 1 special slst as described. Repeat from * 4 more times. Fasten off. Close the round with sewing.
— Edge for the tea light :
Info :
Continue crocheting with crochet hook 2.5 mm. (The designer changed to 2.5 mm for a tighter fit for the tea light; if you crochet rather loosely, use a 2.0 mm needle.) All stitches of the next round are crocheted into the non-crocheted front loops of the 6th round.
Round 1 (edge) :
Insert at one stitch of the 6th round, yarn over and pull up a loop, crochet ch 2. Crochet 1 dc into the same stitch. *Ch 1, skip 1 stitch, 1 puff st in next stitch; repeat from * 16 more times. Ch 1, join with slst in first stitch.
Round 2 (edge) :
[1 slst, ch 2, 1 dc] in first ch1-space, * ch 1, puff st in next ch1-space; repeat from * 16 more times. Ch 1, join with slst in first stitch.
Round 3 (edge) :
Ch 1, sc in first stitch, sc in next ch1-space, * sc in next stitch, sc in next ch1-space; repeat from * 16 more times. Fasten off. Close the round with sewing.
Info :
Managed! Your new LED tealight holder is ready. Place an LED tealight in the center and enjoy the soft glow.
This sweet "Let it Snow" LED tealight holder brings a handmade, cozy sparkle to any table or shelf.
It works up quickly with fine yarn and small hooks, perfect for gifting or holiday displays.
Enjoy making and sharing the warm glow of your crochet creations! 🧶🕯️