🧢 Beautiful ✨ Detailed πŸ’ Adorable

Dog Granny Square Pattern

Dog Granny Square Pattern
4.9β˜… Rating
2-4 Hours Time Needed
2.8K Made This
βœ‚οΈ

Intermediate Level

Ideal for those with basic crochet experience, featuring slightly more advanced stitches and techniques to expand your skills.

⏱️

Bite-Sized Project

Finishes in 2-4 hoursβ€”perfect for an afternoon of creative relaxation.

🏑

Cozy Accent

A warm touch for your space that transforms ordinary corners into inviting nooks filled with handmade charm.

About This Dog Granny Square Pattern

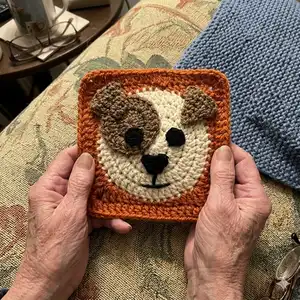
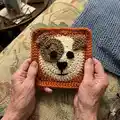
This pattern creates a whimsical dog face granny square made from a circular base with a colored border and small appliquΓ© details. It combines basic rounds, a corner construction for square shaping, and small motifs for ears, eyes, and nose. The pattern includes two color-change methods and an invisible finishing stitch to keep your work tidy.

Dog Granny Square Pattern crochet pattern - detailed view of completed project

Perfect for using scrap yarn, this square measures approximately 11 cm x 11 cm and makes a sweet motif for blankets or gifts. Clear photos and step-by-step rounds guide you through each stage.

Why You'll Love This Dog Granny Square Pattern

I absolutely love this pattern because it turns simple stitches into a character-filled square that brings a smile to any project. I enjoy how quickly the circular base transforms into a square with just a few corner clusters β€” it feels like a small magic trick. The applique pieces (patch, ears, eyes, nose) let me personalize expressions and colors every time I make one. I also love that it uses basic stitches so I can relax and enjoy the rhythm while still producing a charming, detailed result.

Dog Granny Square Pattern step 1 - construction progress Dog Granny Square Pattern step 2 - assembly progress Dog Granny Square Pattern step 3 - details and accessories Dog Granny Square Pattern step 4 - final assembly and finishing

Switch Things Up

I love customizing this square by changing the border color to give a totally different mood; a soft pastel makes a sweet baby motif while a bold color creates a playful accent.

I sometimes make the circular base larger by using a thicker yarn and larger hook so the dog becomes a cuddly coaster or small cushion center.

I also experiment with different eye positions and patch shapes to vary expressions; shifting the patch slightly gives the dog a quirky wink or sleepy look.

For a textured effect, try working Round 5 in front loop only (FLO) or use puff stitches in place of hdc for added dimension.

I often embroider eyelashes, freckles, or whiskers with contrasting yarn to add personality without complicated stitches.

If you want a mini version for keychains, use fingering yarn and a 2.5–3.0 mm hook and sew a loop at a corner for attaching hardware.

I like to add tiny crocheted accessories like a bow or bandana by creating a small rectangle or triangle and stitching it to the neck area.

Try substituting the brown patch for a heart or star shape for a themed project for holidays or baby blankets.

To join multiple squares, I use whipstitch or a join-as-you-go method, aligning faces so ears alternate for a fun patchwork look.

Finally, I recommend experimenting with yarn texturesβ€”using a boucle or slightly fuzzy yarn for the patch creates a fluffy puppy look that's irresistible.

Common Mistakes & How to Fix Them

βœ— Skipping the stitch count at the end of rounds leads to incorrect shaping; count stitches after each round and confirm the number in parentheses to avoid mistakes. βœ— Not tightening the magic ring causes a hole in the center; pull the tail to tighten the MR and then sl st in the first dc to close it neatly. βœ— Changing color incorrectly can create a loose or visible join; use the methods provided (change at last dc or invisible stitch finish) to make a tidy color change. βœ— Forgetting to place corner clusters evenly will distort your square shape; mark corner spaces and count stitches between corners to maintain symmetry. βœ— Overstuffing or uneven tension when shaping appliques results in lumpy patches; keep consistent tension and adjust stuffing minimally while stitching pieces in place.

Dog Granny Square Pattern

Make a charming dog-themed granny square that adds playful personality to blankets, cushions, or standalone decor. This pattern walks you through a circular base, color changes, and small appliques (ears, eyes, nose) to create a friendly dog face. You will learn an invisible finish and how to stitch pieces precisely for a neat, professional result. Perfect for using up scrap yarn and creating a sweet handmade accent.

Intermediate 2-4 Hours

Materials Needed for Dog Granny Square Pattern

β€” Main Fabric

  • 01
    Lightweight acrylic yarn - Beige (main circular base)
  • 02
    Lightweight acrylic yarn - Orange (border and square rounds)
  • 03
    Lightweight acrylic yarn - Brown (eye spot and ears)
  • 04
    Lightweight acrylic yarn - Black (eyes, nose, mouth details)

β€” Tools Required

  • 01
    Crochet hook size 4.0 mm
  • 02
    Yarn needle for sewing and weaving ends
  • 03
    Scissors
  • 04
    Stitch markers (optional)
  • 05
    Tapestry needle

Progress Tracker

0% Complete

β€” Notes :

Infos :

- The ( ) at the end of each round/row indicates the total number of stitches that should be completed for that round/row. - When working through the rounds/rows, work through the entire stitch (back loop and front loop) unless stated otherwise. - The ch1 or ch2 at the beginning or a round/row do not count as a stitch unles stated otherwise. - You can use any yarn to make this square. For example, if you use a larger hook and a suitable yarn, the square will be bigger.

β€” Materials :

Info :

Lightweight acrylic yarn in 4 colors: Beige, Orange, Brown, and Black. 4 mm hook. Yarn Needle. Scissors. The square is 11 cm x 11 cm.

β€” Abbreviations :

Info :

MR - magic ring. ch - chain. sc - single crochet. hdc - half double crochet. dc - double crochet. tc - triple crochet. inc - increase (2sc in 1 st). dec - decrease (1sc in 2 st). dc inc - double crochet increase. sl st - slip stitch. * * - repeat the sequence.

β€” Square :

Round 1 :

MR, ch2, 12dc inside MR (12)

Info :

Tighten the MR by pulling on the tail and then sl st in the 1st dc (skip the ch2).

Round 2 :

ch2, *dc inc* all around (24)

Round 3 :

ch2, *dc, dc inc* all around (36)

Round 4 :

ch2, *2dc, dc inc* all around (48)

Info :

Invisible stitch: after you are done with Round 4, cut the yarn, leave a long tail, and pull it all the way through. With your needle, go into the 2nd dc from the back to the front through both loops, and then go through the center of the last dc towards the back. Pull the tail tight enough to create a stitch on top of the 1st dc and then weave in the excess yarn to secure it.

Info :

Color Change: at the end of Round 4, you will need to do a color change. Method 1: change color at the last dc of Round 4. Method 2: finish off Round 4 with an invisible stitch and then attach the new yarn. Insert your hook into any stitch and attach the new yarn by pulling it through the stitch.

Round 5 :

ch1, *3sc, 2hdc, 2dc, [2tc + ch2 + 2tc] in the same stitch, 2dc, 2hdc* all around (68)

Info :

Sl st in the first sc that you did at the beginning of Round 5.

Round 6 :

ch2, *dc* all around and [2dc + ch2 + 2dc] in the ch2 space (84)

Info :

At the end of the round, finish off and weave in any excess yarn. You can finish off using the invisible stitch method or sl st in the 1st dc and then yarn over and pull it all the way through.

β€” Eye Spot Detail :

Round 1 :

Using the brown yarn: MR, ch2, 12dc inside MR (12)

Round 2 :

ch2, *dc inc* all around (24)

Info :

Finish off and leave a long tail for stitching.

β€” Ears x2 :

Row 1 :

Using the brown yarn: slip knot, ch7, *hdc* across (6)

Row 2 :

ch1, turn, *hdc* all across (6)

Row 3 :

ch1, turn, skip a st, 3 hdc across, skip a st, hdc (4)

Row 5 :

ch1, turn, *hdc* across (4)

Row 6 :

ch1, turn, skip a st, hdc, skip a st, hdc (2)

Row 7 :

ch1, turn, hdc dec (1)

Info :

Cut the yarn, finish off, and leave a long tail for stitching.

β€” Eyes x2 :

Round 1 :

Using the black yarn: MR, ch1, 5sc in MR (5)

Info :

Close the MR, finish off, and leave a long tail for stitching.

β€” Nose :

Round 1 :

Using the black yarn: MR, ch1, [2sc, dc, 2sc] in MR (5)

Info :

Tighten the MR but do not close it completely. Finish off and leave a long tail for stitching.

β€” Assembly :

Info :

Place the face components on the square. Use the tails for stitching. The brown patch is aligned to the edge of the circular base. The ears are aligned to the corners of the square (where the [2tc, ch1, 2tc] stitch is). Fold the ear to the front and stitch the tip of the ear to the square. The eyes are located on Round 2. When stitching the nose, the tip of the nose (the dc) is directed downwards. Use the black yarn to stitch a mouth that is connected to the nose.

Assembly Instructions

  • Place the face components on the square and use the yarn tails to pin them temporarily before stitching to confirm placement.
  • Align the brown eye patch so it meets the edge of the circular base and stitch it down securely around the edge with whipstitch or running stitch.
  • Position the ears at the square corners (at the [2tc, ch1, 2tc] corner stitches), fold the ear forward and stitch the tip of the ear to the front of the square to hold shape.
  • Locate the eyes on Round 2 of the circular base and stitch the small black eye circles in place using the long tails.
  • Stitch the nose with the tip (dc) pointing downward and use black yarn to embroider a short vertical line and curve to form the mouth connected to the nose.

Important Notes

  • πŸ’‘Use stitch markers or a removable marker to mark the start of rounds and the corner positions to keep your square even.
  • πŸ’‘Work through both loops of stitches unless the pattern specifically instructs BLO or FLO for shaping or texture.
  • πŸ’‘Weave in ends securely and trim excess after sewing appliques to prevent unraveling and keep the front neat.

This sweet Dog Granny Square is a quick, satisfying make that adds instant personality to blankets and gifts. Create sets in different colorways to make an adorable puppy-themed afghan or cushions. Mix and match yarn weights for variety and have fun stitching little faces! 🧢🐢

You ask,

we answer.

FAQs

What size will the finished square be?

The finished square measures approximately 11 cm x 11 cm when using the recommended lightweight acrylic yarn and a 4.0 mm hook.

Can I change yarn weight or hook size?

Yes, you can use a different yarn weight and adjust your hook accordingly; this will change the final size so swatch and adjust as needed.

Do I need to use the invisible stitch method?

You can use the invisible stitch method for a neater finish at the center, but you may also sl st and finish off if you prefer; both methods are described.

How long does it typically take to make one square?

Most crocheters complete a single square in about 2-4 hours depending on familiarity with the stitches and how much time is spent on assembly.