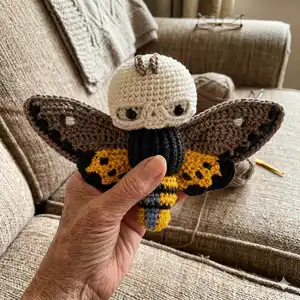
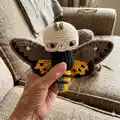
Make a charming Death's Head Hawk Moth amigurumi with this detailed pattern. You will create a skull-like hat, a striped caterpillar body and a removable wing suit with layered wings. The pattern includes step-by-step rounds, color-change tips and assembly guidance so you can create a unique collectible or gift. Perfect for crafters who enjoy small, detailed amigurumi projects.
Progress Tracker
0% Complete
— Tutorials :
Info :
A Invisible SC-Decrease: Insert the hook into the front loop of the 1st stitch and then directly also into the front loop of the 2nd stitch (3 loops on the hook). Single crochet as usual: Yarn over, draw through both front loops on the hook (2 loops on the hook). Yarn over, draw yarn through both loops on the hook. Note: Works for taller stitches as well.
Info :
B Changing yarn to a new color: Join new color during the final step of the last stitch in the old color so the next stitch will be first in the new color.
Info :
C Front loop, back loop, back bump: Work into the front loop or back loop as indicated; some instructions call for working into back bumps on the backside of a foundation chain.
Info :
D Join yarn with a slip knot: Place slip knot onto hook and insert into indicated stitch, pull slip knot through stitch and proceed; you may also insert hook and pull yarn through without a slip knot.
Info :
E Standing stitch join: Standing sc: with slip knot on hook insert into indicated stitch, yarn over draw through, pull through both loops, finish sc. Standing slst: similar but pull loop through in one go.
Info :
F Invisible fasten off: Skip one stitch, insert needle into next stitch, pull yarn through, insert needle into back loop of same stitch and pull gently to create a false closing stitch that mimics the skipped stitch.
Info :
G Close remaining stitches through the front loops: Pull yarn tail through last stitch and with yarn needle draw yarn through every remaining front loop from outside to inside; pull gently to close the gap.
— Head :
Info :
Make a magic loop from sand and work in a continuous spiral.
Round 01 :
sc 7 into magic loop (7)
Round 03 :
[sc 1, inc] 7x (21)
Round 04 :
sc 1, inc, [sc 2, inc] 6x, sc 1 (28)
Round 05 :
[sc 3, inc] 7x (35)
Round 07 :
sc 2, inc, [sc 4, inc] 6x, sc 2 (42)
Round 08-13 :
(6 rnds) sc 42
Round 14 :
sc 2, dec, [sc 4, dec] 6x, sc 2 (35)
Round 15 :
[dec, sc 3] 7x (28)
Info :
Place the eyes between rounds 12 and 13 with a distance of 8 sts between the eyes.
Round 16 :
sc 1, dec, [sc 2, dec] 6x, sc 1 (21)
Round 17 :
[dec, sc 1] 7x (14)
Info :
Slst 1 into the next stitch, cut the yarn and fasten off invisibly (→ Tutorial F). Stuff the head well.
— Body :
Info :
At the open end of the head find the stitch that is standing in the middle between the eyes. Starting in this stitch count 8 sts (any direction) along the open end to find the stitch that is standing in the middle of the back side of the neck.
Round 18 :
Join black with a standing slst (→ Tutorial E) into the indicated 8th stitch, slst 13 (14)
Round 19 :
[sc-blo 1, inc-blo] 7x (21)
Round 20 :
change to yellow (→ Tutorial B), cut black: [sc 2, inc] 3x, sc 1, change to blue. sc 1, inc, change to yellow, [sc 2, inc] 3x (28)
Round 21 :
sc 13, change to blue, sc 3, change to yellow, sc 12
Round 22 :
sc 13, change to blue, sc 3, change to yellow, sc 12
Round 23 :
change to black, sc 28
Round 24 :
change to yellow (cut black), sc 13, change to blue, sc 3, change to yellow, sc 12
Round 25 :
dec, sc 2, dec, sc 1, dec, sc 2, dec, change to blue, sc 3, change to yellow, [dec, sc 2] 3x (21)
Round 26 :
[sc 1, dec] 3x, change to blue, sc 1, dec, change to yellow, [sc 1, dec] 3x (14)
Round 27 :
change to black (cut blue and yellow), slst 14
Round 28 :
[sc-flo 1, inc-flo] 7x (21)
Info :
Slst 1, cut black and close rnd invisibly (= closing stitch → Tutorial F). Stuff the upper part of the body now.
Round 29 :
Join yellow with a standing sc into the closing st (→ Tutorial E). Place marker (= new beginning of following rnds), sc 1, inc, [sc 2, inc] 2x, change to blue (carry yellow here and throughout), sc 3, change to yellow, [inc, sc 2] 3x (27)
Round 30 :
sc 12, change to blue, sc 3, change to yellow, sc 12
Round 31 :
change to black, sc 27
Round 32 :
change to yellow (cut black), sc 12, change to blue, sc 3, change to yellow, sc 12
Round 33 :
[sc 2, dec] 3x, change to blue, sc 3, change to yellow, [dec, sc 2] 3x (21)
Round 34 :
change to black, [dec, sc 1] 7x (14)
Info :
Stuff the middle part of the body.
Round 36 :
change to yellow (cut black), [sc-flo 1, inc-flo] 3x, change to blue, sc-flo 3, change to yellow, [inc-flo, sc-flo 1] 2x, inc-flo (20)
Round 37 :
sc 9, change to blue, sc 3, change to yellow, sc 8
Round 38 :
[sc 1, dec] 3x, change to blue, sc 3, change to yellow, [dec, sc 1] 2x, dec (14)
Round 39 :
[dec] 3x, change to blue, sc3tog, change to yellow, [dec] 2x, sc 1 (7)
Info :
Stuff the lower body part, then cut the yarn. Close the remaining 7 stitches through the front loops (→ Tutorial G) and weave in the ends.
— Skull Mask :
Info :
Make a magic loop from white.
Round 01 :
sc 7 into magic loop (7)
Round 03 :
[sc 1, inc] 7x (21)
Round 04 :
sc 1, inc, [sc 2, inc] 6x, sc 1 (28)
Round 05 :
[sc 3, inc] 7x (35)
Round 07 :
sc 2, inc, [sc 4, inc] 6x, sc 2 (42)
Round 08 :
[sc 13, inc] 3x (45)
Round 09-13 :
(5 rnds) sc 45
Info :
After rnd 13, pull the hat straight onto the head. The rim should be 2 rnds above the eyes; add an extra rnd with 45 sc if the hat is too short.
Round 14 :
sc 15, slst 6, sc 3, slst 6, sc 15 (51)
Round 15 :
sc 15, ch 7, sk 6, dc 1, into the next stitch: °dc 1 + ch 2 + dc 1°, dc 1, ch 7, sk 6, sc 15 (51)
Round 16 :
sc 14, sk 1, sc 8 into ch7sp, sk 2, °sc 3° into ch2sp, sk 2, sc 8 into ch7sp, sk 1, sc 14 (47)
Round 17 :
sc 14, sk 1, slst 7, into next st: °slst 1 + ch 1 + sc 1°, sc 1 into next st: °sc 1 + ch 1 + slst 1°, slst 7, sk 1, sc 14 (47)
Info :
Slst 1 into the next stitch, cut the yarn and fasten off invisibly (→ Tutorial F).
— Antennae (MAKE 2) :
Info :
Make a foundation chain of 4 ch from beige. Work into bumps on the back of the chain, starting in the 2nd back bump (→ Tutorial C): sc 2, slst 1.
Info :
Cut the yarn and fasten off leaving a long tail to sew the antenna onto the skull hat. Sew antennae onto the hat between rnds 08 and 09 with a distance of 2 sts between the antennae.
— Details :
Info :
With pink yarn, embroider CHEEKS onto the skull hat as shown. Embroider a bright spot onto each large wing using sand colored yarn and add black lines and spots as indicated in the photos.
— Wing Suit :
Info :
Each large wing is made from 2 layers - PIECE 1 and PIECE 2 - assembled to become a left or right wing.
— PIECE 1 (MAKE 2) :
With beige make a foundation chain of 15 ch.
Round 01 :
Starting in the 5th ch from hook, work along the chain: °dc 2° into the 5th ch, dc 1, hdc 3, sc 3, slst 3, turn (13)
Round 02 :
ch 1, slst 3, sc 3, hdc 3, dc 2, °dc 2° into the next st, °dc 1 + tr 1° into the last st (= into top of the beginning ch-4), turn (15)
Round 03 :
ch 4, dc 1 into the st at the base of the turning ch-4, °dc 2° into the next st, dc 1, hdc 3, sc 3, slst 2, leave remaining sts unworked, turn (14)
Round 04 :
ch 1, slst 3, sc 3, hdc 3, dc 2, °dc 2° into the next st, °dc 1 + tr 1° into last st, turn (15)
Round 05 :
ch 3, dc 1 into the st at the base of the turning ch-3, °dc 2° into the next st, dc 3, hdc 4, sc 6, along the remaining sts of row 02: hdc 1, sc 2, slst 1 (21). Cut the yarn and fasten off.
Info :
Rotate so long side is up and top side is on the left. Join black with a standing sc (→ Tutorial E) into end of first row, °sc 2° into same space, °sc 3° into end of each of next 4 rows. Cut yarn, fasten off and weave in ends. Make another piece the same way.
— PIECE 2 (MAKE 2) :
Follow instructions given for PIECE 1 until end of row 05. Cut the yarn and fasten off. Turn the piece with the backside facing you and rotate 90° so that long side is up and top side on right. Join black with a standing sc into end of the first row, °sc 2° into same space, °sc 3° into the end of each of the next 4 rows. Cut yarn, fasten off and weave in all ends. Make another piece the same way.
— Assembling PIECE 1 and PIECE 2 to make one large wing (LEFT WING) :
Hold PIECE 1 and PIECE 2 together, PIECE 1 on top of PIECE 2 so both black rows visible outside. Rotate 180° so bottom side up. Crochet the sts of the following rnd into corresponding sts or spaces on both layers to connect them. On the bottom side of the wing, join beige with a standing sc (→ Tutorial E) into the first remaining loop of the foundation chain. Along the bottom side: sc 10 along remaining loops of foundation chains. Rotate 90° along long side into black sts: sc 1, °sc 2°, sc 12, °sc 2 + ch 1°. Rotate 90° along top side: hdc 1 into same space as black sts, sc 19, into last st: °sc 1 + ch 1 + sc 1°. Rotate 90° along short side: sc 1 into end of the row in the center, sc 1 into same spot as 1st stitch of rnd. Cut yarn with a long rest and close invisibly into first st (standing sc) → Tutorial F.
Info :
Make the RIGHT WING by holding PIECE 1 and PIECE 2 together so PIECE 2 on top of PIECE 1 and follow same joining method. Cut yarn and fasten off.
— Small Wings (MAKE 2) :
Info :
Each small wing is made from 2 layers of PIECE 3 assembled to become a left or right wing.
PIECE 3 (MAKE 4) :
With yellow make a foundation chain of 10 ch.
Round 01 :
Starting in the 4th ch from hook, work along the chain: hdc 2, sc 3, slst 2, turn (8)
Round 02 :
ch 1, slst 2, sc 2, hdc 3, °hdc 1 + dc 1° into the last st (= into the top of the beginning ch-3), turn (9)
Round 03 :
ch 3, hdc 1 into the st at the base of the turning ch-3, hdc 1, sc 2, slst 2, leave remaining sts unworked, turn (7)
Round 04 :
ch 1, slst 2, sc 2, hdc 2, °hdc 1 + dc 1° into last st. Cut the yarn, fasten off and weave in the ends. Make 3 more C-pieces.
Assembling two pieces to make one small wing (LEFT WING) :
Hold two wing pieces (PIECE 3) together so they lay flat on top of each other — rotate 180° so top side is down and the short side is on the right. Crochet sts of following rnd into corresponding sts or spaces on both layers to connect them. On the bottom side of the wing join yellow with a standing sc into the first stitch, sc 6 along the bottom side, change to black (→ Tutorial B, photo 35). Rotate 90° along long side into ends of rows: °sc 1 + hdc 4° into first row, skip end of second row, °hdc 2 + dc 2° into end of third row, °dc 3 + hdc 1 + sc 1° into end of last row, change to yellow. Rotate 90° along top side: sc 7 then into remaining sts of row 03: dc 1, hdc 1, °sc 1 + ch 1 + sc 1° into last st. Rotate 90° along short side: sc 1 into same spot as first st of rnd, slst 1 to close rnd. Cut yarn with a long rest and fasten off.
Info :
Make the RIGHT WING the same way by holding pieces so top side up and short side to the right. Finish and fasten off.
— Details and Mini Skull :
Info :
Embroider a bright spot onto each large wing using sand colored yarn. Add a black line next to the bright spot. On the small wings embroider three black spots as shown in the photos.
Mini Skull :
Make a magic loop from sand. 01: ch 3, into the loop: dc 4, ch 4, hdc 1, ch 1, hdc 1, ch 4, close rnd with a slst into 3rd beginning-ch. 02: sc 4, sc 5 into the ch4sp, into the ch1sp: °slst 1 + ch 2 + hdc 2 + ch 2 + slst 1°, sc 5 into the ch4sp (→ photo 42). Cut the yarn with a long rest and close the rnd invisibly (→ Tutorial F).
— Wing Belt :
Info :
The wing belt is a crochet rectangle finished into a ring that the wings attach to. Work rows of slip stitches to build an elastic, stable ribbed belt.
Make the belt :
With black make a foundation chain of 12 ch. Crochet along the chain, starting in 2nd ch from hook. 01: slst-blo 11, turn (11). 02–35: (34 rows) ch 1, slst-blo 11, turn. Do not fasten off. Ch 1, turn the rectangle into a ring by holding first and last rows next to each other. Crochet together the remaining loops of the foundation chain at the bottom of the first row with corresponding back loops of stitches on last row to form seam (→ photo 44). Slst the ends together stitch by stitch. Break yarn and fasten off. Weave in ends on inside of the belt.
— Assembling the Wing Suit :
01 MAKING TWO PAIRS OF WINGS :
Sew the top side of the small wing in front of the large wing so their edges lay one above the other. Weave in the ends and make a second pair of wings the same way.
02 SEWING THE WINGS ONTO THE BELT :
With the backside of the wings facing, sew one wing pair next to the seam of the belt. Sew the second pair onto the other side of the seam.
03 ATTACH THE SKULL :
Cover the point where the wings join with the mini skull. Sew the skull onto the wings inserting the needle around the posts of the stitches of the skull (→ photo 50).
This Death's Head Hawk Moth amigurumi adds a touch of gothic whimsy to your handmade collection. The removable wing suit and skull hat give it playful character and plenty of display potential. Make one as a unique gift or keep it for your own quirky shelf — happy crocheting! 🧶✨