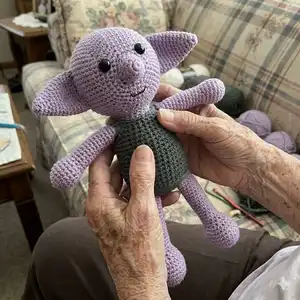
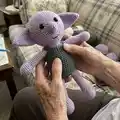
Make your own cuddly Dobby house-elf with this detailed crochet pattern. You will be guided through every part — head, body, arms, legs, ears and clothes — with clear round-by-round instructions so you can create a charming handmade toy. Suitable for stitchers comfortable with basic amigurumi techniques, it includes notes on assembly and toy safety for a confident finish.
Progress Tracker
0% Complete
— Head :
Info :
Begin using the pale merino wool, using a 3.5mm hook. The stitch count for each round is given at the end of the row in brackets.
Info :
This pattern is worked in a continuous spiral round, expanding from the initial magic circle.
Info :
Use a stitch marker to mark the first stitch of each row, to help you keep count as they expand.
Round 1 :
Make a magic circle of 6 stitches (6)
Round 2 :
Make 2 single crochets (2sc) in each stitch (12)
Round 3 :
1sc in each stitch (12)
Round 4 :
1sc in each stitch (12)
Round 5 :
1sc in each stitch (12)
Round 6 :
1sc in each stitch (12)
Round 7 :
Make 1sc in the first stitch, and 2sc in the next. Repeat for the round – (1sc, 2sc). (18)
Round 8 :
Make 1sc in the first two stitches, then 2sc in the next. Repeat for the round (1sc x 2, 2sc). (24)
Round 9 :
(1sc x 3, 2sc) repeat for the round (30)
Round 10 :
(1sc x 4, 2sc) repeat for the round (36)
Round 11 :
(1sc x 5, 2sc) repeat for the round (42)
Round 12 :
(1sc x 6, 2sc) repeat for the round (48)
Round 13 :
(1sc x 7, 2sc) repeat for the round (54)
Round 14 :
(1sc x 8, 2sc) repeat for the round (60)
Round 15 :
(1sc x 9, 2sc) repeat for the round (66)
Round 16 :
1sc in each stitch (66)
Round 17 :
1sc in each stitch (66)
Round 18 :
1sc in each stitch (66)
Round 19 :
Make 1sc in the first nine stitches, then single crochet two stitches together (sc2tog). Repeat for the round (1sc x 9, sc2tog). (60)
Round 20 :
(1sc x 8, sc2tog) repeat for the round (54)
Round 21 :
(1sc x 7, sc2tog) repeat for the round (48)
Round 22 :
(1sc x 6, sc2tog) repeat for the round (42)
Info :
Pull the last stitch out to form a large loop to help keep your place.
Info :
You will now need to attach your safety eyes. The outer eye pushes through the crochet head in a screw fashion. The back which holds it in place is pushed in at the rear of the pattern in the same manner.
Info :
If you are unsure of your eye placement try pulling a thread of yarn through each of your desired places first. This will give you an idea whether they are evenly placed before you commit to stretching the stitch gap out with the actual eye piece.
Round 23 :
(1sc x 5, sc2tog) repeat for the round (36)
Round 24 :
(1sc x 4, sc2tog) repeat for the round (30)
Round 25 :
(1sc x 3, sc2tog) repeat for the round (24)
Round 26 :
(1sc x 2, sc2tog) repeat for the round (18)
Info :
Pull the last stitch out to form a large loop to help keep your place. You will now need to stuff the head.
Info :
Start with the long nose, using the butt of your crochet hook to make sure the stuffing is pushed right down to the end. Pad it well, leaving just a little space for you to work your last couple of rows.
Round 27 :
(1sc x 1, sc2tog) repeat for the round (12)
Info :
Add the final stuffing if you feel it is required to give the toy the right shaped head.
Round 28 :
sc2tog until closed (6)
Info :
Slip stitch to join and leave a long tail for sewing the sections together later.
Info :
Now set your crochet Dobby’s head to one side somewhere safe, and begin work on his body.
— Body :
Info :
To make your crochet Dobby toy’s body you will need to use the same equipment as for his head, starting with the pale merino wool and 3.5mm hook.
Info :
As with the head, his body pattern is worked in a continuous spiral round, expanding from the initial magic circle. Stitch markers will help you to keep count of your rows as they expand.
Round 1 :
Make a magic circle of 6 stitches (6)
Round 2 :
Make 2 single crochets (2sc) in each stitch (12)
Round 3 :
Make 1sc in the first stitch, and 2sc in the next. Repeat for the round – (1sc, 2sc). (18)
Round 4 :
1sc in each stitch (18)
Round 5 :
1sc in each stitch (18)
Round 6 :
Make 1sc in the first two stitches, then 2sc in the next. Repeat for the round (1sc x 2, 2sc). (24)
Round 7 :
(1sc x 3, 2sc) repeat for the round (30)
Round 8 :
(1sc x 4, 2sc) repeat for the round (36)
Round 9 :
1sc in each stitch (36)
Round 10 :
1sc in each stitch (36)
Round 11 :
1sc in each stitch (36)
Round 12 :
1sc in each stitch (36)
Round 13 :
1sc in each stitch (36)
Round 14 :
1sc in each stitch (36)
Round 15 :
(1sc x 5, 2sc) repeat for the round (42)
Round 16 :
(1sc x 6, 2sc) repeat for the round (48)
Round 17 :
(1sc x 7, 2sc) repeat for the round (54)
Round 18 :
1sc in each stitch (54)
Round 19 :
1sc in each stitch (54)
Round 20 :
1sc in each stitch (54)
Round 21 :
1sc in each stitch (54)
Round 22 :
1sc in each stitch (54)
Round 23 :
1sc in each stitch (54)
Round 24 :
Make 1sc in the first seven stitches, then single crochet two stitches together (sc2tog). Repeat for the round (1sc x 7, sc2tog). (48)
Round 25 :
(1sc x 6, sc2tog) repeat for the round (42)
Round 26 :
(1sc x 5, sc2tog) repeat for the round (36)
Round 27 :
(1sc x 4, sc2tog) repeat for the round (30)
Round 28 :
(1sc x 3, sc2tog) repeat for the round (24)
Round 29 :
(1sc x 2, sc2tog) repeat for the round (18)
Info :
You will now need to stuff your toy’s body. Fill it with toy stuffing, but make sure not to overfill the body. It should have a certain amount of ‘squidge’ to it when you hold it, rather than being completely rigid.
Round 30 :
(1sc x 1, sc2tog) repeat for the round (12)
Round 31 :
sc2tog until closed (6)
Info :
Slip stitch to join and leave a long tail for sewing the sections together later. Now set your crochet Dobby’s body to one side with his head, as we won’t be joining any parts together until we have them all ready.
— Arms :
Info :
ARMS (MAKE 2). Crochet Dobby’s arms and legs are slightly different patterns, so make just two of these. Use the same body wool colour and your 3.5mm hook. Again we will be working in an increasing spiral.
Round 1 :
Make a magic circle of 6 single crochet stitches (6)
Round 2 :
Put 2sc in each stitch until the end of the row (12)
Round 3 :
Make 1sc in the first stitch, and 2sc in the next. Repeat for the round – (1sc, 2sc). (18)
Round 4 :
Put 1sc in each stitch (18)
Round 5 :
Put 1sc in each stitch (18)
Round 6 :
(1sc x 1, sc2tog) repeat for the round (12)
Round 7 :
Put 1sc in each stitch (12)
Round 8 :
Put 1sc in each stitch (12)
Round 9 :
Put 1sc in each stitch (12)
Round 10 :
Put 1sc in each stitch (12)
Round 11 :
Put 1sc in each stitch (12)
Round 12 :
Put 1sc in each stitch (12)
Round 13 :
Put 1sc in each stitch (12)
Round 14 :
Put 1sc in each stitch (12)
Round 15 :
Put 1sc in each stitch (12)
Round 16 :
Put 1sc in each stitch (12)
Round 17 :
Put 1sc in each stitch (12)
Round 18 :
Put 1sc in each stitch (12)
Round 19 :
Put 1sc in each stitch (12)
Round 20 :
Put 1sc in each stitch (12)
Round 21 :
Put 1sc in each stitch (12)
Round 22 :
Put 1sc in each stitch (12)
Round 23 :
Put 1sc in each stitch (12)
Round 24 :
Put 1sc in each stitch (12)
Round 25 :
Put 1sc in each stitch (12)
Round 26 :
Put 1sc in each stitch (12)
Round 27 :
Put 1sc in each stitch (12)
Round 28 :
Put 1sc in each stitch (12)
Round 29 :
Put 1sc in each stitch (12)
Info :
Slip stitch to join and leave a long tail for sewing it on later. Fill the leg with toy stuffing, using the end of your hook to push it down to the hand pad. Leave top of the arm empty for later attaching it to the body, approximately the width of your thumb.
— Legs :
Info :
LEGS (MAKE 2). We will be making two legs for Dobby. They have bigger feet sections than the arms and will be slightly longer.
Round 1 :
Make a magic circle of 6 single crochet stitches (6)
Round 2 :
Put 2sc in each stitch until the end of the row (12)
Round 3 :
Make 1sc in the first stitch, and 2sc in the next. Repeat for the round – (1sc, 2sc). (18)
Round 4 :
Make 1sc in the first two stitches, then 2sc in the next. Repeat for the round (1sc x 2, 2sc). (24)
Round 5 :
Put 1sc in each stitch (24)
Round 6 :
Put 1sc in each stitch (24)
Round 7 :
Put 1sc in each stitch (24)
Round 8 :
(1sc x 2, sc2tog) repeat for the round (18)
Round 9 :
(1sc x 1, sc2tog) repeat for the round (12)
Round 10 :
Put 1sc in each stitch (12)
Round 11 :
Put 1sc in each stitch (12)
Round 12 :
Put 1sc in each stitch (12)
Round 13 :
Put 1sc in each stitch (12)
Round 14 :
Put 1sc in each stitch (12)
Round 15 :
Put 1sc in each stitch (12)
Round 16 :
Put 1sc in each stitch (12)
Round 17 :
Put 1sc in each stitch (12)
Round 18 :
Put 1sc in each stitch (12)
Round 19 :
Put 1sc in each stitch (12)
Round 20 :
Put 1sc in each stitch (12)
Round 21 :
Put 1sc in each stitch (12)
Round 22 :
Put 1sc in each stitch (12)
Round 23 :
Put 1sc in each stitch (12)
Round 24 :
Put 1sc in each stitch (12)
Round 25 :
Put 1sc in each stitch (12)
Round 26 :
Put 1sc in each stitch (12)
Round 27 :
Put 1sc in each stitch (12)
Round 28 :
Put 1sc in each stitch (12)
Round 29 :
Put 1sc in each stitch (12)
Round 30 :
Put 1sc in each stitch (12)
Round 31 :
Put 1sc in each stitch (12)
Info :
Slip stitch to join and leave a long tail of yarn. As you did with his arms, fill your crochet Dobby toy’s legs with stuffing, leaving just a small space at the top for later sewing in.
— Ears :
Info :
EARS (MAKE 2). To make your Dobby toy some ears you will need to crochet two cones. These will then be pushed flat to form the right shapes for his characteristic elven ears.
Round 1 :
Make a magic circle of 4 stitches (4)
Round 2 :
Make 2sc in each stitch (8)
Round 3 :
Make 1sc in each stitch (8)
Round 4 :
(1sc, 2sc) repeat for the round (12)
Round 5 :
Make 1sc in each stitch (12)
Round 6 :
(1sc x 2, 2sc) repeat for the round (16)
Round 7 :
Make 1sc in each stitch (16)
Round 8 :
Make 1sc in each stitch (16)
Round 9 :
Make 1sc in each stitch (16)
Round 10 :
(1sc x 3, 2sc) repeat for the round (20)
Round 11 :
Make 1sc in each stitch (20)
Round 12 :
Make 1sc in each stitch (20)
Round 13 :
Make 1sc in each stitch (20)
Round 14 :
Make 1sc in each stitch (20)
Round 15 :
Make 1sc in each stitch (20)
Round 16 :
Make 1sc in each stitch (20)
Round 17 :
Make 1sc in each stitch (20)
Round 18 :
Make 1sc in each stitch (20)
Round 19 :
Make 1sc in each stitch (20)
Info :
Fold the ear in half along the length of the cone, and without stuffing sew the open bottom edge together using your yarn needle. Leave a long tail for attaching it to the head later.
— Joining Together :
Info :
Before you begin sewing Dobby together lay out all of his individual parts in the manner that you want him to be the joined in. This will enable you to make sure that it is all in proportion before you begin committing them together.
Info :
Joining your dobby toy together: Your long tails left at the end of each section will be used to neatly sew each part together. The most important thing to do is ensure that the stitches are small, neat and discreet.
Info :
When you have sewn each piece together, pass the threaded needle a few times through the body and then cut off the length of yarn. Pull the yarn tight before snipping so the loose end should ping back into the body and be hidden from view.
Info :
Once he is complete you can if you wish sew a mouth on for him using your dark brown yarn and needle. Be careful here, as pulling too tightly can disfigure the face or cause stuffing to stick out. It is recommended to sew the mouth after stuffing for better final shape control.
— Clothes :
Info :
The clothes are crocheted separately from slate grey DK yarn. The main clothing body is worked flat in rows to form a rectangular tunic with arm holes and shoulder straps.
Round 1 :
Make a chain of 14 stitches, plus 2 to form the first sc. Put 1sc in each chain from the 3rd loop.
Round 2 :
*Chain 2 to form the first sc. Put 1sc into each remaining stitch of the row.
Round 6 :
Chain 2 to form the first sc. Sc once in the next 10 stitches. Chain 2.
Round 7 :
Ch2 to form the first sc. Then sc once into each of the next 10 stitches.
Round 8 :
Ch2 to form the first sc. Then sc once into each of the next 10 stitches.
Round 9 :
Ch2 to form the first sc. Then sc once into each of the next 10 stitches.
Round 10 :
Ch2 to form the first sc. Sc once into each subsequent stitch. Chain 6 at the end of the row.
Round 11 :
*Sc into the 3rd stitch from the hook, then sc once into each stitch to the end of the row. Ch2 at row’s end.
Round 12 :
Repeat row 11 sequence across as instructed.
Round 13 :
Repeat row 11 sequence across as instructed.
Round 14 :
Repeat row 11 sequence across as instructed.
Round 15 :
From the 3rd stitch from the hook, sc once in the first 10 stitches. Chain 2.
Round 16 :
From 3rd stitch from the hook, sc once into each of the 10 stitches. Ch 2 at the row’s end.
Round 17 :
From 3rd stitch from the hook, sc once into each stitch. Chain 6 at the end of the row.
Round 18 :
*Sc into the 3rd stitch from the hook, then sc once into each stitch to the end of the row. Ch2 at row’s end.
Round 19 :
Repeat from * for rows 24 to 27 as needed to form tunic body.
Info :
Decide which face of the garment you want to be displayed, and threading your yarn needle with a long tail of single crochet the opposite sides of the rectangle together. Pull the sleeve over the body of your toy and now make the shoulder straps. This will ensure they are the correct size for the toy regardless of the stitch size you ended up with.
Round 20 :
Make a chain of 8 stitches for clothing straps, put a single crochet into the 3rd stitch from the hook. Single crochet in each remaining stitch to the row’s end. Leave a long tail at each end.
Info :
Sew the straps on to each shoulder corner of the main body clothing piece, fixing them at a point which is snuggly fitted but allows the clothes to be removed if you want.
— Final Notes & Safety :
Info :
Before you finish, ensure all parts are sewn with small neat stitches and long tails have been woven in. The pattern recommends considering stitched eyes for babies and using officially safety-tested toy stuffing to increase safety.
This charming Dobby amigurumi makes a thoughtful handmade gift and a lovely keepsake for fans and collectors. The pattern guides you through shaping, assembly, and safety steps so you can finish with pride. Have fun personalizing colours, expressions and outfits to make each Dobby unique. 🧶✨🧵