🧢 Beautiful ✨ Detailed πŸ’ Adorable

Plant Car Amigurumi Pattern

Plant Car Amigurumi Pattern
4.4β˜… Rating
2-4 Hours Time Needed
2.0K Made This
βœ‚οΈ

Intermediate Level

Ideal for those with basic crochet experience, featuring slightly more advanced stitches and techniques to expand your skills.

⏱️

Bite-Sized Project

Finishes in 2-4 hoursβ€”perfect for an afternoon of creative relaxation.

🏑

Cozy Accent

A warm touch for your space that transforms ordinary corners into inviting nooks filled with handmade charm.

About This Plant Car Amigurumi Pattern

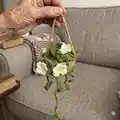
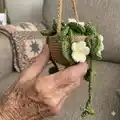
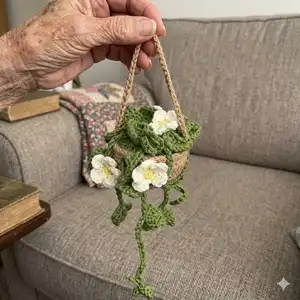
This pattern creates a small hanging plant pot with braided hanger, green circle soil topper, trailing vines, crocheted leaves and tiny layered flowers. You will work in rounds to shape the pot and a separate circle base, then make vines and leaves to sew in place. It uses light/super-fine yarn and small hooks for delicate detail and a compact finished piece.

Plant Car Amigurumi Pattern crochet pattern - detailed view of completed project

The instructions include every row for the pot, the circle base, leaf construction, and flower petals, plus assembly steps for finishing. Any size changes are noted at the start of each piece so you can adapt the pattern easily.

Why You'll Love This Plant Car Amigurumi Pattern

I absolutely love this pattern because it turns simple crochet stitches into a charming tiny hanging planter full of personality. I enjoy how the vines and leaves drape naturally and how the layered flowers add a delicate, handcrafted touch. The project is compact and satisfying to finish in a few sittings, yet detailed enough to feel special. It makes a lovely gift or decorative accent that I am proud to display or give to friends.

Plant Car Amigurumi Pattern step 1 - construction progress Plant Car Amigurumi Pattern step 2 - assembly progress Plant Car Amigurumi Pattern step 3 - details and accessories Plant Car Amigurumi Pattern step 4 - final assembly and finishing

Switch Things Up

I love how easily this pattern can be customized by changing yarn color to match your decor; try pastel greens for a soft look or deep greens for realism.

If you want a larger planter, use a bulkier yarn and a larger hook and increase the rounds in the pot and the circle base proportionally.

To make a tiny keychain version, use a finer thread and a smaller hook and shorten the vines significantly so it fits in a pocket.

I often add tiny beads or French knot embroidery to the flower centers for an extra sparkle and texture.

You can vary vine lengths and leaf placement to change the overall silhouette β€” stagger leaves and vines for a more natural cascade.

Try making a set in different sizes and colors to create a hanging cluster β€” it's a lovely way to decorate an entryway or window corner.

I sometimes line the inside of the pot with felt before sewing the circle base in for extra structure and hidden seams.

For more stability, lightly glue a small disc of cardboard into the pot base before adding stuffing and the green circle.

If you want posable vines, crochet a thin cord and insert florist wire inside before finishing the vine edges.

I recommend experimenting with flower petal counts and sizes β€” five petals are sweet, but three or six can change the style dramatically.

Common Mistakes & How to Fix Them

βœ— Forgetting to count increases in early rounds; always verify stitch counts at the end of each round to keep your pot shape even and round. βœ— Cutting the yarn too early after Round 11 of the pot; keep the yarn attached as instructed so you can chain the hanging strap without rejoining. βœ— Skipping placement checks when sewing the circle base inside the pot; pin or mark the position before stitching to avoid a crooked insert. βœ— Not making enough vines of varying lengths; make the recommended 5-6 vines in lengths 30ch, 25ch and 20ch so the finished hanger looks balanced and natural.

Plant Car Amigurumi Pattern

Make a charming hanging mini plant pot with vines, leaves and tiny flowers using a simple crochet pattern. This pattern gives clear step-by-step rounds for the pot, circle base, leaves, vines and flowers so you can assemble a delightful hanging planter. Perfect as a gift or a sweet decorative accent for your space.

Intermediate 2-4 Hours

Materials Needed for Plant Car Amigurumi Pattern

β€” Main Fabric

  • 01
    Super fine yarn (supper fine) 1.8 oz (50 g) per skein - beige for pot
  • 02
    Super fine yarn (supper fine) 1.8 oz (50 g) - light green for soil circle, vines and leaves
  • 03
    Super fine yarn (supper fine) 1.8 oz (50 g) - white for flower petals
  • 04
    Super fine yarn (supper fine) 1.8 oz (50 g) - yellow for flower centers

β€” Tools Required

  • 01
    Crochet hook size 2.5-3.0 mm
  • 02
    Stitch marker
  • 03
    Sewing needle
  • 04
    Scissors
  • 05
    Cotton filling (polyester stuffing) for pot
  • 06
    Pins for positioning pieces while sewing

Progress Tracker

0% Complete

β€” Pots :

Round 1 :

Magic ring, chain 1, 10 single crochet, slip stitch end row 1. (10 stitches)

Round 2 :

chain 1, (1 single crochet, 1 increase) 5 times, slip stitch end row 2. (15 stitches)

Round 3 :

chain 1, (2 single crochet, 1 increase) 5 times, slip stitch end row 3 (20 stitches)

Round 4 :

chain 1, (3 single crochet, 1 increase) 5 times (25 stitches)

Round 5 :

chain 1, (4 single crochet, 1 increase) 5 times (30 stitches)

Round 6 :

chain 1, (5 single crochet, 1 increase) 5 times (35 stitches)

Round 7 :

chain 1, (6 single crochet, 1 increase) 5 times (40 stitches)

Round 8-11 :

40 single crochet (40 stitches)

Info :

*do not cut yarn*

Round 11 end :

sl st end row 11 and chain 60 make a hanging

β€” Circle Base :

Round 1 :

Magic ring, chain 1, 10 half double crochet. (10 stitches)

Round 2 :

10 half double crochet increase. (20 stitches)

Round 3 :

(1 half double crochet, 1 increase) 10 times. (30 stitches)

Round 4 :

(2 single crochet, 1 increase)*10 (40 stitches)

β€” Leaf (Part 1) :

Info :

Before make leaf, make the vines by 30ch, 25ch and 20ch. (make 5-6)

Info :

- start crochet the Leaf - *every vines crochet 1 - 5 leaf*

Round 1 :

Slip knot and yarn over in chain stitch(vines), chain 7, 1 single crochet in 3rd stitches

Round 2 :

2 half double crochet, 1 double crochet, chain 3 and slip stitch in next stitches

β€” Leaf (Part 2) :

Round 1 :

1 slip stitch into the opposite row, chain 3 , 1 double crochet in next sts, 1 double crochet, 2 half double crochet, 1 single crochet

Round 2 :

slip stitch in the first sts and cut yarn to finish the leaf.

β€” Flower (MAKE 5-8) :

Round 1 :

(yellow) hook in the vines a magic ring β€’ 5 single crochet (5stitches) β€’ Cut yarn.

Round 2 :

(white) chain 2, 2 double crochet in same sts, chain 2 and hook in same stitches (all in one stitches)

Round 3 :

Slip stitch in next stitch and do the same do

Round 4 :

After 5 petals have been completed, slip stitch in first sts to end row and cut yarn.

β€” Assembly :

Info :

Use needle : sewing the circle inside the pot and stuffing inside the pot to finish

Info :

next step : sew every vines on the green circle

Assembly Instructions

  • Sew the circle base inside the pot using a sewing needle so the green circle sits flush in the pot opening, then stuff cotton filling inside the pot under the circle to create the soil mound.
  • Use the chain 60 hanging loop created at the end of Round 11 to form the hanger; braid or twist as desired and secure ends into the pot rim before finishing.
  • Arrange and position vines around the green circle and sew each vine to the circle using small whipstitches so they drape naturally over the pot edge.
  • Attach leaves to vines by sewing the leaf bases to the vine chains; space leaves along the vines and secure flowers onto vines or leaves as desired for composition.

Important Notes

  • πŸ’‘Keep the yarn attached at the end of Round 11 so you can chain the hanging strap without rejoining a new yarn.
  • πŸ’‘Make 5-6 vines in lengths of 30ch, 25ch and 20ch as instructed to create a natural trailing look.
  • πŸ’‘Pin pieces in place before sewing to check placement and symmetry for best finished appearance.

This tiny hanging planter is a delightful little project that makes a perfect handmade gift or decorative accent. It combines small stitches, delicate leaves and tiny layered flowers for charming detail. Finish it, hang it, and enjoy the cozy handmade touch in any room. 🧢🌿

You ask,

we answer.

FAQs

What size will the finished piece be?

The finished hanging planter is a small, palm-sized decoration; size will vary slightly depending on yarn tension and exact hook size used.

Can I use different yarn weights for this pattern?

Yes, you can use different yarn weights, but changing yarn weight will affect the final size; use an appropriate hook and expect a larger or smaller finished pot.

Do I need prior crochet experience for this pattern?

This pattern is rated intermediate and uses basic stitches like sc, hdc and dc along with simple shaping and assembly, so some crochet experience is recommended.

How long does this project typically take to complete?

Most crocheters complete this project in 2-4 hours, depending on experience and how many decorative vines and flowers you make.