🧢 Beautiful ✨ Detailed πŸ’ Adorable

Deer Hat and Scarf Crochet Pattern

Deer Hat and Scarf Crochet Pattern
4.4β˜… Rating
2-3 Hours Time Needed
4.2K Made This
βœ‚οΈ

Beginner Friendly Level

Perfect for those just starting their crochet journey, with clear instructions and simple techniques

⏱️

Bite-Sized Project

Finishes in 2-4 hoursβ€”perfect for an afternoon of creative relaxation.

🧣

Snug Essential

Everyday comfort with practical charm, designed for both functionality and style through changing seasons.

About This Deer Hat and Scarf Crochet Pattern

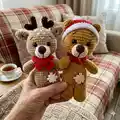
This pattern provides full instructions to crochet the hat, pompom and two scarf variants shown on the deer toys. It uses plush/bulky yarn and a 4 mm hook to create soft, cosy accessories with clear round-by-round instructions. The pattern includes a white brim option and a decorative pompom, plus a buttoned scarf variant for a finished look.
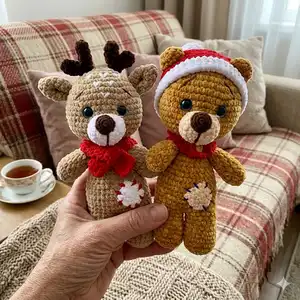
Deer Hat and Scarf Crochet Pattern crochet pattern - detailed view of completed project

You will find round-by-round directions, a substitute yarn list, and simple finishing tips. Ideal for quick holiday accessories or to dress up amigurumi characters.

Why You'll Love This Deer Hat and Scarf Crochet Pattern

I absolutely love this pattern because it transforms simple stitches into a charming holiday accessory set that looks professional yet remains quick to make. I enjoy how the plush yarn creates a squishy, luxurious texture without complicated techniques, so you get a big impact for little effort. The two scarf variants let me personalize each toy for a different personality or gift recipient. Changing to the white brim and adding a pompom gives a delightful finishing touch that always feels festive and fun.

Deer Hat and Scarf Crochet Pattern step 1 - construction progress Deer Hat and Scarf Crochet Pattern step 2 - assembly progress Deer Hat and Scarf Crochet Pattern step 3 - details and accessories Deer Hat and Scarf Crochet Pattern step 4 - final assembly and finishing

Switch Things Up

I love how easily this pattern adapts to color and size changes β€” switch the red and white for pastel tones and you instantly have a softer look for a nursery display.

I often make a larger version by using a bulkier yarn and a larger hook to create a chunky winter hat that fits adult heads rather than amigurumi.

I like to experiment with different brim styles: try two rounds of dc for a taller brim or add an extra round of sc for a snugger fit.

You can replace the pompom with a crocheted flower or a small tassel for a different decorative finish that suits any season.

I sometimes embroider a small initial or tiny heart on the scarf to personalize a gift; just use a contrasting yarn and a tapestry needle.

For a sturdier, lined brim, sew a thin felt strip inside the brim area before attaching it to a toy for extra shape retention.

I recommend trying non-plush worsted yarn with a smaller hook if you want a more defined stitch texture; this will make the hat and scarf firmer and more detailed.

If you want a secure, functional scarf for play, add a small button and buttonhole as shown in Variant 2, or use a snap fastener for easy opening and closing.

I often create matching sets by making the same color scheme for mittens or little booties so the amigurumi looks fully dressed for winter.

Don't be afraid to mix texturesβ€”pair a fuzzy plush yarn for the main body with a smoother cotton or acrylic for the brim and scarf edge to create visual contrast and interest.

Common Mistakes & How to Fix Them

βœ— Working in joined rounds instead of a continuous spiral can create visible seams; work every piece in a spiral and do not end rounds with a slip stitch to keep the surface smooth. βœ— Skipping the color change instruction at the brim will make the hat look unfinished; change to white yarn exactly where the pattern indicates (after Round 12) to form a clean brim row. βœ— Failing to count stitches during increase rounds often results in uneven shaping; count after each increase round and use stitch markers to mark the start of the round if needed. βœ— Not leaving a long tail for sewing the pompom or button makes finishing difficult; leave long tails as instructed for secure sewing and neat attachment.
Deer Hat and Scarf Crochet Pattern

Create a cozy hat and scarf set designed to fit the little deer amigurumi shown in the photos. This pattern focuses on the accessories only, using plush yarn for an ultra-soft, winter-ready finish. You will enjoy clear, step-by-step rounds and simple shaping that make a professional-looking brim, pompom, and two scarf variants. Perfect for adding personality and seasonal flair to your handmade toys or gifting as a finished set.

Beginner Friendly 2-3 Hours

Materials Needed for Deer Hat and Scarf Crochet Pattern

β€” Main Fabric

  • 01
    Plush yarn Dolce YarnArt 120m (131 yds)/100g – 30g in red and 30g in white (original yarn for hat, brim and scarf)
  • 02
    Substitute plush yarn: Himalaya Dolphin Baby 120m (131 yds)/100g (use similar amounts)
  • 03
    Substitute plush yarn: Baby Bee Adore-a-Ball 100g/84m (adjust quantity to match thickness)
  • 04
    Substitute plush yarn: Velvet by Bernat 288m (315 yds)/300g (use equivalent yardage)
  • 05
    Substitute plush yarn: IceCream Deluxe by Lion Brand 142m (155 yds)/142g (use equivalent yardage)

β€” Tools Required

  • 01
    Hook US size G/6 (4 mm) (use 4 mm hook as recommended)
  • 02
    Hook 4 mm (G/6) - mentioned throughout the pattern
  • 03
    Fiber fill stuffing (for toy bodies if attaching accessories to a plush toy)
  • 04
    Tapestry needle for sewing and weaving in ends
  • 05
    Small button for Scarf Variant 2 (sew between rows 1 and 2)

Progress Tracker

0% Complete

β€” Hat :

Info :

All pieces are worked in a spiral continuously. This means that you do not end the rnd with a slip stitch and do not start a rnd with a chain. I start working every piece from a magic ring but you can ch2 and work the necessary number of sc in the second st from the hook.

Info :

With red yarn and hook 4mm make a magic ring.

Round 1 :

6 sc in magic ring = 6 sts

Round 2 :

2 sc in each st around = 12 sts

Round 3 :

(sc in next st, 2 sc in next st)*6 times = 18 sts

Round 4 :

(sc in next 2 sts, 2 sc in next st)*6 times = 24 sts

Round 5 :

(sc in next 3 sts, 2 sc in next st)*6 times = 30 sts

Round 6 :

(sc in next 4 sts, 2 sc in next st)*6 times = 36 sts

Round 7 :

(sc in next 5 sts, 2 sc in next st)*6 times = 42 sts

Round 8 :

(sc in next 6 sts, 2 sc in next st)*6 times = 48 sts

Round 9 :

(sc in next 15 sts, 2 sc in next st)*3 times = 51 sts

Round 10 :

sc in next 10 sts, chain 7, skip 7 stitches, sc in next 9 sts, chain 7, skip 7 stitches, sc in next 18 sts = 51 sts

Round 11 :

sc in next 10 sts, sc in next 7 chains, sc in next 9 sts, sc in next 7 chains, sc in next 18 sts = 51 sts

Round 12 :

sc in each st around = 51 sts

Info :

!!! Change yarn to white

Round 13 :

dc in each st around = 51 sts

Round 14 :

sc in each st around = 51 sts

Info :

Fasten off. Cut yarn and weave in ends.

β€” Pompom :

Info :

With white yarn and hook 4mm make a magic ring.

Round 1 :

6 sc in magic ring =6 sts

Round 2 :

sc 2 in each st around =12 sts

Round 3 :

(sc in next st, 2 sc in next st)*6 times =18 sts

Round 4 :

sc in each st around =18 sts

Round 5 :

(sc in next st, sc dec)*6 times = 12 sts

Round 6 :

sc dec*6 times =6 sts

Info :

Fasten off. Leave the long tail for sewing.

β€” Scarf (Variant 1) :

Info :

Work the scarf back and forth in rows. This means that you need to make a turning chain at the end of each row.

Info :

With red plush yarn and hook 4mm make ch 5.

Row 1 :

sc in 2nd chain from hook and in next 3 sts, ch1 = 4 sts, turn

Row 2-39 :

sc in next 4 sts, ch 1 = 4 sts, turn

Row 40 :

sc in next 4 sts = 4 sts

Info :

Fasten off, cut yarn and weave in ends.

β€” Scarf (Variant 2) :

Info :

Work the scarf back and forth in rows. This means that you need to make a turning chain at the end of each row.

Info :

With red plush yarn and hook 4mm make ch 5. (leave long tail for sewing botton)

Row 1 :

sc in 2nd chain from hook and in next 3 sts, ch1 = 4 sts, turn

Row 2-39 :

sc in next 4 sts, ch 1 = 4 sts, turn

Row 25 :

sc in next 4 sts = 4 sts

Row 26 :

sc in next 2 sts, chain, sc in next 2 sts = 5 sts

Row 27 :

sc in next 2 sts, skip 1 chain, sc in next 2 sts = 5 sts

Info :

Fasten off, cut yarn and weave in ends.

Info :

Sew the button between rows 1 and 2.

Assembly Instructions

  • Change to white yarn after Round 12 and work the white brim rows (Round 13 DC and Round 14 SC) before fastening off to form a neat hat brim.
  • Sew the pompom to the top center of the hat using the long tail left after fastening off; secure with several passes and weave in the ends.
  • For Scarf Variant 2, position the button between rows 1 and 2 and sew it through the scarf using the long tail left for sewing; ensure the button lines up securely when looped.
  • Weave in all ends neatly inside the hat and scarf so they are not visible from the outside and trim excess threads.
  • If attaching the hat and scarf to an amigurumi body, pin both pieces in place first to check fit, then sew securely with a tapestry needle and matching yarn.

Important Notes

  • πŸ’‘Work all hat rounds in a continuous spiral; do not join with a slip stitch or start rounds with chains to keep the surface seamless.
  • πŸ’‘You may start each piece with a magic ring or ch2 and work the required number of sc in the second stitchβ€”either method is acceptable.
  • πŸ’‘Change to the white yarn exactly where indicated (after Round 12) to create the contrasting brim for a clean look.
  • πŸ’‘Leave long tails when fastening off the pompom and scarf button areas to make sewing and finishing easier and more secure.

This cheerful hat and scarf set adds instant festive charm to your deer amigurumi and makes a thoughtful handmade gift. 🧢 The plush yarn and simple shaping deliver a soft, squishy finish that is fun to crochet and lovely to display. 🎁 Keep this pattern handy for quick holiday accessories or sweet additions to your toy collection. ✨

You ask,

we answer.

FAQs

What size will the finished hat and scarf be?

The hat and scarf pictured fit the sample amigurumi approximately 12 in / 28 cm high for the toy; the hat brim and scarf lengths are sized to match that scale when using the recommended plush yarn and 4 mm hook.

Can I use different yarn weights for this pattern?

Yes. You can substitute other bulky or plush yarns listed in the substitute yarn section, but the finished size will change; adjust hook size accordingly to maintain proper fabric density.

Do I need advanced crochet skills to make these accessories?

No. This pattern is rated beginner friendly (easy) and only requires basic single crochet, increases, decreases, chains, and a round of double crochet for the brim.

How long does it take to complete the hat and scarf set?

This set typically takes 2-3 hours for most crocheters, depending on experience, yarn handling speed, and whether you make one of the scarf variants or both.