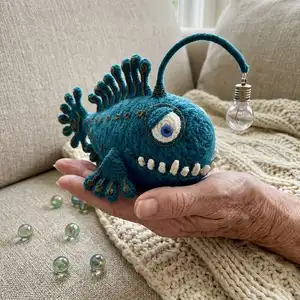
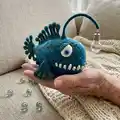
Make a whimsical Anglerfish named SAM with this detailed intermediate crochet pattern. You will create a stuffed fish with a working lamp effect, articulated fins, and decorative beads — perfect as a quirky toy or night lamp. The pattern includes step-by-step rounds, diagrams for joining rays, and reinforcement tips for wire frames so your fish keeps its shape.
Progress Tracker
0% Complete
— Fins :
Side fin - Finger-rays A - 2 rays (A) :
1) Make a MR, 6 sc into the ring (6)
Round 2 :
2) 2 sc in each st around (12)
Round 3 :
3) (3 sc, 2 sc in next st) * 3 (15)
Round 4-5 :
4-5) sc in each st around (15)
Round 6 :
6) (3 sc, 2 sc tog) * 3 (12)
Round 7 :
7) (sc, 2 sc tog) * 4 (8)
Round 8-10 :
8-10) sc in each st around (8)
Info :
After having made one ray, cut off the yarn, but do not cut the yarn after having made the second ray. Continue working from the marker of the second ray.
Side fin - Finger-rays B - 2 rays (B) :
11) 2 sc in next st, 2 sc, (2 sc in next st) * 2, 2 sc, 2 sc in next st (12). Fasten off, weave in the end.
Info :
Join the rays together according to the diagram provided. When joining rays together you DO NOT have to make increases or decreases; follow the diagram and match increases to increases when needed. To avoid holes, draw up one more loop through the same place where you just made a sc, then draw a loop through the previous ray stitch to join three loops and sc through all three.
Side fin - Join rays :
Join the rays together according to the diagram: 4 sc around finger 'A' (make the 4th sc as described above to avoid holes), 6 sc around finger 'B', 6 sc around finger 'B', 8 sc around finger 'A'; turn work and continue in the opposite direction: 6 sc around finger 'B', 6 sc around finger 'B', 4 sc around finger 'A' (40).
Side fin - Continue shaping :
2) 2 sc tog, 16 sc, (2 sc tog) * 2, 16 sc, 2 sc tog (36) + shift st
Round 3 :
(16 sc, 2 sc tog) * 2 (34)
Round 4 :
(15 sc, 2 sc tog) * 2 (32) + shift st
Round 5 :
(14 sc, 2 sc tog) * 2 (30)
Round 6 :
(13 sc, 2 sc tog) * 2 (28) + shift st
Round 7 :
(12 sc, 2 sc tog) * 2 (26)
Round 8 :
(11 sc, 2 sc tog) * 2 (24) + shift st
Round 9 :
(10 sc, 2 sc tog) * 2 (22). Change the yarn into the multicolor yarn.
Round 10 :
(9 sc, 2 sc tog) * 2 (20) + shift st
Round 11-13 :
11-13) sc in each st around (20) + shift st
Round 14 :
(9 sc, 2 sc in next st) * 2 (22)
Round 15 :
(10 sc, 2 sc in next st) * 2 (24). Fasten off and weave in the end. Stuff the finger-rays with polyester (do not stuff too tightly!). Do not stuff the fin itself.
Info :
Reinforce the fin with at least 120 cm of wire for one fin. Insert the even parts of the wire into each finger so the ends coming out of the fin are even. One end of the wire will make the frame of the fishing line and the other end will form the spine of the fish.
Lower fin - Finger-rays A - 2 rays :
1) Make a MR, 6 sc into the ring (6)
Round 2 :
2) 2 sc in each st around (12)
Round 3 :
3) (3 sc, 2 sc in next st) * 3 (15)
Round 4-5 :
4-5) sc in each st around (15)
Round 6 :
6) (3 sc, 2 sc tog) * 3 (12)
Round 7 :
7) (sc, 2 sc tog) * 4 (8)
Round 8-9 :
8-9) sc in each st around (8)
Info :
After having made one ray, cut off the yarn and weave in the end, but do not cut the yarn after having made the second ray. Continue working from the marker of the second ray.
Lower fin - Finger-rays B - 1 ray :
10) 2 sc in next at, 2 sc, (2 sc in next st) * 2, 2 sc, 2 sc in next st (12). Fasten off, weave in the end.
Join lower fin rays :
Join the rays together according to the diagram: Join rays B to finger A as shown. When joining rays together you DO NOT have to make increases. Follow the diagram and join using the technique to avoid holes.
Dorsal fin - Finger-rays A - 1 ray, B - 1 ray, C - 2 rays, D - 3 rays, E - 1 ray :
1) Make a MR, 6 sc into the ring (6)
Round 2 :
2) 2 sc in each st around (12)
Round 3 :
3) (3 sc, 2 sc in next st) * 3 (15)
Round 4-5 :
4-5) sc in each st around (15)
Round 6 :
6) (3 sc, 2 sc tog) * 3 (12)
Round 7 :
7) (sc, 2 sc tog) * 4 (8)
Rounds 8-12 (A) :
8-12) sc in each st around (8)
Rounds 8-16 (B) :
8-16) sc in each st around (8)
Rounds 8-15 (C) :
8-15) sc in each st around (8)
Rounds 8-13 (D) :
8-13) sc in each st around (8)
Rounds 8-12 (E) :
8-12) sc in each st around (8). Fasten off and weave in the end where indicated.
Info :
Do not cut the yarn for some rays where instructed; continue working from the marker of that ray and follow the table to finish and fasten off as described.
Join rays of dorsal fin :
Join the rays together according to the diagram: 4 sc around finger 'A', 6 sc around finger 'B', 6 sc around finger 'C', 6 sc around finger 'C', 5 sc around finger 'D' (with increases where shown); then turn and work back: 6 sc around finger 'C', 6 sc around finger 'C', 6 sc around finger 'B', 4 sc around finger 'A' (58). Then continue joining as the following instructions show for larger joins to reach counts shown in diagrams.
Tail - Finger-rays B - 4 rays, C - 1 ray, A - 2 rays (make A after B and C) :
1) Make a MR, 6 sc into the ring (6)
Round 2 :
2) 2 sc in each st around (12)
Round 3 :
3) (3 sc, 2 sc in next st) * 3 (15)
Round 4-5 :
4-5) sc in each st around (15)
Round 6 :
6) (3 sc, 2 sc tog) * 3 (12)
Round 7 :
7) (sc, 2 sc tog) * 4 (8)
Rounds 8-11 :
8-11) sc in each st around (8)
Round 13 (C) :
13) 2 sc in next st, 2 sc, (2 sc in next st) * 2, 2 sc, 2 sc in next st (12). Fasten off, weave in the end.
Join rays of tail :
Join the rays according to the diagram: 4 sc around finger 'A', 6 sc around finger 'C', 3 sc, 2 sc in next st, 4 sc around finger 'B', turn and continue in opposite direction: 6 sc around finger 'C', 3 sc, 2 sc in next st, 4 sc around finger 'A' (30). Continue with increases and rounds: (2 sc in next st, 13 sc) * 2 (30), (2 sc in next st, 14 sc) * 2 (32), (2 sc in next st, 15 sc) * 2 (34). Fasten off and weave in end. Do not insert wire at this step. Stuff finger-rays lightly.
— Body :
Lower jaw :
Make one with multicolor yarn and 1.5 mm crochet hook following the instructions. The marker goes along the side edge of the jaw. You do not have to change its position.
Round 1 :
1) Make a MR, 6 sc into the ring (6)
Round 2 :
2) 2 sc in each st around (12)
Round 3 :
3) (sc, 2 sc in next st) * 6 (18)
Round 4 :
4) sc, 2 sc in next st, (2 sc, 2 sc in next st) * 5, sc (24)
Round 5 :
5) (3 sc, 2 sc in next st) * 6 (30)
Round 6 :
6) 2 sc, 2 sc in next st, (4 sc, 2 sc in next st) * 5, 2 sc (36)
Round 7 :
7) (5 sc, 2 sc in next st) * 6 (42)
Round 8 :
8) 3 sc, 2 sc in next st, (6 sc, 2 sc in next st) * 5, 3 sc (48)
Round 9 :
9) (7 sc, 2 sc in next st) * 6 (54)
Round 10 :
10) 4 sc, 2 sc in next st, (8 sc, 2 sc in next st) * 5, 4 sc (60)
Round 11 :
11) (9 sc, 2 sc in next st) * 6 (66)
Round 12 :
12) 5 sc, 2 sc in next st, (10 sc, 2 sc in next st) * 5, 5 sc (72)
Round 13 :
13) (11 sc, 2 sc in next st) * 6 (78)
Round 14 :
14) 6 sc, 2 sc in next st, (12 sc, 2 sc in next st) * 5, 6 sc (84)
Round 15 :
15) (13 sc, 2 sc in next st) * 6 (90)
Round 16 :
16) sc in each st around (90)
Round 17 :
17) 7 sc, 2 sc in next st, (14 sc, 2 sc in next st) * 5, 7 sc (96)
Round 18 :
18) sc in each st around (96)
Round 19 :
19) (15 sc, 2 sc in next st) * 6 (102)
Round 20 :
20) sc in each st around (102)
Round 21 :
21) 8 sc, 2 sc in next st, (16 sc, 2 sc in next st) * 5, 8 sc (108)
Round 22 :
22) sc in each st around (108)
Round 23 :
23) (35 sc, 2 sc in next st) * 3 (111)
Round 24 :
24) sc in each st around (111)
Round 25 :
25) 18 sc, 2 sc in next st, (36 sc, 2 sc in next st) * 2, 18 sc (114)
Round 26 :
26) sc in each st around (114)
Round 27 :
27) (37 sc, 2 sc in next st) * 3 (117)
Round 28 :
28) sc in each st around (117)
Round 29 :
29) 19 sc, 2 sc in next st, (38 sc, 2 sc in next st) * 2, 19 sc (120)
Round 30 :
30) sc in each st around (120)
Round 31 :
31) (39 sc, 2 sc in next st) * 3 (123)
Round 32 :
32) sc in each st around (123)
Round 33 :
33) 20 sc, 2 sc in next st, (40 sc, 2 sc in next st) * 2, 20 sc (126)
Round 34-35 :
34-35) sc in each st around (126)
Round 36 :
36) (41 sc, 2 sc in next st) * 3 (129)
Round 37 :
37) sc in each st around (129)
Round 38 :
38) 21 sc, 2 sc in next st, (42 sc, 2 sc in next st) * 2, 21 sc (132)
Round 39 :
39) ((2 sc in next st) * 2, 64 sc) * 2 (136)
Round 40 :
40) sc, (2 sc in next st) * 2, 66 sc, (2 sc in next st) * 2, 65 sc (140)
Round 41 :
41) 2 sc, (2 sc in next st) * 2, 68 sc, (2 sc in next st) * 2, 66 sc (144)
Round 42 :
42) 3 sc, (2 sc in next st) * 2, 70 sc, (2 sc in next st) * 2, 67 sc (148), ss. Fasten off and weave in the end.
Muzzle :
Make one with multicolor yarn and 1.5 mm crochet hook following the instructions. The marker goes along the back. You do not need to change the position of the marker before you start joining the muzzle and the jaw.
Muzzle Round 1 :
1) Make a MR, 7 sc into the ring (7)
Round 2 :
2) 2 sc in each st around (14)
Round 3 :
3) (sc, 2 sc in next st) * 7 (21)
Round 4 :
4) sc, 2 sc in next st, (2 sc, 2 sc in next st) * 6, sc (28)
Round 5 :
5) (3 sc, 2 sc in next st) * 7 (35)
Round 6 :
6) 2 sc, 2 sc in next st, (4 sc, 2 sc in next st) * 6, 2 sc (42)
Round 7 :
7) 3 sc, 2 sc in next st, (6 sc, 2 sc in next st) * 5, 3 sc (48)
Round 8 :
8) (7 sc, 2 sc in next st) * 6 (54)
Round 9 :
9) 4 sc, 2 sc in next st, (8 sc, 2 sc in next st) * 5, 4 sc (60)
Round 10 :
10) (9 sc, 2 sc in next st) * 6 (66)
Round 11 :
11) 5 sc, 2 sc in next st, (10 sc, 2 sc in next st) * 5, 5 sc (72)
Round 12 :
12) (11 sc, 2 sc in next st) * 6 (78)
Round 13 :
13) 6 sc, 2 sc in next st, (12 sc, 2 sc in next st) * 5, 6 sc (84)
Round 14 :
14) sc in each st around (84)
Round 15 :
15) (13 sc, 2 sc in next st) * 6 (90)
Round 16 :
16) sc in each st around (90)
Round 17 :
17) 7 sc, 2 sc in next st, (14 sc, 2 sc in next st) * 5, 7 sc (96)
How to assemble muzzle and lower jaw :
Fold the lower jaw to place the increases in opposite corners. There are 72 sts on the inner side of the jaw and 76 sts on the outer side of the jaw (total 148 sts). Turn the muzzle so that the marker is in the center of the future back; the back comprises 57 sts, the inner part of the muzzle hiding under the lower jaw comprises 72 sts. Start working from this marker and change the position of the marker from time to time by making shift sts.
Join muzzle and lower jaw - Step 1 :
1) 28 sc around the muzzle, then insert the hook into 29th st of the muzzle and between 1st and 2nd sts of the lower jaw (near the first increase), join the inner part of the lower jaw and the muzzle, make 72 sc inserting the hook through the sts of the muzzle and the jaw at the same time, 29 sc around the muzzle till the marker (129).
Join muzzle and lower jaw - Step 2 :
2) 28 sc from the marker around the muzzle, insert the hook between 1st and 2nd sts near the increase of the lower jaw, 76 sc around the outer part of the lower jaw, 29 sc around the muzzle till the marker (133).
Continue joining and outer contour :
Continue working around the outer contour only (muzzle and the outer side of the lower jaw). Change the marker position as you go to keep the center of the back aligned. Follow the rounds and decreases listed in the pattern to shape the head and jaw.
This anglerfish SAM is a delightful and slightly spooky companion with a luminous lamp detail and whimsical fins. Make it as a unique night-lamp ornament or a playful decorative toy for your shelf. The pattern is full of clever joins, wire reinforcement tips, and assembly photos to guide you through every step. 🧶✨