🧶 Beautiful ✨ Detailed 💝 Adorable

Baby Sunflower Amigurumi Pattern

Baby Sunflower Amigurumi Pattern
4.7★ Rating
5-7 Hours Time Needed
3.0K Made This
✂️

Intermediate Level

Ideal for those with basic crochet experience, featuring slightly more advanced stitches and techniques to expand your skills.

⏱️

Weekend Treat

Takes 5-7 hours, making it an enjoyable project to finish over a couple of days.

🧸

Cute Companion

An adorable friend to cherish, handcrafted with love to bring comfort and joy for years to come.

About This Baby Sunflower Amigurumi Pattern

This pattern creates a small, adorable Baby Sunflower amigurumi with a layered petal face and a soft, poseable body. You will crochet the head, layered petals (three rows), petals edges, body, legs and arms, then assemble and embroider the facial details. The design uses continuous spiral rounds and works well in fine cotton or fingering yarn for a delicate finish.

Baby Sunflower Amigurumi Pattern crochet pattern - detailed view of completed project

Detailed rounds and helpful photos guide you through each step, from magic rings to invisible decreases. The pattern includes yarn suggestions, hook sizes used in testing, and clear assembly instructions for neat finishing.

Why You'll Love This Baby Sunflower Amigurumi Pattern

I absolutely love this pattern because the sunflower design feels cheerful and playful while still being compact and quick to make. I enjoy the layered petal technique — it adds so much personality and depth to the face without complicated shaping. The pattern lets me play with color combinations (try Ukrainian blue + yellow or warm mustard tones) and small embroidery details for the eyes and eyelashes. Making these little sunflowers is a joyful, meditative project that yields a sweet handmade gift every time.

Baby Sunflower Amigurumi Pattern step 1 - construction progress Baby Sunflower Amigurumi Pattern step 2 - assembly progress Baby Sunflower Amigurumi Pattern step 3 - details and accessories Baby Sunflower Amigurumi Pattern step 4 - final assembly and finishing

Switch Things Up

I love how easy it is to customize this Baby Sunflower — I often change the petal colors to create different moods: try pastel pinks for a soft look or teal and gold for a modern twist.

I sometimes use a bulky yarn and larger hook to make a chunky, cuddly sunflower; conversely I use cotton lace yarn and a very small hook to create tiny keychain versions.

I add wire to the arms if I want a posable figure; inserting thin craft wire lets me bend the arms into cute poses.

I experiment with eye styles — safety eyes, embroidered circles, or French knots — each gives a different expression and suitability for children.

I often embroider a tiny smile or freckles to change the character, and different eyelash styles can give sleepy, happy, or curious looks.

If I want a seasonal look I mix mustard and rusty orange for autumn or bright yellow with white edges for a sunny summer vibe.

I sometimes make the inner petals a contrasting color (blue, pink or cream) and then edge them with a darker shade to make the layers pop.

For gifts I attach a small crocheted hat, scarf, or a miniature sign saying "hello" — tiny props make them extra special.

Want to make it wearable? I design a small loop at the back to hang it as ornament or convert to a bag charm by adding a split ring and cord.

I recommend testing placement of the petals and eyes before securing them so you can tweak spacing for the perfect expression.

Common Mistakes & How to Fix Them

✗ Skipping the stitch marker when working in continuous spirals causes you to lose track of the start of rounds; place a marker at the first stitch of each round and move it up each round to maintain correct counts. ✗ Forgetting to stuff progressively when shaping heads and bodies leads to lumps or flat areas; stuff gradually as you crochet and adjust the amount to keep an even rounded shape. ✗ Not making holes for safety eyes before inserting them can warp stitches or split threads; widen small holes gently with a wooden skewer and insert eyes before final stuffing to keep the fabric smooth. ✗ Crocheting petals too tightly will make them stiff and hard to shape; use the recommended yarn/hook and keep a relaxed tension so petals sit naturally and layer easily. ✗ Cutting tails too short at the end of pieces makes sewing difficult and fragile; leave the recommended long tails (20-30 cm) for sewing head to body and for secure joining of legs and arms.

Baby Sunflower Amigurumi Pattern

Make a charming Baby Sunflower amigurumi you can treasure or gift. This pattern walks you through each part — arms, legs, head, petals and body — with clear step-by-step rounds and helpful photos. You will enjoy shaping the petals and assembling the little sunflower into a sweet, posed companion. Perfect for giving as a handmade present or adding to your amigurumi collection.

Intermediate 5-7 Hours

Materials Needed for Baby Sunflower Amigurumi Pattern

— Main Fabric

  • 01
    Sport weight yarn (Fine yarn) for cotton+acrylic or Fingering (Super fine yarn) for 100% cotton
  • 02
    Colors: green (approx. 30g)
  • 03
    brown (approx. 15g)
  • 04
    yellow (approx. 10g)
  • 05
    blue (approx. 10g) - optional (for Ukrainian sunflower)
  • 06
    mustard (a few meters) - for petal edges
  • 07
    black and white (a few meters each) for eye and detail embroidery
  • 08
    Schachenmayr Catania (50g/125m, 100% cotton) used: green (0414 - moose), mustard (0383 - zimt), yellow (0208 - sonne), black (0110 - schwarz), white (0106 - weiß)
  • 09
    Scheepjes Catona (50g/125m, 100% cotton): brown (388 - rust)

— Tools Required

  • 01
    Crochet hook suitable for your yarn (pattern author used 1.75 mm)
  • 02
    Additional hooks used in testing: 1.5 mm and 0.75 mm
  • 03
    Safety eyes 6 mm (2 pieces)
  • 04
    Scissors
  • 05
    Tapestry needle for sewing and weaving ends
  • 06
    Pins for positioning parts while assembling
  • 07
    Stitch marker (author uses a piece of yarn)
  • 08
    Fiberfill (stuffing)
  • 09
    Stuffing tool (author uses wooden skewers and tweezers)
  • 10
    Strong thread for thread joining (for attaching limbs)

Progress Tracker

0% Complete

— Read Me :

Info :

Decreases: In order to make an invisible decrease, insert the hook only under the FRONT loop of one stitch, then under the FRONT loop of the second stitch (p.1,2), yarn over and pull through these two front loops (p.3), yarn over and pull through two loops left on the hook (p.4).

— Arms :

Info :

Work with green yarn. Do not stuff the arms.

Round 1 :

6 sc in a MR (6)

Round 2-4 :

(3 rows) 6 sc (6)

Round 5 :

inc, 5 sc (7)

Round 6 :

3 sc in 1 stitch, 2 sc, dec, 2 sc (8)

Round 7 :

(inc, 1 sc) * 2, dec, 2 sc (9)

Round 8 :

(dec, 1 sc) * 2, 2 inc, 1 sc (9)

Round 9-11 :

(3 rows) 9 sc (9)

Round 12 :

(dec, 1 sc) * 3 (6)

Info :

Cut the yarn off leaving a tail for closing the opening. Insert the yarn tail into a needle, go under the front loops of all 6 sc (p.5), tighten the thread and weave in the yarn ends. Later we will attach the arms to the body.

— Legs :

Info :

Work with green yarn. Ch 5.

Round 1 :

From the 2nd ch from the hook (p.8): inc, 2 sc, 4 sc in 1 stitch, 2 sc along the other side of the chain, inc (12). Continue working in spirals.

Round 2 :

inc, 4 sc, 2 inc, 4 sc, inc (16)

Round 3 :

16 sc (16)

Round 4 :

4 sc, 4 dec, 4 sc (12)

Round 5 :

3 sc, 3 dec, 3 sc (9)

Info :

Stuff the foot.

Round 6 :

9 sc (9)

Round 7 :

(inc, 2 sc) * 3 (12)

Round 8 :

(inc, 3 sc) * 3 (15)

Round 9-10 :

(2 rows) 15 sc (15)

Round 11 :

(dec, 3 sc) * 3 (12)

Info :

Lightly stuff the top part of the leg, so that the shape of the leg is almost flat (p.9).

Round 12 :

6 dec (6)

Info :

Cut the yarn off, close the opening, weave in the yarn end. Later we will attach the legs to the body.

— Head :

Info :

Work with brown yarn.

Round 1 :

6 sc in a MR (6)

Round 2 :

6 inc (12)

Round 3 :

(inc, 1 sc) * 6 (18)

Round 4 :

(inc, 2 sc) * 6 (24)

Round 5 :

(inc, 3 sc) * 6 (30)

Round 6 :

(inc, 4 sc) * 6 (36)

Round 7-8 :

(2 rows) 36 sc (36)

Round 9-10 :

(2 rows) FLO 36 sc (p.10) (36)

Info :

Cut the yarn off leaving 15-20 cm and weave in the end using the "straight edge" method. Insert your needle into the 2nd stitch of the row (skip one stitch, insert the needle into the 2nd one) (p.11). Insert it into the last stitch of the row (between the front and the back loops of the stitch) (p.12). Pull the needle out, tighten the thread, and weave in the end (p.13).

Info :

Turn the detail inside out, the tail of the MR should be outside (p.15).

Info :

Attach green yarn to the back loop of the last stitch of the previous row (p.17,18). Continue crocheting clockwise (p.16).

Round 11 :

BLO 36 sc (36)

Info :

Mark the back loop of the 1st stitch of 11th row, we will need it in 13th row.

Round 12 :

The whole row is crocheted FLO (watch this video before starting to crochet this row): (in one stitch: sl st, ch 2, 1 hdc, 1 dc, ch 2, sl st into the 2nd ch from hook, into the next stitch: 1 dc, 1 hdc, ch 2, sl st, into the next stitch: 1 sl st) * 12 (12 leaves) (p.19,20)

Round 13 :

Work into the BLO of 11th row (start from the loop you marked before) (p.21): 36 sc (36)

Round 14-16 :

(3 rows) 36 sc (36)

Info :

Insert the safety eyes between the 4th and 5th rows of the head. But first, make holes for the eyes to make it easier to insert them. I use a wooden skewer, insert it between the stitches and widen the hole (p.22). Attach safety eyes (p.23).

Round 17 :

(dec, 4 sc) * 6 (30)

Round 18 :

(dec, 3 sc) * 6 (24)

Info :

Start to stuff the head, add stuffing as you go.

Round 19 :

(dec, 2 sc) * 6 (18)

Round 20 :

(dec, 1 sc) * 6 (12)

Round 21 :

6 dec (6)

Info :

Cut the yarn off, close the opening, weave in the yarn end.

— Petals :

Info :

Watch this video before starting to crochet petals. Attach yarn of blue color (if you want a Ukrainian sunflower) or yellow color (if you want a regular sunflower) to the front loop of the last brown row (p.26,27).

Petal 1 Instruction 1 :

1 sc, ch 6 (p.28), turn, work on the wrong side of the chain (into the loops indicated in the p.28),

Petal 1 Instruction 2 :

from the 2nd ch from hook: 5 sc (p.29), sl st into the back loop of the base sc (p.30), turn,

Petal 1 Instruction 3 :

from the 2nd stitch from hook (skip sl st, work into the last sc of the previous row, p.31): 1 sc, 3 hdc, 2 sc in 1 stitch, ch 3, sl st into the 3rd loop from the hook (p.32), 1 sc into the same sc (the last stitch) (p.32), work along the other side of the chain, 1 sc, 3 hdc, 1 sc (p.33), sl st into the front loop of the base sc (p.34)

Petal 1 Instruction 4 :

2 sl st into the front loops on the head

Info :

The first petal is ready (p.35). Repeat instructions 1-4 11 more times. The first row of 12 petals is ready (p.36).

Info :

If you crocheted this row with blue yarn, fasten off, and attach yellow yarn to the front loop of the next stitch (p.37). If you crocheted with yellow yarn, continue to crochet.

Petals Row 2 :

The 2nd row is made almost in the same way, the only difference is that you start with 4th instruction (make 2 sl st, p.38) and then make instructions 1-3. The petals of this row should close the spaces between petals of the previous row. Repeat instructions (4, 1-3) 12 times. Fasten off.

Info :

Attach yarn of mustard color to the next front loop (p.39).

Petal Edge Row :

Ch 4 (p.40), sl st into the next stitch (p.41,42), repeat 35 more times (till the end of the row) (p.43). Cut the yarn off, weave in the end (p.44).

— Body :

Info :

Work with green yarn.

Round 1 :

6 sc in a MR (6)

Round 2 :

6 inc (12)

Round 3 :

(inc, 1 sc) * 6 (18)

Round 4 :

(inc, 2 sc) * 6 (24)

Round 5 :

(inc, 3 sc) * 6 (30)

Round 6 :

(inc, 4 sc) * 6 (36)

Round 7-11 :

(5 rows) 36 sc (36)

Round 12 :

14 sc, (dec, 1 sc) * 3, 13 sc (33)

Round 13 :

12 sc, (dec, 1 sc) * 3, 12 sc (30)

Round 14 :

(dec, 3 sc) * 6 (24)

Round 15 :

24 sc (24)

Round 16 :

(dec, 2 sc) * 6 (18)

Round 17-19 :

(3 rows) 18 sc (18)

Info :

Stuff the body firmly.

Info :

Cut the yarn off leaving 20-30 cm for sewing the body to the head.

— Assembling :

Info :

Embroider the nose using the same yarn you used for crocheting the face. Make 3-4 stitches over the MR (p.47,48).

Info :

Embroider the whites of the eyes with white yarn (p.49-51).

Info :

Embroider eyelashes with black thread following instructions (p.52-54). I use 4 ply yarn, divide it in half and embroider in 2 threads. You can also use embroidery thread.

Info :

Pull all the ends out at the back of the head, tie them together and weave in. If during embroidery some fiberfill threads were pulled out on the face, remove them using tweezers.

Info :

Fix the head on the body with pins as close to the green leaves as possible, the face should look a little upwards (p.55-57). Sew the head to the body with the thread left from crocheting the body. Grab a stitch on the head (p.58), then a stitch on the body (note, not a loop, a stitch - p.59). Add stuffing to the neck before you completely close the opening. Weave in the yarn end.

Thread joining :

Count the rows from the bottom of the body. Pin the legs between rows 6 and 7 and the arm between rows 13 and 14 (p.61,62).

Thread joining :

Use a strong thread (we will need about 50 cm for the arms and 50 cm for the legs). Grab several stitches from the inside of the leg (p.63), pull the needle through the body (p.64,65), grab several stitches on the inner side of the second leg (p.66), and pull the needle back through the body (p.67). Repeat these steps several times (2-3 will be enough), inserting the needle into the same holes and trying to grab the same stitches on the legs. Squeeze the legs a little (p.68), pull up both ends, tie them together several times and weave them in.

Thread joining :

Attach the arms using the same method, but grab just 1-2 stitches on the arms (p.69).

Info :

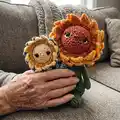
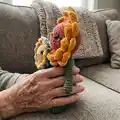
Final checks: make sure all ends are woven in, petals are layered neatly and facial embroidery is secure. Your Baby Sunflower is ready!

Assembly Instructions

  • Attach the head to the body by aligning the head so the face looks a little upwards and pinning it close to the green leaves, then sew securely using the thread left from crocheting the body, grabbing a stitch on the head and then a stitch on the body (not a loop).
  • Position the legs between rows 6 and 7 of the body and pin them. Use a strong thread and grab several stitches from the inside of the leg, pull the needle through the body, repeat for the second leg and secure by repeating several times and tying the ends together tightly.
  • Attach the arms between rows 13 and 14, using the same thread-joining method but grabbing only 1-2 stitches on the arms for a snug attachment.
  • Insert safety eyes between the 4th and 5th rounds of the head after widening the holes with a skewer as needed, then embroider the eyes' whites and eyelashes before final sewing to keep the face neat.
  • Embroider the nose by making 3-4 stitches over the magic ring, weave all ends through the back of the head, remove any pulled fiberfill with tweezers, add final stuffing to the neck and close the opening.

Important Notes

  • 💡All parts are worked in continuous spirals (without slip stitch and ch), unless noted otherwise, so use a stitch marker to keep track of the start of each round.
  • 💡Do not stuff the arms; only stuff the feet and body as instructed and stuff the head gradually to keep a smooth round shape.
  • 💡Leave long tail yarns (20-30 cm) for sewing the body to the head and similar long tails for attaching limbs to make assembly durable.

This sweet Baby Sunflower is ready to brighten anyone's day—perfect as a handmade gift or a cheerful desk companion. 🌻 Keep experimenting with colors and tiny details to create unique blossoms. Happy crocheting and may your yarn always be tangle-free! 🧶

You ask,

we answer.

FAQs

What size will the finished piece be?

The finished amigurumi measures approximately 12 cm (4.7 inches) tall when using the recommended fine cotton yarn and the suggested hook sizes; test gauges with your chosen yarn and hook as sizes will vary.

Can I use different yarn weights for this pattern?

Yes, you can change yarn weight and hook size to make the sunflower larger or smaller, but keep in mind the stitch counts remain the same and the final size will change; adjust stuffing and eye size accordingly.

Do I need prior crochet experience for this pattern?

This pattern is rated intermediate, so basic knowledge of single crochet, increases, decreases, working in spiral rounds, and simple embroidery is recommended for best results.

How long does this project typically take to complete?

Most crocheters complete this project in 5-7 hours, though time may vary based on experience, yarn choice, and how much time you spend on embroidery and assembly.

What safety considerations should I follow for toys given to children?

Use embroidered eyes and features for toys intended for young children instead of safety eyes, and securely weave in all ends and securely attach limbs to avoid choking hazards.