🧢 Beautiful ✨ Detailed πŸ’ Adorable

Capybara Amigurumi Pattern

Capybara Amigurumi Pattern
3.9β˜… Rating
1.5-2 Hours Time Needed
1.1K Made This
βœ‚οΈ

Beginner Friendly Level

Perfect for those just starting their crochet journey, with clear instructions and simple techniques

⏱️

Quick Make

Complete in under 2 hoursβ€”lightning fast fun for instant gratification and quick gifts.

🧸

Cute Companion

An adorable friend to cherish, handcrafted with love to bring comfort and joy for years to come.

About This Capybara Amigurumi Pattern

This pattern creates a plush capybara amigurumi using super-bulky plush yarn for a soft, squishy finish. You will crochet the head-body first, then make and sew on the legs, ears, a tiny tangerine and leaves as cute accessories. The pattern includes exact round-by-round instructions, stitch counts and simple finishing tips.

Capybara Amigurumi Pattern crochet pattern - detailed view of completed project

Ideal for beginners comfortable with basic stitches like single crochet and increases/decreases. Photographs and placement guidance for ears, eyes and legs help you achieve the correct look.

Why You'll Love This Capybara Amigurumi Pattern

I absolutely love this pattern because it turns simple stitches into a delightfully expressive, squishy capybara with very little time investment. I enjoy how the super-bulky plush yarn creates a soft tactile finish that is perfect for cuddling and gifting. The construction β€” crocheting the body first and sewing the legs later β€” makes assembly straightforward and forgiving for beginners. I also love the tiny tangerine accessory: it adds a playful personality to the finished toy and is quick to make.

Capybara Amigurumi Pattern step 1 - construction progress Capybara Amigurumi Pattern step 2 - assembly progress Capybara Amigurumi Pattern step 3 - details and accessories Capybara Amigurumi Pattern step 4 - final assembly and finishing

Switch Things Up

I love how easy it is to customize this capybara by changing yarn colors; try a pastel beige or a fun rainbow for a playful twist.

If you want a larger capybara, use thicker yarn and a bigger hook, and adjust stuffing accordingly for a squishier result.

For a miniature version, work with thinner yarn and a smaller hook to create keychain-sized capybaras perfect for gifts.

I often add tiny props like a crocheted scarf or a felt flower to give personality and seasonal flair.

You can modify leg placement to make the capybara sit differently; move the markers a few stitches to alter posture.

Swap the tangerine for other tiny fruits or objects β€” a tiny hat or flower also looks adorable on top of the head.

Experiment with embroidered expressions by changing eye angle or stitch length for sleepy, happy, or surprised looks.

Try wire inside the legs if you want a slightly poseable toy, but be careful to secure wire ends safely inside stuffing.

Mix yarn textures for contrast: a fluffy body with smooth leaves or a shiny nose thread can add subtle detail.

I also like to embroider small spots or patterns on the back to create one-of-a-kind characters from the same basic pattern.

Common Mistakes & How to Fix Them

βœ— Skipping stitch markers when you need to mark ear positions; solution: place markers exactly where instructed (mark the two stitches in R18) to ensure symmetrical ear placement. βœ— Under- or over-stuffing the body leads to a misshapen form; solution: stuff gradually, check shape frequently and stuff firmly but not so tight that stitches stretch. βœ— Not counting stitches after increases/decreases causes incorrect shaping; solution: count your stitches at the end of each round to confirm the expected stitch count. βœ— Closing the magic ring too tightly or too loosely can change the final size; solution: make a neat magic ring and adjust tension so the initial round lies flat without gapping. βœ— Sewing legs or ears without pinning can make them uneven; solution: pin or use stitch markers to preview placement and adjust before sewing permanently.

Capybara Amigurumi Pattern

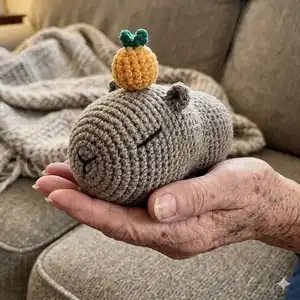
Make a soft, cuddly capybara amigurumi using super-bulky plush yarn and simple crochet stitches. This pattern walks you through crocheting the body first, then sewing on the legs, with clear photos and step-by-step rounds. Perfect as a quick handmade gift or a cozy desk companion you can finish in an afternoon. Follow the detailed rounds, embroidery and finishing steps for a polished result.

Beginner Friendly 1.5-2 Hours

Materials Needed for Capybara Amigurumi Pattern

β€” Main Fabric

  • 01
    Super bulky plush yarn - Himalaya Dolphin Baby 120m/100g (131 yds/100g) or similar - approx 1 skein beige (main body)
  • 02
    Small amount of orange super-bulky plush yarn - for tangerine (a little skein or scraps)
  • 03
    Small amount of green yarn - for tangerine leaves (scraps)
  • 04
    Fine black yarn (for eyes and nose) - YarnArt Begonia black color 0999 or equivalent - small amount

β€” Tools Required

  • 01
    4.5 mm (H-7 US) crochet hook
  • 02
    Polyester stuffing
  • 03
    Crochet stitch markers
  • 04
    Big and small yarn needles
  • 05
    Scissors
  • 06
    Pins (for assembly/placement)

Progress Tracker

0% Complete

β€” Notes :

Info :

Measurements approx.: 8.7x4.7x4.7" (22x12x12 cm). Crochet level: Easy. Time: 1.5-2 hours.

β€” Leg (x 4) :

Round 1 :

crochet a MR with 6 Sc (6)

Round 2 :

Inc around (12)

Round 3 :

Sc around, Sl St (12)

Info :

Fasten off. Leave a sewing tail.

β€” Ear (x 2) :

Round 1 :

crochet a MR with 6 Sc (6)

Info :

Don`t close the ring, turn, Ch

Round 2 :

(Inc, Sc) x 3 (9)

Info :

Fasten off.

Info :

Sew the corners together. Leave sewing tail.
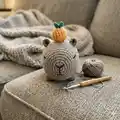
β€” Head-body :

Round 1 :

crochet a MR with 8 Sc (8)

Round 2 :

Inc around (16)

Round 3 :

(Sc 1, inc) x 8 (24)

Round 4 :

(Sc 2, inc) x 8 (32)

Round 5 :

(Sc 3, inc) x 8 (40)

Round 6 :

(Sc 4, inc) x 8 (48)

Round 7 :

Sc around (48)

Round 8 :

Sc 19, Inc, Sc 8, Inc, Sc 19 (50)

Round 9 :

Sc around (50)

Round 10 :

Sc 21, Inc, Sc 6, Inc, Sc 21 (52)

Round 11-13 :

Sc around (52) 3 Rnds

Round 14 :

Sc 23, Inc, Sc 4, Inc, Sc 23 (54)

Round 15-17 :

Sc around (54) 3 Rnds

Info :

In the next round we will mark the approximate position of the ears.

Round 18 :

Sc 6, Dec, Sc 4, Dec, Sc 9, Sc 1 (mark this St), Sc 9, Sc 1 (mark this St), Sc 10, Dec, Sc 4, Dec, Sc 2 (50)

Round 19 :

Sc 4, Dec, Sc 2, Dec, Sc 34, Dec, Sc 2, Dec (46)

Round 20-22 :

Sc around (46) 3 Rnds

Round 23 :

Sc 20, Dec, Sc 4, Dec, Sc 18 (44)

Round 24 :

Sc 20, Dec, Sc 2, Dec, Sc 18 (42)

Round 25 :

Sc 10, Inc, Sc 8, Dec, Sc 4, Dec, Sc 8, Inc, Sc 6 (42)

Round 26 :

Sc around (42)

Round 27 :

(Sc 6, Inc) x 6 (48)

Round 28-34 :

Sc around (48) 7 Rnds

Info :

Stuff with filler.

Round 35 :

(Sc 4, Dec) x 8 (40)

Round 36 :

(Sc 3, Dec) x 8 (32)

Round 37 :

(Sc 2, Dec) x 8 (24)

Round 38 :

(Sc, Dec) x 8 (16)

Info :

Stuff firmly.

Round 39 :

Dec 8 (8)

Info :

Tighten the hole, hide the thread inside.

β€” Determine position of the legs / Sew legs :

Info :

Determine the position of the legs. Sew the legs in the positions shown; use markers or pins to adjust spacing so markers are equally distant from center. Sew firmly.
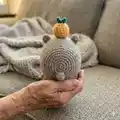
β€” Embroider the EYES :

Info :

Left eye. From the left ear down 3 rounds, then to the left 5 stitches - here is the 1st dot of the eye. From this dot down 5 stitches and to the left 1 stitch - here is the 2nd dot of the eye.

Info :

Embroider the eye with a thin black thread connecting these two dots. I used one long thread to embroider the eyes and nose. You can fix the thread as shown in the photo. Make 2 stitches to make the eye more expressive.

Info :

Right eye. From the right ear down 3 rounds, then to the right 5 stitches - here is the 1st dot of the eye. From this dot down 5 stitches and to the right 1 stitch - here is the 2nd dot of the eye. Embroider the second eye in the same way as the first.

β€” Embroider the NOSE :

Info :

Using the same long thread, embroider the nose by connecting the three nose points as shown in photos. Tie a knot and hide the threads inside the head.
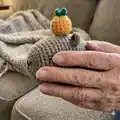
β€” Tangerine :

Round 1 :

crochet a MR with 6 Sc (6)

Round 2 :

Inc around (12)

Round 3 :

(Sc 1, Inc) x 6 (18)

Round 4-6 :

Sc around (18) 3 Rnds

Round 7 :

(Sc 1, Dec) x 6 (12)

Info :

Stuff

Round 8 :

Dec around (6)

Info :

Fasten off, tighten the hole, leave the thread for sewing.

β€” Leaves :

Info :

Ch 4, Sl St in 1st Ch, Ch 4, Sl St in 1st Ch. Fasten off, wrap the center with thread and tie a knot.

β€” Final assembly :

Info :

Sew the leaves to the tangerine, hide the threads inside. Sew the tangerine to the head. Hide the threads inside. Our capybara is ready!

Assembly Instructions

  • Determine the position of the legs using markers as shown in the photos, spacing them evenly from the center and adjusting to match the reference layout before sewing.
  • Sew each leg securely to the body at the marked positions, using the long sewing tails and a yarn needle; stitch through several times for a stable attachment.
  • Sew the ears at the two marked stitches from R18, spacing them approximately 9-10 stitches apart from the center; pin and adjust to ensure symmetry before stitching.
  • Embroider the eyes by marking the two dots as described (3 rounds down from ear, then 5 stitches left/right, then 5 stitches down and 1 stitch left/right) and connect them with thin black yarn.
  • Embroider the nose with the same black thread, tie a knot when finished and hide all thread tails inside the head.
  • Sew the tangerine to the top of the head and attach the leaves to the tangerine, hiding all threads inside for a neat finish.

Important Notes

  • πŸ’‘Use stitch markers to mark the two ear stitches in Round 18 and to help position legs and ears symmetrically before sewing.
  • πŸ’‘Stuff gradually and check the shape frequently; stuff firmly in the final shaping rounds but avoid overstretching the stitches.
  • πŸ’‘Pin or use markers to preview placement for legs and ears and adjust if necessary to keep parts symmetrical.
  • πŸ’‘Weave in and hide thread tails inside the toy after completing the nose, eyes and final closures for a clean finish.
  • πŸ’‘Maintain consistent tension throughout to ensure the body shape and stitch counts match the pattern rounds.

This adorable capybara amigurumi is soft, simple and full of personality β€” perfect for quick handmade gifts or a cozy shelf friend. Follow the step-by-step rounds and photos to assemble and embroider the face for a charming finish. Enjoy crocheting this squishy little creature and share the joy of handmade toys! 🧢🐾

You ask,

we answer.

FAQs

What size will the finished piece be?

The finished amigurumi measures approximately 8.7 x 4.7 x 4.7 inches (22 x 12 x 12 cm) when using the recommended super-bulky plush yarn and 4.5 mm hook.

Can I use different yarn weights for this pattern?

Yes, you can use different yarn weights, but this will change the final size. Use an appropriate hook for your chosen yarn and expect to adjust stuffing and placement of parts.

Do I need prior crochet experience for this pattern?

This pattern is beginner friendly and uses basic stitches (single crochet, increases and decreases), so it's great for those with basic crochet skills.

How long does this project typically take to complete?

Most crocheters finish this project in about 1.5-2 hours, though time may vary based on experience and yarn choice.

How do I embroider the eyes to match the photos?

Mark the dots relative to the ears (3 rounds down then 5 stitches left/right and 5 down + 1 left/right) and connect each pair of dots with thin black yarn; make two stitches for an expressive look.