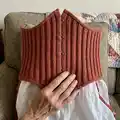
🧢 Beautiful ✨ Detailed πŸ’ Adorable

Crochet Corset Belt Pattern

Crochet Corset Belt Pattern
4.5β˜… Rating
5-7 Hours Time Needed
1.8K Made This
βœ‚οΈ

Intermediate Level

Ideal for those with basic crochet experience, featuring slightly more advanced stitches and techniques to expand your skills.

⏱️

Weekend Treat

Takes 5-7 hours, making it an enjoyable project to finish over a couple of days.

✨

Stylish Touch

An elegant detail to elevate any look, combining traditional techniques with contemporary design sensibilities.

About This Crochet Corset Belt Pattern

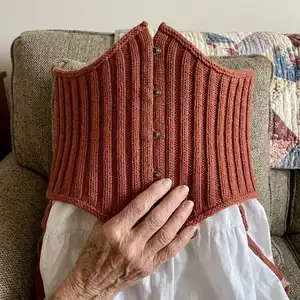
This pattern creates a structured crochet corset belt with shaping for a flattering fit and optional boning for extra support. Youll work textured half-double crochet in a back-horizontal-bar variation and linked double crochet for clean edges and eyelets. The pattern includes detailed finishing instructions for attaching a corset busk, D-rings and optional skirt hikes.

Crochet Corset Belt Pattern crochet pattern - detailed view of completed project

Written for multiple sizes with clear color-coded sizing, it includes diagrams for stitch placement and optional components. Perfect for makers who enjoy assembly and garment construction details.

Why You'll Love This Crochet Corset Belt Pattern

I absolutely love this pattern because it blends garment construction with crochet techniques to produce a truly wearable accessory. I enjoy how the hdchb stitch creates a ridged, corset-like texture that looks professional and tailored. I also appreciate the clear instructions for attaching a corset busk and optional boning, which elevate the final piece. Working the eyelets and linked double crochet gives satisfying structure and a polished finish that I am proud to wear and gift.

Crochet Corset Belt Pattern step 1 - construction progress Crochet Corset Belt Pattern step 2 - assembly progress Crochet Corset Belt Pattern step 3 - details and accessories Crochet Corset Belt Pattern step 4 - final assembly and finishing

Switch Things Up

I love experimenting with color: swap the Fawn for a bold jewel tone to make a modern statement corset belt.

You can change yarn weight and hook size to alter finished size; a bulkier yarn plus larger hook makes a chunkier, more dramatic belt.

I often add contrast edging by working the final single crochet row in a darker or metallic yarn for visual pop.

For a vintage feel, try a natural or cream yarn and antique brass D-rings and busk hardware to complement the texture.

Make a mini keychain version by using fingering weight yarn and a smaller hook, reducing stitch counts proportionally for a tiny accessory.

Swap the busk for a decorative front closure like vintage buttons or snaps if you prefer a softer, more flexible front.

I like to customize the eyelet spacing for a wider or narrower lacing panel depending on the look I wantβ€”adjust ch-2 spacing repeats accordingly.

Add embroidered details or tiny appliques over the ridges for a romantic or theatrical look that personalizes each piece.

Use ribbon, leather cord, or satin laces to change the drape and finish of the lacing; each material gives a different character to the corset.

Consider lining the inside with lightweight fabric for comfort against skin when wearing directly over bare skin, and always test boning placement before final stitching.

Common Mistakes & How to Fix Them

βœ— Skipping the stitch marker at the end of the row during shaping can make counts confusing; always place a marker and recount after each shaped row. βœ— Failing to work into the specified front loops only or back horizontal bar will change texture and fit; follow loop instructions exactly and check your stitch placement. βœ— Attaching boning too close to the edge risks fabric distortion; ensure boning is at least 1/2" [1.5 cm] from the edge before stitching casings. βœ— Not testing gauge with hdchb stitch will alter final size and fit; make a gauge swatch of 20 hdchb x 13 rows to confirm your hook choice.

Crochet Corset Belt Pattern

Create a structured, stylish crochet corset belt that cinches the waist and adds a handmade statement to any outfit. This intermediate pattern guides you through shaping, eyelets, busk placement and optional boning for a professional finish. Youll work textured half-double linked stitches and learn finishing techniques like busk and D-ring attachment. Perfect for makers who enjoy construction and tailoring details.

Intermediate 5-7 Hours

Materials Needed for Crochet Corset Belt Pattern

β€” Main Fabric

  • 01
    Bernat Maker (8.8 oz/250 g; 317 yds/290 m) - Color Fawn (06013)
  • 02
    Yarn amounts by size (Fawn 06013): XS/S - 1 ball (approx 245 yds / 224 m)
  • 03
    Yarn amounts by size (Fawn 06013): M - 1 ball (approx 306 yds / 280 m)
  • 04
    Yarn amounts by size (Fawn 06013): L - 2 balls (approx 367 yds / 336 m)
  • 05
    Yarn amounts by size (Fawn 06013): XL - 2 balls (approx 441 yds / 403 m)
  • 06
    Yarn amounts by size (Fawn 06013): 2/3XL - 2 balls (approx 507 yds / 464 m)
  • 07
    Yarn amounts by size (Fawn 06013): 4/5XL - 2 balls (approx 568 yds / 519 m)

β€” Tools Required

  • 01
    Crochet hook size U.S. G/6 [4 mm] Susan Bates Silvalume or size needed to obtain gauge
  • 02
    Susan Bates yarn needle
  • 03
    Susan Bates locking stitch marker
  • 04
    10" [25.5 cm] steel Corset Busk
  • 05
    Approx 10 yds [9.1 m] of 1/2" [1.5 cm] wide satin ribbon for lacing
  • 06
    Optional D-rings (8 shown in photo) 1" [2.5 cm] for skirt hikes
  • 07
    Two pieces of 1/4" spiral steel boning 5" [12.5 cm] long
  • 08
    Four pieces of 1/4" spiral steel boning 7" [18 cm] long
  • 09
    Scissors
  • 10
    Measuring tape

Progress Tracker

0% Complete

β€” SIZES :

Info :

Corset is designed to fit with no ease. Fit is adjustable based on gap allowed at center back lacing.

Info :

To fit waist measurement XS/S 23-26Β½" [58.5-67.5 cm], M 28-30" [71-76 cm], L 32-34" [81.5-86.5 cm], XL 36-38" [91.5-96.5 cm], 2/3XL 40-45" [101.5-114 cm], 4/5XL 46-50" [116.5-127 cm].

Info :

Finished waist XS/S 20" [51 cm], M 24" [61 cm], L 28" [71 cm], XL 32" [81 cm], 2/3XL 38" [96.5 cm], 4/5XL 42" [106.5 cm].

β€” Gauge :

Info :

20 hdchb and 13 rows = 4" [10 cm].

β€” Instructions :

Info :

The instructions are written for size XS/S. If changes are necessary for larger sizes the instructions will be written XS/S (M-L-XL-2/3XL-4/5XL). Numbers for each size are shown in the same color throughout the pattern. When only one number is given in black, it applies to all sizes.

Info :

Note: Ch 2 at beg of row does not count as st.

β€” LEFT HALF (Busk "Pin" Side) :

Info :

Ch 46.

1st row :

(RS). 1 dc in 3rd ch from hook. 1 lnkdc in each ch to end of chain. Turn. 44 dc.

2nd row :

(WS). Ch 1. Working in front loops only, 1 sc in each dc to end of row. Turn. PM at end of row.

3rd row :

Ch 1. 1 sc in each sc to end of row. Turn.

4th row :

*4th row: (WS). Ch 1. Working in front loops only, 1 hdc in each sc to end of row. Turn.

5th row :

Ch 1. 1 hdchb in each hdc to end of row. Turn.

6th row :

Ch 1. 1 hdchb in first hdchb. Hdchb2tog. 1 hdchb in each hdchb to last 3 hdchb. Hdchb2tog. 1 hdchb in last hdchb. Turn. 42 hdchb.

7th to 14th rows :

Rep 5th and 6th rows 4 times more. 34 hdchb.

15th row :

Ch 1. 1 hdchb in each hdc to end of row. Turn.

Info :

Rep last row until work from marked row measures approx 5Β½ (7Β½-9Β½-11Β½-14Β½-16Β½)" [14 (19-24-29-37-42) cm], ending on a WS row.

β€” Back Shaping :

1st row :

(RS). Ch 1. 1 hdchb in first st. 2 hdchb in next st. 1 hdchb in each st to last 2 hdchb. 2 hdchb in next hdchb. 1 hdchb in last hdchb. Turn. 36 hdchb.

2nd row :

Ch 1. 1 hdchb in each hdchb to end of row. Turn.

3rd to 10th rows :

Rep 1st and 2nd rows 4 times more. 44 hdchb.

β€” Proceed with Eyelets :

1st row :

(RS). Ch 1. 1 sc in each of first 3 hdchb. *Ch 2. Skip next 2 hdchb. 1 sc in each of next 2 hdchb. Rep from * to last hdchb. 1 sc in last hdchb. Turn.

2nd row :

Ch 1. 1 sc in each of first 3 sc. *2 sc in next ch-2 sp. 1 sc in each of next 2 sc. Rep from * to last sc. 1 sc in last sc. Turn.

3rd row :

Ch 2. Working in front loops only, 1 dc in first st. 1 lnkdc in each st to end of row. Turn.

4th row :

As 3rd row. Fasten off.

Info :

Sew final row to unworked loops of 2nd row to form back facing. **

β€” RIGHT HALF (Busk "Hook" Side) :

Info :

Ch 45.

Front Shaping 1st row :

(RS). 1 sc in 2nd ch from hook. 1 sc in each ch to end of chain. Turn. 44 sc.

Front Shaping 2nd row :

Ch 1. 1 sc in each of first 5 sc. (Ch 2. Skip next 2 sc. 1 sc in each of next 6 sc) 4 times. Ch 2. Skip next 2 sc. 1 sc in each of last 5 sc. Turn.

Front Shaping 3rd row :

Ch 2. 1 dc in first sc. 1 lnkdc in each of next 4 sc. (2 lnkdc in next ch-2 sp. 1 lnkdc in each of next 6 sc) 4 times. 2 lnkdc in next ch-2 sp. 1 lnkdc in each of last 5 sts. Turn.

Info :

Work from ** to ** as given for Left Half.

β€” FINISHING :

Right Front Busk :

Stretching edge slightly, insert "loops" of Corset Busk through ch-2 sps worked in 2nd row.

Info :

Sew foundation chain to unworked back loops of 3rd row.

Left Front Busk :

With WS facing up, and stretching edge slightly, insert "pins" of Corset Busk up between sc worked in 2nd row, placed as shown in diagram. Sew unworked loops of foundation chain to unworked back loops of 3rd row.

Finishing Edging :

With RS facing, join yarn with sl st to far right edge of work as shown in diagram below. Ch 1. Work 1 row of sc evenly to opposite edge of work. Fasten off.

Info :

Rep for rem edges on both pieces.

Note :

For optional D-rings, place on lower edges as shown in Boning Placement Diagram and work 3 sc around flat edge of each D-ring.

β€” BONING (Optional) Create Boning "Casings" :

Info :

Place sl st on hook, and place working yarn behind boning. *Yoh and draw through loop on hook, drawing yarn tightly around boning. Reposition working yarn behind boning. Rep from * until length of boning is covered. Fasten off.

Info :

Following placement diagram, and ensuring boning is at least Β½" [1.5 cm] from edge of work, whipstitch boning casing to hdchb "ridge" on WS of work.

β€” SKIRT HIKES (optional) :

Info :

Ch 22.

1st row :

1 dc in 3rd ch from hook. 1 lnkdc in each ch to end of chain. Turn. 20 dc. Fasten off.

Info :

Fold each edge of work around D-ring and whipstitch in place as shown in photo.

β€” DIAGRAMS & STITCH KEY :

Info :

See pattern diagrams for reduced sample of pattern, eyelets, back shaping and stitch key illustrating ch, sc, hdc, dc, lnkdc, hdchb2tog, worked in front loop and worked in back horizontal bar.

Assembly Instructions

  • Insert loops of Corset Busk through ch-2 spaces worked in the 2nd row of the Right Front and stretch slightly to position pins, then sew foundation chain to unworked back loops of the 3rd row to secure the busk.
  • With WS facing up on the Left Front, insert busk "pins" between the sc worked in the 2nd row (per diagram spacing) and sew unworked loops of the foundation chain to the unworked back loops of the 3rd row.
  • Join yarn with a slip stitch at the far right edge with RS facing and work one row of single crochet evenly across to the opposite edge to form edging; repeat for remaining edges on both pieces.
  • Place optional D-rings on lower edges as shown in the boning placement diagram and work 3 single crochet around the flat edge of each D-ring, then whipstitch skirt hikes and D-ring attachments as photographed.
  • Create boning casings by wrapping working yarn around boning and fastening off, then position boning at least 1/2" [1.5 cm] from the edge and whipstitch casings to the hdchb ridge on the WS of the work.

Important Notes

  • πŸ’‘Use stitch markers to identify the marked row for shaping and to keep track of turns and pattern repeats during back shaping and eyelet placement.
  • πŸ’‘Ensure boning is positioned at least 1/2" [1.5 cm] from the edge before whipstitching casings to prevent fabric deformation and ensure comfortable wear.
  • πŸ’‘Work the linked double crochet (lnkdc) and hdchb stitches as illustrated in the stitch diagrams for correct texture and clean facing edges.
  • πŸ’‘Test your gauge carefully using hdchb stitch; 20 hdchb x 13 rows should measure 4" [10 cm] to ensure proper finished waist sizing.

This Crochet Corset Belt Pattern blends classic corsetry details with modern crochet techniques for a beautiful finished accessory. Whether you add optional boning and D-rings or keep it soft and flexible, the finished piece has a polished, tailored look. Make one as a statement accessory or a thoughtful handmade gift. 🧢✨

You ask,

we answer.

FAQs

What size will the finished piece be?

Finished waist measurements are provided: XS/S 20" [51 cm], M 24" [61 cm], L 28" [71 cm], XL 32" [81 cm], 2/3XL 38" [96.5 cm], 4/5XL 42" [106.5 cm]. Corset fits with no ease and is adjustable with back lacing.

Can I add boning to this corset belt?

Yes; optional boning casings and placement are included. Ensure boning is positioned at least 1/2" [1.5 cm] from the edge and whipstitch casings to the hdchb ridge on the WS of the work.

Do I need experience with linked double crochet and hdchb?

This is an intermediate pattern that uses linked double crochet (lnkdc) and a back-horizontal-bar half double crochet (hdchb). Familiarity with those techniques is recommended; diagrams are provided to guide you.

How long does this project usually take?

Most crocheters finish this project in about 5-7 hours, depending on experience level and whether you add optional boning or embellishments.