🧢 Beautiful ✨ Detailed πŸ’ Adorable

Cinta Bag Crochet Pattern

Cinta Bag Crochet Pattern
4.7β˜… Rating
5-7 Hours Time Needed
4.1K Made This
βœ‚οΈ

Intermediate Level

Ideal for those with basic crochet experience, featuring slightly more advanced stitches and techniques to expand your skills.

⏱️

Weekend Treat

Takes 5-7 hours, making it an enjoyable project to finish over a couple of days.

✨

Stylish Touch

An elegant detail to elevate any look, combining traditional techniques with contemporary design sensibilities.

About This Cinta Bag Crochet Pattern

This pattern creates the Cinta Bag, a textured crocheted handbag with a lace-up front and decorative ribbon finish. Youll work the bottom panel first, then build the body and add two structured handles before assembly. The pattern uses alternating rows and a modified jacobs ladder stitch to create the distinctive laced look and texture.

Cinta Bag Crochet Pattern crochet pattern - detailed view of completed project

Perfect for gifting or as a statement piece in your wardrobe, the bag measures roughly 41 cm by 29 cm using the suggested materials. Videos are referenced throughout to help with tricky steps like the handle and ribbon assembly.

Why You'll Love This Cinta Bag Crochet Pattern

I absolutely love this pattern because it combines simple construction with striking details like the lace-up front and ribbon finish. I enjoy the rhythm of working the repeating row pairs to build texture and shape, and the jacobs-ladder-inspired stitch makes the bag feel unique. I also love that it is easily customizable in size by changing the multiples for the stitch repeat. Finally, assembling the handles and watching the bag take shape is always rewarding and makes a lovely handmade accessory that I am proud to carry.

Cinta Bag Crochet Pattern step 1 - construction progress Cinta Bag Crochet Pattern step 2 - assembly progress Cinta Bag Crochet Pattern step 3 - details and accessories Cinta Bag Crochet Pattern step 4 - final assembly and finishing

Switch Things Up

I love how easy it is to customize the Cinta Bag by changing the yarn and hook; using a chunkier yarn makes a cozy, chunky tote while thinner yarn and a smaller hook creates a delicate mini bag.

I often experiment with different ribbon types and widths; try satin for a sleek look or lace and sheer ribbons for a romantic finish.

I sometimes substitute fabric strips or braided cord for the laces to add contrast and strength to the front detail.

For a more structured bag I add an interfacing and a sewn lining, which helps the bag keep its shape and supports heavier contents.

I like to play with color sequencing in the body rows so the ladder stitch stands out; try a variegated yarn or alternate two colors every few rows.

To make the bag portable or smaller, I reduce the foundation multiple to 7 and shorten the number of repeats to create a compact wristlet version.

I also like to add decorative pockets inside the lining for keys or a phone, which makes the bag more functional and personalized.

For handles, you can chain longer and create a shoulder-strapped version or use leather handles sewn on for a mixed-material look.

I recommend testing gauge and adjusting the row repeats if you want a wider or taller bag so the lacing pattern aligns correctly.

Finally, I enjoy embellishing the finished bag with beads or embroidered initials on the ribbon for a truly unique handmade gift.

Common Mistakes & How to Fix Them

βœ— Skipping the stitch marker when working rounds or repeating rows causes misalignment across the panels; place a marker at the start of each row to keep repeats consistent. βœ— Not counting chains in foundation rows leads to incorrect stitch multiples and uneven lacing holes; recount your foundation chain and ensure the multiple (9 in this pattern) is correct. βœ— Pulling chains too tight when making the long chain spaces will close the lace holes and distort the jacobs-ladder effect; keep chains loose and even so the chains sit as open spaces. βœ— Forgetting to keep the right side facing consistently when attaching yarn can flip your texture; follow the right-side/wrong-side instructions carefully when joining and turning. βœ— Cutting yarn before combining chains at assembly can leave you with mismatched or loose edges; do not cut the yarn β€” ch1 and sc across to combine edges as instructed.

Cinta Bag Crochet Pattern

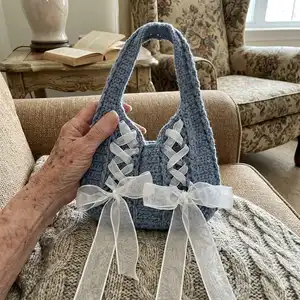
Make a charming crocheted Cinta Bag that blends texture and feminine details for a stylish everyday accessory. This pattern guides you from the bottom panel through the body and handles, finishing with a decorative ribbon. Youll love the lace-up front detail and the clear step-by-step instructions that help you achieve a polished look.

Intermediate 5-7 Hours

Materials Needed for Cinta Bag Crochet Pattern

β€” Main Fabric

  • 01
    Main yarn for bag (use a medium/aran/worsted weight or similar; amount depends on yarn and hook used)
  • 02
    Ribbon - various types, color, texture, and width as desired (for lace-up front and bow)
  • 03
    Scrap fabric or laces (optional) to use as an alternative to ribbon
  • 04
    Lining fabric (optional) if using a soft yarn to prevent overstretching

β€” Tools Required

  • 01
    Crochet hook (size depends on your yarn and desired drape)
  • 02
    Stitch markers
  • 03
    Scissors
  • 04
    Yarn needle for weaving and sewing
  • 05
    Measuring tape
  • 06
    Pins for assembly (optional)

Progress Tracker

0% Complete

β€” Bottom :

Foundation row :

Chain 15.

Row 1 :

Dc in the 4th ch from your hook, dc 11, ch 3 and TO.

Row 2 :

Dc 12 across the row, ch 3 and TO.

Row 3-16 :

Repeat Row 2 14 more times, for a total of 16 rows, and fasten off.

Info :

Stitch count: 13 sts for each row (Including the ch 3). Size would be around 8 cm x 21.5 cm.

Info :

This is similar to the Jacob's ladder stitch yet the Jacob's ladder stitch starts with dc and we start with sc here.

Info :

The Jacob's ladder stitch is done in the multiples of odd number. (In this case, we are working with the multiples of 9, so 9 stitches as 1 group.)

Info :

For examples, if you want to make the bag in a smaller size, work with multiples of 7. 7 stitches as 1 group. Then there should be 6 stitches between the chains and ch 10 in the 7th stitch.

Info :

On the other hand, if you want to make the bag in a bigger size, work with the multiples of 11 (or even bigger odd number). 11 stitches as 1 group. Then there should be 10 stitches between the chains and ch 10 in the 11th stitch.

Info :

If you change the number of the stitches, change the size of the bottom. (Inc or dec the number of row)

β€” Body :

Info :

Attach your yarn to the 2nd stitch at the top left corner with the right side facing up. Video of rows 1-2.

Row 1 :

Insert your hook and make a chain, sc in the same stitch, then sc 4, "ch 10, sl st into the last sc (5th sc), sc 9", repeat 8 more times for a total of 9 groups, ch 10, sl st into the last sc, sc 4, sl st, ch 3 and TO.

Info :

Stitch count: 90 sts for each row of the body, with 10 groups of the stitch.

Info :

As there are no v stitches allocated along the long edges of the bottom panel, sc in the random holes on the side. To place the stitches evenly, sc 2 for each row.

Row 2 :

Dc 89, sl st to the 3rd ch, ch 1 and TO.

Rows 3-16 :

Repeat rows 1-2 for 7 times. Total of 8 groups of rows 1-2. Make sure the stitches with the chains are crocheted in the same column.

Row 17 :

Repeat row 1, but do not make the chains for 4 columns in the centre, sl st and fasten off.

Row 17 (written instruction) :

Sc 5, ch 10, sl st into the last sc, sc 27, "ch 10, sl st into the last sc, sc 9" repeat 2 more times for a total of 3, sc 18, ch 10, sl st into the last sc, sc 9, ch 10, sl st into the last sc, sc 4, sl st and fasten off.

Info :

Size would be around 18 cm x 29 cm.

β€” Handle :

Info :

With the right side facing up, find the 3rd stitch in the same column with the chains counting from the left, then turn over and start with the wrong side facing up. (Video of handle part).

Row 1 :

Insert your hook and ch 3, dc 36, ch 1 and TO. (37)

Row 2 :

Sc3tog , sc 7, "ch 10, sl st into the last sc, sc 9", repeat 1 more time, ch 10, sl st into the last sc, sc 6, sc3tog, ch 3 and TO. (33)

Row 3 :

Dc3tog (ch 3 and 2 unfinished dc) , dc 27, dc3tog, ch 1 and TO. (29)

Row 4 :

Sc3tog , sc 3, "ch 10, sl st into the last sc, sc 9", repeat 1 more time, ch 10, sl st into the last sc, sc 2, sc3tog, ch 3 and TO. (25)

Row 5 :

Dc3tog, dc 19, dc3tog, ch 1 and TO. (21)

Row 6 :

Sc3tog , sc 8, ch 10, sl st into the last sc, sc 7, sc3tog, ch 3 and TO. (17)

Row 7 :

Dc3tog, dc 11, dc3tog , ch 1 and TO. (13)

Row 8 :

Sc3tog , sc 4, ch 10, sl st into the last sc, sc 3, sc3tog, ch 3 and TO. (9)

Row 9 :

Dc 8, ch 1 and TO. (9)

Row 10 :

Sc 5, ch 10, sl st into the last sc, sc 4, ch 3 and TO. (9)

Rows 11-12 :

Repeat rows 9-10 til your desired length of handle. I repeated 7 times after rows 9-10.

Rows 25-26 :

Crochet 2 more rows of dc and fasten off. Written instructions: Row 25: Dc 8, ch 3 and TO. Row 26: Dc 8 and fasten off.

Info :

Repeat this handle part for the other side.

β€” Assembly :

Step 1 :

After you finish 2 handles, roll up all the chains.

Step 2 :

Then you may sc/ sl st/ sew the handles together, with wrong sides facing up.

Step 3 :

Include the last 2 chains from both handles when you connect the handles.

Step 4 :

Do NOT cut off the yarn, ch 1, and sc across the edges for both sides. Remember to sc evenly.

Step 5 :

After finishing one side, fasten off. Attach the yarn to the other side where the handles are connected, ch 1, sc across, and combine the chains.

Info :

Video of assembly.

β€” Ribbon :

Info :

It's time to add ribbon to the bag! There are various types of ribbons in color, texture, and width. You can also use scrap fabric or laces. Have fun with the mix and match!!

Info :

Video of ribbon.

β€” Size :

Info :

Length - 41 cm. Width - 29 cm.

Info :

Note: you might have different measurements for your bag depending on your yarn and hook used.

Assembly Instructions

  • After you finish both handles, roll up all the chains and align them so the loops match before joining.
  • With wrong sides facing up, sc or sl st the two handles together and include the last two chains from both handles when connecting for a secure seam.
  • Do not cut the yarn after attaching one side; ch 1 and sc across the edge, fasten off, then attach yarn to the other side and sc across to combine the chains.
  • When combining the bag edges, sc evenly along the sides to maintain a neat shape and avoid puckering.
  • Sew or weave in all loose ends with a yarn needle and press the lining in place if you chose to add one.

Important Notes

  • πŸ’‘Use a stitch marker to keep the same amount of stitches each row, especially where chain spaces form the lace holes.
  • πŸ’‘Weave in the loose ends as work progresses to keep the edges tidy and to make assembly easier.
  • πŸ’‘You can add a lining if using soft yarn so the bag doesnt stretch too much and so the ribbon holds securely.
  • πŸ’‘Keep the right side facing out for all parts to ensure consistent texture and appearance during assembly.

This Cinta Bag pattern helps you create a stylish, laced-front handbag with textured stitches and a ribbon finish. Whether youre making one for yourself or as a thoughtful gift, the unique jacobs-ladder-inspired stitch adds personality and charm. Enjoy the process and the beautiful finished accessory you can proudly carry! 🧢✨

You ask,

we answer.

FAQs

What size will the finished bag be?

The finished bag measures approximately 41 cm in length and 29 cm in width when using the yarn and hook that produced the sample.

Can I change the size of the bag?

Yes, change the foundation chain multiples: this pattern uses multiples of 9 for the jacobs-ladder effect, but you can use 7 for a smaller bag or 11 for a larger bag; adjust rows accordingly.

Do I need special skills to make the jacobs-ladder stitch?

Basic knowledge of sc, dc, chain spaces, and working in columns is required; the pattern is best suited to an intermediate crocheter familiar with reading row repeats and joining chains.

Should I add a lining to the bag?

If you use a soft or stretchy yarn, adding a lining is recommended to prevent overstretching and to help the ribbon and chains hold shape.