About This Crochet Bunny Pumpkin Amigurumi Pattern
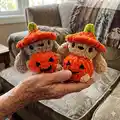
This pattern teaches you how to crochet a tiny bunny tucked into a pumpkin-shaped body using chenille yarn. You will work in the round with bobble stitch textures and color changes to create the pumpkin look. The finished toy has a removable-feel hat, embroidered nose and a felt or embroidered pumpkin face.
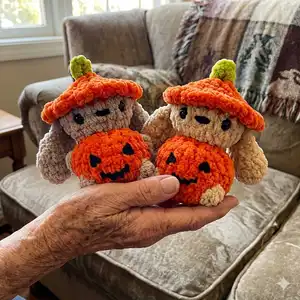
The pattern includes step-by-step rounds for the head/body, hat sides, ears and a small pumpkin stem. It uses safety eyes and simple sewing to assemble the final amigurumi.
Why You'll Love This Crochet Bunny Pumpkin Amigurumi Pattern
I absolutely love this pattern because it blends a playful character design with seasonal pumpkin charm that feels cozy and whimsical. I enjoy the texture that chenille yarn brings—each bobble stitch and color change makes the pumpkin surface feel irresistible. I also love how quick it is to make; you can finish one in a weekend and gift it right away. Making several in different color combos is one of my favorite ways to customize and gift them to friends.
Switch Things Up
I love to customize this pattern by changing the color palette — I often swap Color A for pastel orange or coral to soften the look.
I sometimes use a lighter yarn weight and a 3.5mm hook to make a smaller keychain-friendly version for gifts.
I like adding embroidered freckles or different mouth shapes to change the bunny's expression and personality.
Try switching the bobble (BO) rows to plain single crochet rows for a less textured pumpkin if you prefer a smoother finish.
I often replace the plastic safety eyes with embroidered eyes for a fully handmade, baby-safe toy.
To make a standing display, I sew a small weight into the base before closing to help the toy balance better.
I also make tiny crocheted scarves or hats in contrasting colors to create a seasonal set you can swap around.
For a playful twist, I embroider tiny cheeks or add blush with fabric-safe chalk to give each bunny its own personality.
If I want a rustic look I use brown for the hat trim and stitch a leaf motif onto the pumpkin surface.
I sometimes create a trio of pumpkins in graduated sizes by changing hook and yarn weight and arranging them together as a centerpiece.
Common Mistakes & How to Fix Them
✗ Skipping the magic ring setup can leave you with a holey center; always start with a proper MR to secure the first round.
✗ Forgetting to change colors at the correct round will disrupt the pumpkin stripes; mark the round where you switch to Color B with a stitch marker before you begin.
✗ Not stretching your work during the bobble/bloom rounds can make the pumpkin look flat; gently stretch to the sides to round the shape before stuffing.
✗ Overstuffing early causes difficulty closing the piece neatly; stuff gradually and add more with each shaping round to maintain control.
✗ Placing safety eyes without checking spacing can look unbalanced; place safety eyes between R13-R14 four single crochets apart and double-check symmetry before securing.