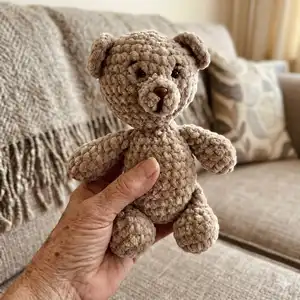
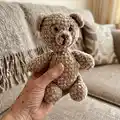
🧢 Beautiful ✨ Detailed πŸ’ Adorable

Disy: the bear Amigurumi Pattern

Disy: the bear Amigurumi Pattern
4.5β˜… Rating
5-7 Hours Time Needed
3.5K Made This
βœ‚οΈ

Intermediate Level

Ideal for those with basic crochet experience, featuring slightly more advanced stitches and techniques to expand your skills.

⏱️

Weekend Treat

Takes 5-7 hours, making it an enjoyable project to finish over a couple of days.

🧸

Cute Companion

An adorable friend to cherish, handcrafted with love to bring comfort and joy for years to come.

About This Disy: the bear Amigurumi Pattern

This pattern creates Disy, a small plush amigurumi bear worked in bulky velvet-style yarn. It includes complete round-by-round instructions for the head, body, arms, legs, ears, muzzle and tail. The design emphasizes soft shaping and a cuddly silhouette using simple decreases and increases. Finished pieces are great for gifts, decor, or as a comforting handmade companion.

Disy: the bear Amigurumi Pattern crochet pattern - detailed view of completed project

You will learn placement for safety eyes, embroidery details for eyebrows, and clear sewing instructions for tidy assembly. Techniques used are accessible with basic crochet skills and a willingness to stuff and sew parts neatly.

Why You'll Love This Disy: the bear Amigurumi Pattern

I absolutely love this pattern because it turns simple stitches into a charming, huggable bear with lots of personality. I enjoy the quick shaping that bulky yarn provides β€” you get a satisfying plush result in just a few hours. The placement details for the eyes and muzzle always make the face come to life, and I find sewing the pieces together very rewarding. Sharing this pattern lets me see so many creative color choices from crocheters, which always inspires me.

Disy: the bear Amigurumi Pattern step 1 - construction progress Disy: the bear Amigurumi Pattern step 2 - assembly progress Disy: the bear Amigurumi Pattern step 3 - details and accessories Disy: the bear Amigurumi Pattern step 4 - final assembly and finishing

Switch Things Up

I love experimenting with colors, so I often change the yarn color to pastel pinks or greys to create themed bears that fit nurseries or seasonal gifts.

If you want a more robust bear, I change the yarn weight and use a larger hook to make a chunkier, cuddlier version β€” just expect a larger finished size.

I sometimes embroider different facial expressions by shifting the eyebrow placement or mouth stitch to give the bear a happier or sleepier look.

To make a keychain or pocket pal, I use fingering weight yarn and a much smaller hook to scale the pattern down proportionally.

I also add little accessories like crocheted scarves, tiny hats, or felt hearts to personalize each bear for gifting or charity projects.

When I want posable limbs, I add a small piece of floral wire inside the arm and leg before stuffing, being careful to wrap it well to avoid sharp edges.

I occasionally stitch contrasting inner ear rounds using a thinner yarn for a subtle detail that stands out against velvet yarn.

Try alternating textures: pair a velvet bulky yarn body with a smooth cotton muzzle for a nice tactile contrast.

I recommend testing eye sizes: swap the 8mm eyes for 6mm or 10mm to see how the personality of the face changes before committing to placement.

Finally, I always try different stuffing densities: slightly firmer stuffing yields a more sculpted look, while softer stuffing makes the bear more snuggly.

Common Mistakes & How to Fix Them

βœ— Skipping the advice to use a slightly smaller hook can make holes appear and stuffing show through; use a smaller hook than the yarn recommendation for a tight fabric. βœ— Forgetting to add stuffing gradually causes lumps and uneven shaping; add stuffing as you go and shape frequently for a smooth finish. βœ— Placing safety eyes without counting rounds precisely will give an asymmetrical face; place eyes between rounds 7 and 8 with three stitches separation as instructed. βœ— Not folding and closing limbs correctly can lead to gaps when sewing; follow the closing rounds and sew through both layers evenly to secure the arm or leg.

Disy: the bear Amigurumi Pattern

Make your own cuddly Disy bear with this step-by-step amigurumi pattern. You'll enjoy the soft, plush texture of bulky velvet-style yarn and clear round-by-round instructions. Perfect for gifting or decorating a cozy corner, this pattern guides you through every piece and assembly detail. Pick your favorite color and start crocheting a charming handmade companion.

Intermediate 5-7 Hours

Materials Needed for Disy: the bear Amigurumi Pattern

β€” Main Fabric

  • 01
    100 meters of Bulky yarn. I used Soft Baby from Madame Tricote Paris (100 grams = 120 meters).
  • 02
    If using bulkier velvet yarns like Bernat Velvet, consider using a 5 mm crochet hook (see notes).
  • 03
    Small amounts of contrast yarn for embroidered eyebrows (optional).
  • 04
    8mm safety eyes (2 pieces).
  • 05
    9mm x 7mm safety nose (optional, 1 piece).
  • 06
    Polyester toy stuffing approximately 50-100g depending on firmness preferred.

β€” Tools Required

  • 01
    Crochet hook size 4 mm (see notes below)
  • 02
    Alternative crochet hook size 5 mm if using bulkier velvet yarns like Bernat Velvet
  • 03
    8mm safety eyes
  • 04
    9mm x 7mm safety nose (optional)
  • 05
    Scissors
  • 06
    Yarn needle for sewing
  • 07
    Toy stuffing
  • 08
    Pins for positioning parts (optional)

Progress Tracker

0% Complete

β€” Materials :

Infos :

100 meters of Bulky yarn. I used Soft Baby from Madame Tricote Paris (100 grams = 120 meters). 4 mm crochet hook (see notes below). 8mm safety eyes. 9mm x 7mm safety nose (optional). Scissors. Yarn needle. Toy stuffing. Gauge or tension: Not important, just make sure to work tight and use a crochet hook smaller to the recommended for the yarn you ensure that stuffing does not show through or fall out.

Infos :

Notes: I noticed that some velvet yarns are bulkier, like Bernat Velvet. In this case use 5 mm crochet hook. Invisible dec: Insert your hook into the front loop for the next stitch. Yarn over (yo) and draw the yarn through the stitch. Insert your hook into the front loop for the next stitch. Yarn over (yo) and draw the yarn through the stitch. Yarn over and draw the yarn through all 3 loops on your hook. The instructions between ( ) are a sequence of stitches that need to be worked the amount of times indicated next. For example, (sc in the next 2 stitches, sc inc) x 6, means that you need to crochet 6 times the sequence of single crochet in the next 2 stitches and make a single crochet increase in the third stitch. The number between [ ] is the amount of stitches at the end of each round. Using this particular yarn or similar i prefer to chain 2 and work the first Round in the first chain.

β€” Body :

Round 1 :

ch 2, 6 sc in the second ch from hook [6]

Round 2 :

inc into each stitch [12]

Round 3 :

(sc in the next stitch, inc in the next stitch) x 6 [18]

Round 4 :

(inc in the next stitch, sc in the next 2 stitches) x 6 [24]

Round 5 :

(sc in the next 3 stitches, inc in the next stitch) x 6 [30]

Round 6 - 8 :

sc in the next 30 stitches [30]

Round 9 :

(dec in the next 2 stitches, sc in the next 3 stitches) x 6 [24]

Round 10 - 11 :

sc in the next 24 stitches [24]

Info :

From here add stuffing as you go.

Round 12 :

(sc in the next 2 stitches, dec in the next 2 stitches) x 6 [18]

Round 13 :

sc in the next 18 stitches [18]

Round 14 :

(dec in the next 2 stitches, sc in the next stitch) x 6 [12]

Info :

If you will add an additional support to the body and head, put it after finish round 14.

Round 15 :

sc in the next 12 stitches [12]

Round 16 :

(dec in the next 2 stitches, sc in the next 2 stitches) x 3 [9]

Round 17 :

sc in the next 9 stitches [9]

Info :

Fasten off and cut the yarn, you can add an extra knot and weave the end.

β€” Head :

Round 1 :

ch 2, 6 sc in the second ch from hook [6]

Round 2 :

inc into each stitch [12]

Round 3 :

(sc in the next stitch, inc in the next stitch) x 6 [18]

Round 4 :

(inc in the next stitch, sc in the next 2 stitches) x 6 [24]

Round 5 :

(sc in the next 3 stitches, inc in the next stitch) x 6 [30]

Round 6 :

(inc in the next stitch, sc in the next 4 stitches) x 6 [36]

Round 7 - 10 :

sc in the next 36 stitches [36]

Info :

Place the safety eyes between rounds 7 and 8 with 3 stitches of separation.

Round 11 :

(sc in the next 4 stitches, dec in the next 2 stitches) x 6 [30]

Info :

From here add stuffing as you go.

Round 12 :

(dec in the next 2 stitches, sc in the next 3 stitches) x 6 [24]

Round 13 :

(sc in the next 2 stitches, dec in the next 2 stitches) x 6 [18]

Round 14 :

(dec in the next 2 stitches, sc in the next stitch) x 6 [12]

Info :

Fasten off and leave a long tail to sew the head to the body.

Info :

Embroidery the eyebrows as is shown below.

β€” Arms (make 2) :

Round 1 :

ch 2, 6 sc in the second ch from hook [6]

Round 2 :

inc into each stitch [12]

Round 3 - 4 :

sc in the next 12 stitches [12]

Round 5 :

(sc in the next 2 stitches, dec in the next 2 stitches) x 3 [9]

Round 6 - 8 :

sc in the next 9 stitches (add the stuffing - do not add more in the next round) [9]

Round 9 :

(sc in the next stitch, dec in the next 2 stitches) x 3 [6]

Round 10 :

To close the arm, fold it in half, 3 sc through the stitches of both parts as pictured below. [3]

Info :

Fasten off and leave a long tail to sew the arms to the body.

β€” Tail :

Round 1 :

ch 2, 6 sc in the second ch from hook [6]

Round 2 :

sc into each stitch. [6]

Round 3 :

sc in the next 4 stitches. [4]

Info :

Fasten off and leave a long tail to sew the tail to the body.

β€” Legs (make 2) :

Round 1 :

ch 2, 6 sc in the second ch from hook [6]

Round 2 :

inc into each stitch [12]

Round 3 :

(sc in the next 2 stitches, inc in the next stitch) x 4 [16]

Round 4 - 5 :

sc in the next 16 stitches [16]

Round 6 :

sc in the next 4 stitches, (dec in the next 2 stitches) x 6 [10]

Round 7 - 8 :

sc in the next 10 stitches (add the stuffing - do not add more in the next round) [10]

Round 9 :

to close the leg, fold it in half, 5 sc through the stitches of both parts as pictured below. [5]

Info :

Fasten off and leave a long tail to sew the legs to the body.

β€” Ears (make 2) :

Round 1 :

ch 2, 6 sc in the second ch from hook [6]

Round 2 :

inc into each stitch. [12]

Round 3 :

sc in the next 4 stitches. [4]

Info :

Fasten off and leave a long tail to sew the ear to the head.

β€” Muzzle :

Round 1 :

ch 2, 6 sc in the second ch from hook [6]

Round 2 :

(inc in the next stitch, sc in the next 2 stitches) x 2 [8]

Round 3 :

sc in the next 8 stitches [8]

Info :

Fasten off and leave a long tail to sew the muzzle to the head. Place the safety nose between rows 2 and 3 in one of the stitches without increase or embroidery one.

β€” Assembly :

Item Name (P1) :

Sew the head to the round 15 of the body (rounds 16 and 17 should be inside the head) taking both loops of the last round of the head.

Item Name (P2) :

Sew the arms one round below from the head approximately on both sides of the body.

Item Name (P3) :

Sew the legs between rounds 5 and 6 in the body and the tail in the middle as pictured below.

Item Name (P4) :

Sew the ears between rounds 4 and 7 using the 4 sc stitches from last round. Sew the muzzle between rounds 8 and 11 in the head.

Info :

Optional: You can look for something to help the head stay up. I used 3 plastic coffee stirrers tied together with some pieces of yarn that I already had at home.

Assembly Instructions

  • Sew the head to round 15 of the body so that rounds 16 and 17 are inside the head, taking both loops of the last round of the head for a secure join.
  • Position and sew the arms approximately one round below the head on both sides of the body, aligning them for a natural pose and stitching through the body fabric to secure.
  • Sew the legs between rounds 5 and 6 on the body, spacing them evenly; place the tail in the center between the legs and sew firmly.
  • Attach the ears between rounds 4 and 7 using the 4 sc stitches from the last ear round for symmetry.
  • Sew the muzzle to the head between rounds 8 and 11 and attach the safety nose between rows 2 and 3 in one of the non-increase stitches.
  • If needed, add internal support to help the head stand by inserting tied plastic stirrers or a small support after round 14 on the body before closing.
  • Embroider eyebrows and other facial details after placing eyes and muzzle, checking placement on the stuffed head before final stitching.

Important Notes

  • πŸ’‘Use a slightly smaller hook than yarn recommendation to ensure tight stitches so stuffing does not show through.
  • πŸ’‘Add stuffing gradually during shaping and check the silhouette frequently for even shaping and firmness.
  • πŸ’‘Place safety eyes between rounds 7 and 8 with three stitches separation to achieve correct facial proportions.
  • πŸ’‘Leave long tails when fastening off for pieces you will sew to the body to make assembly easier.

This delightful Disy the bear pattern brings soft, plush charm to life in bulky velvet-style yarn. Whether you make one as a cozy companion or a heartfelt gift, it will hold special handmade meaning. Share your makes with #disythebear and tag @gavacrochetlove to join the community! 🧢🧸

You ask,

we answer.

FAQs

What size will the finished piece be?

The finished amigurumi measures approximately 18-22 cm tall when using the recommended bulky yarn and a 4 mm hook; final size varies with yarn and tension.

Can I use different yarn weights for this pattern?

Yes, you can use different yarn weights, but this will affect the final size and texture; adjust your hook accordingly and expect changes in the finished dimensions.

Do I need prior crochet experience for this pattern?

This pattern is rated intermediate, so basic knowledge of single crochet, increases, decreases and simple assembly is recommended for best results.

How long does this project typically take to complete?

Most crocheters complete this project in 5-7 hours, though time may vary based on experience level, yarn choice, and how carefully you assemble and embroider details.

Where should I place the safety eyes?

Place the safety eyes between rounds 7 and 8 of the head with three stitches of separation for correct facial placement.