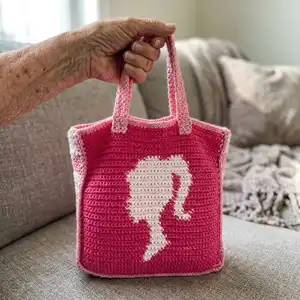
Make a stylish Baddie Barbie tote using tapestry crochet techniques and bold pink accents. This pattern walks you through two mirror panels—a Baddie word panel and a Barbie silhouette—plus straps and a striped block strap for a fashionable finish. Youll love the modern look and the clear step-by-step row instructions for color changes and assembly.
Progress Tracker
0% Complete
— Front of bag - Baddie :
Round 1 :
Sc in the first ch from the hook and in each ch across. Ch 1, turn.
Round 2-16 :
Sc in each st across. Ch 1, turn.
Info :
Add white yarn and carry it along each row switching when necessary. Follow the steps for the color changes as follows.
Round 17 :
39 pink, 2 white, 4 pink. Ch 1, turn.
Round 18 :
3 pink, 5 white, 37 pink. Ch 1, turn.
Round 19 :
35 pink, 7 white, 3 pink. Ch 1, turn.
Round 20 :
3 pink, 2 white, 2 pink, 3 white, 3 pink, 2 white, 30 pink. Ch 1, turn.
Round 21 :
29 pink, 4 white, 1 pink, 3 white, 3 pink, 2 white, 3 pink. Ch 1, turn.
Round 22 :
3 pink, 2 white, 4 pink, 2 white, 1 pink, 6 white, 27 pink. Ch 1, turn.
Round 23 :
22 pink, 1 white, 4 pink, 2 white, 2 pink, 2 white, 1 pink, 2 white, 4 pink, 2 white, 3 pink. Ch 1, turn.
Round 24 :
3 pink, 2 white, 4 pink, 2 white, 1 pink, 2 white, 2 pink, 2 white, 2 pink, 5 white, 20 pink. Ch 1, turn.
Round 25 :
19 pink, 6 white, 2 pink, 2 white, 2 pink, 2 white, 1 pink, 2 white, 4 pink, 2 white, 3 pink. Ch 1, turn.
Round 26 :
3 pink, 2 white, 4 pink, 2 white, 1 pink, 3 white, 1 pink, 2 white, 1 pink, 3 white, 2 pink, 2 white, 2 pink, 4 white, 13 pink. Ch 1, turn.
Round 27 :
12 pink, 5 white, 2 pink, 2 white, 3 pink, 2 white, 1 pink, 5 white, 2 pink, 8 white, 3 pink. Ch 1, turn.
Round 28 :
1 pink, 1 white, 1 pink, 7 white, 4 pink, 4 white, 1 pink, 2 white, 3 pink, 2 white, 1 pink, 6 white, 1 pink, 2 white, 9 pink. Ch 1, turn.
Round 29 :
9 pink, 2 white, 1 pink, 1 white, 3 pink, 2 white, 1 pink, 2 white, 3 pink, 2 white, 1 pink, 2 white, 3 pink, 1 white, 3 pink, 2 white, 2 pink, 2 white, 1 pink, 2 white. Ch 1, turn.
Round 30 :
2 white, 1 pink, 2 white, 3 pink, 2 white, 2 pink, 2 white, 2 pink, 2 white, 1 pink, 2 white, 3 pink, 2 white, 1 pink, 2 white, 3 pink, 1 white, 1 pink, 2 white, 3 pink, 3 white, 3 pink. Ch 1, turn.
Round 31 :
2 pink, 5 white, 2 pink, 2 white, 1 pink, 1 white, 3 pink, 2 white, 1 pink, 2 white, 3 pink, 2 white, 1 pink, 2 white, 1 pink, 2 white, 3 pink, 2 white, 3 pink, 2 white, 1 pink, 2 white. Ch 1, turn.
Round 32 :
2 white, 2 pink, 1 white, 3 pink, 3 white, 2 pink, 5 white, 1 pink, 2 white, 3 pink, 2 white, 1 pink, 2 white, 3 pink, 1 white, 1 pink, 2 white, 1 pink, 3 white, 2 pink, 2 white, 1 pink. Ch 1, turn.
Round 33 :
1 pink, 2 white, 2 pink, 3 white, 1 pink, 2 white, 1 pink, 1 white, 3 pink, 2 white, 1 pink, 3 white, 1 pink, 3 white, 1 pink, 4 white, 3 pink, 3 white, 5 pink, 2 white, 1 pink. Ch 1, turn.
Round 34 :
1 pink, 3 white, 4 pink, 2 white, 10 pink, 6 white, 1 pink, 2 white, 3 pink, 1 white, 1 pink, 2 white, 1 pink, 3 white, 3 pink, 1 white, 1 pink. Ch 1, turn.
Round 35 :
1 pink, 1 white, 1 pink, 5 white, 1 pink, 2 white, 1 pink, 1 white, 3 pink, 2 white, 1 pink, 5 white, 11 pink, 8 white, 2 pink. Ch 1, turn.
Round 36 :
3 pink, 6 white, 15 pink, 2 white, 1 pink, 6 white, 1 pink, 2 white, 1 pink, 2 white, 1 pink, 1 white, 1 pink. Ch 1, turn.
Round 37 :
2 pink, 3 white, 1 pink, 2 white, 1 pink, 2 white, 1 pink, 5 white, 2 pink, 2 white, 16 pink, 3 white, 5 pink. Ch 1, turn.
Round 38 :
24 pink, 2 white, 3 pink, 4 white, 1 pink, 2 white, 1 pink, 2 white, 2 pink, 3 white, 1 pink. Ch 1, turn.
Round 39 :
1 pink, 2 white, 3 pink, 2 white, 1 pink, 2 white, 1 pink, 2 white, 5 pink, 2 white, 24 pink. Ch 1, turn.
Round 40 :
24 pink, 2 white, 5 pink, 2 white, 5 pink, 6 white, 1 pink. Ch 1, turn.
Round 41 :
2 pink, 4 white, 3 pink, 2 white, 1 pink, 2 white, 5 pink, 1 white, 25 pink. Ch 1, turn.
Round 42 :
31 pink, 2 white, 1 pink, 2 white, 4 pink, 2 white, 3 pink. Ch 1, turn.
Round 43 :
9 pink, 2 white, 1 pink, 2 white, 31 pink. Ch 1, turn.
Round 44 :
34 pink, 2 white, 9 pink. Ch 1, turn. *cut white yarn, you will only be using pink for the remainder of the rows*
Round 45 - 55 :
1 sc in each st across. Ch 1, turn.
Infos :
Finish off yarn. Attach sparkle pink in the bottom right corner and ch 1. Loosely sc 27 evenly up the side. 3 sc in the corner. 1 sc in each st across the top. 3 sc in corner. Loosely sc 27 evenly down the left side. 3 sc in corner. 1 sc in each st across the bottom. 3 sc in corner. Finish off.
— Back of bag - Barbie Silhouette :
Round 1 :
Sc in the first ch from the hook and in each ch across. Ch 1, turn.
Round 2-9 :
Sc in each st across. Ch 1, turn.
Info :
*add white and carry it through, you will be starting the barbie silhouette
Round 10 :
19 pink, 2 white, 24 pink. Ch 1, turn.
Round 11 :
23 pink, 3 white, 19 pink. Ch 1, turn.
Round 12 :
19 pink, 4 white, 22 pink. Ch 1, turn.
Round 13 :
21 pink, 4 white, 20 pink. Ch 1, turn.
Round 14 :
20 pink, 5 white, 20 pink. Ch 1, turn.
Round 15 :
19 pink, 6 white, 20 pink. Ch 1, turn.
Round 16 :
21 pink, 6 white, 18 pink. Ch 1, turn.
Round 17 :
19 pink, 5 white, 21 pink. Ch 1, turn.
Round 18 :
21 pink, 5 white, 19 pink. Ch 1, turn.
Round 19 :
20 pink, 4 white, 21 pink. Ch 1, turn.
Round 20 :
21 pink, 4 white, 20 pink. Ch 1, turn.
Round 21 :
20 pink, 4 white, 21 pink. Ch 1, turn.
Round 22 :
20 pink, 4 white, 21 pink. Ch 1, turn.
Round 23 :
21 pink, 4 white, 2 pink, 2 white, 16 pink. Ch 1, turn.
Round 24 :
16 pink, 8 white, 5 pink, 4 white, 12 pink. Ch 1, turn.
Round 25 :
12 pink, 5 white, 4 pink, 9 white, 15 pink. Ch 1, turn.
Round 26 :
15 pink, 10 white, 3 pink, 3 white, 2 pink, 1 white, 11 pink. Ch 1, turn.
Round 27 :
14 pink, 3 white, 3 pink, 11 white, 14 pink. Ch 1, turn.
Round 28 :
15 pink, 11 white, 2 pink, 3 white, 14 pink. Ch 1, turn.
Round 29 :
13 pink, 4 white, 1 pink, 13 white, 14 pink. Ch 1, turn.
Round 30 :
15 pink, 13 white, 1 pink, 3 white, 13 pink. Ch 1, turn.
Round 31 :
12 pink, 4 white, 1 pink, 13 white, 15 pink. Ch 1, turn.
Round 32 :
15 pink, 13 white, 1 pink, 4 white, 12 pink. Ch 1, turn.
Round 33 :
12 pink, 3 white, 2 pink, 13 white, 15 pink. Ch 1, turn.
Round 34 :
15 pink, 13 white, 2 pink, 4 white, 11 pink. Ch 1, turn.
Round 35 :
11 pink, 4 white, 2 pink, 14 white, 14 pink. Ch 1, turn.
Round 36 :
14 pink, 14 white, 2 pink, 4 white, 11 pink. Ch 1, turn.
Round 37 :
11 pink, 5 white, 1 pink, 14 white, 14 pink. Ch 1, turn.
Round 38 :
15 pink, 18 white, 12 pink. Ch 1, turn.
Round 39 :
12 pink, 16 white, 17 pink. Ch 1, turn.
Round 40 :
17 pink, 16 white, 12 pink. Ch 1, turn.
Round 41 :
13 pink, 14 white, 18 pink. Ch 1, turn.
Round 42 :
20 pink, 4 white, 3 pink, 4 white, 14 pink. Ch 1, turn.
Round 43 - 55 :
1 sc in each st across. Ch 1, turn.
Infos :
Finish off yarn. Attach sparkle pink in the bottom right corner and ch 1. Loosely sc 27 evenly up the side. 3 sc in the corner. 1 sc in each st across the top. 3 sc in corner. Loosely sc 27 evenly down the left side. 3 sc in corner. 1 sc in each st across the bottom. 3 sc in corner. Finish off.
— Block Strap :
Round 1 :
1 sc in the 1st ch from the hook and in each ch across. Ch 1, turn.
Round 2-7 :
1 sc in each st across. Ch 1, turn.
Info :
Change to sparkle pink. *Alternate colors after every 7 rows until you have a total of 21 blocks.
— Assembly :
Info :
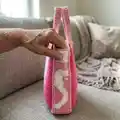
Now align the block strap along the bottom of the front of the bag. The center block should align with the center of the bag. Note place stitch markers in the corners and center to keep it in place. Then use stitch markers on each side. (see pics below).
Info :
Attach sparkle pink yarn to the top LEFT corner and single crochet the block strap to the front of the bag. Then repeat whole process with the back of the bag.
Info :
Once you have attached the block strap, you will now attach your sparkle pink yarn to any stitch along the top of the bag. Ch 1, sc in each st around. Join with a sl st to the first sc. Finish off.
— Handles - make 2 :
Info :
With sparkle pink yarn, ch 50.
Round 1 :
1 sc in the first ch from the hook and in each ch across. Ch 1, turn.
Round 2-4 :
1 sc in each st across. Ch 1, turn.
Info :
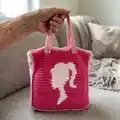
Finish off. Attach them to the front and back of bag by sewing them into place. Use the reference images below to see how to place them.
This Baddie Barbie Bag pattern brings playful charm and modern style to your crochet projects with bold tapestry colorwork. Add sparkle pink accents and a striped block strap for a unique, fashionable finish. Perfect for gifts or making a statement accessory, this tote is a joy to stitch and style. 🧶✨