🧢 Beautiful ✨ Detailed πŸ’ Adorable

Creeper Amigurumi Pattern

Creeper Amigurumi Pattern
4.3β˜… Rating
5-7 Hours Time Needed
3.4K Made This
βœ‚οΈ

Intermediate Level

Ideal for those with basic crochet experience, featuring slightly more advanced stitches and techniques to expand your skills.

⏱️

Weekend Treat

Takes 5-7 hours, making it an enjoyable project to finish over a couple of days.

🧸

Cute Companion

An adorable friend to cherish, handcrafted with love to bring comfort and joy for years to come.

About This Creeper Amigurumi Pattern

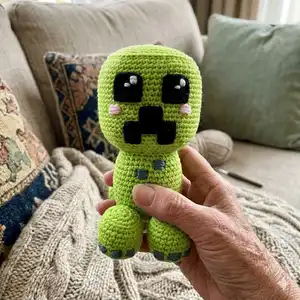
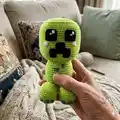
This pattern teaches you how to crochet a kawaii-style Creeper amigurumi using 2.5 mm cotton yarn. You will shape the head, body and four little feet, then add felt facial features and embroidered squares for authentic detail. The finished toy measures about 15 cm tall using the recommended materials.

Creeper Amigurumi Pattern crochet pattern - detailed view of completed project

Clear round-by-round instructions make shaping and assembly straightforward, and the pattern includes guidance for embroidery and felt placement. Swap colors or yarn weights to customize size and personality.

Why You'll Love This Creeper Amigurumi Pattern

I absolutely love this pattern because it transforms simple rounds into a hugely expressive little character with minimal stitching. I enjoy how the square head and tiny feet capture the Creeper look while staying cute and approachable. The felt eyes and mouth let you add a kawaii personality in just a few steps. Sewing and embroidery finishings are satisfying and let you personalize each amigurumi for gifts or decor.

Creeper Amigurumi Pattern step 1 - construction progress Creeper Amigurumi Pattern step 2 - assembly progress Creeper Amigurumi Pattern step 3 - details and accessories Creeper Amigurumi Pattern step 4 - final assembly and finishing

Switch Things Up

I love how easy it is to customize this Creeper by changing yarn color; try pastel greens or even neon shades for a playful twist.

You can make it larger by using a thicker yarn and bigger hook, or go tiny by using thinner yarn for keychain-friendly minis.

I sometimes swap felt eyes for safety eyes if making for an adult collector, but for a kawaii look I prefer felt with embroidered reflections.

I like to add tiny accessories like a scarf, hat, or tiny crocheted flowers to personalize the character further.

If you want posable limbs, insert thin craft wire in the legs before stuffing so you can pose the feet slightly.

Try embroidering different patterns on the body instead of squaresβ€”polka dots or stripes change the character entirely.

For a gift set, make multiple creepers in different sizes and colors to create a collectible family.

I often experiment with different stuffing densities; firmer stuffing makes corners crisper while softer stuffing gives a squishier toy.

Change the face expression by adjusting eye placement or mouth shape; a tilted eye or smaller mouth gives a shy personality.

When making multiples, keep notes about yarn brand and hook size so you can reproduce the same size and finish for matching sets.

Common Mistakes & How to Fix Them

βœ— Skipping stitch markers when working continuous rounds can make it hard to identify the start of a round; place a marker at the first stitch and move it after each round to keep accurate counts. βœ— Understuffing the head and body will cause a floppy shape that does not hold the square look; stuff gradually and firmly, especially around corners, to maintain structure. βœ— Pulling yarn too tightly during decreases can distort shaping and create visible holes; keep a consistent, moderate tension and check stitch counts often. βœ— Sewing pieces without pinning can lead to uneven placement and a crooked final toy; pin feet and head in position before sewing and review symmetry before fastening off. βœ— Forgetting to leave a long tail when fastening off makes assembly sewing difficult; always leave a long strand when you plan to attach pieces later and use it to secure parts cleanly.

Creeper Amigurumi Pattern

Create an adorable kawaii Creeper amigurumi inspired by Minecraft. This clear pattern guides you through every round, from head and body shaping to tiny embroidered details, so you can craft a 15 cm tall plush with confidence. Perfect as a collectible or handmade gift, it includes materials, step-by-step rounds, photos, and assembly tips to help you finish with a polished result.

Intermediate 5-7 Hours

Materials Needed for Creeper Amigurumi Pattern

β€” Main Fabric

  • 01
    2.5 mm cotton yarn (Rainbow cotton 8/6) - Green lime (main color)
  • 02
    2.5 mm cotton yarn (Rainbow cotton 8/6) - Dark green (for squares and details)
  • 03
    2.5 mm cotton yarn (Rainbow cotton 8/6) - Pink (for blush)
  • 04
    2.5 mm cotton yarn (Rainbow cotton 8/6) - White (for eye reflections)
  • 05
    Black felt - for eyes and mouth
  • 06
    Synthetic cotton filling (polyester stuffing) for head, body and feet

β€” Tools Required

  • 01
    2.5 mm crochet hook
  • 02
    Yarn needle for sewing and embroidery
  • 03
    Scissors
  • 04
    Hot glue gun or needle and thread to sew felt
  • 05
    Stitch markers
  • 06
    Pins for assembly (optional)

Progress Tracker

0% Complete

β€” Head :

Info :

With 2.5 mm lime green cotton yarn.

Round 1 :

8 sc in a magic ring (8)

Round 2 :

8 inc (16)

Round 3 :

2 inc, 2 sc (24)

Round 4 :

1 sc, 2 inc, (4 sc, 2 inc) x3, 3 sc (32)

Round 5 :

2 sc, 2 inc, (6 sc, 2 inc) x3, 4 sc (40)

Round 6 :

3 sc, 2 inc, (8 sc, 2 inc) x3, 5 sc (48)

Round 7 :

4 sc, 2 inc, (10 sc, 2 inc) x3, 6 sc (56)

Round 8 :

5 sc, 2 inc, (12 sc, 2 inc) x3, 7 sc (64)

Round 9 :

1 sc BLO (64)

Round 10 - Round 26 :

1 sc (64)

Round 27 :

7 sc, 2 dec, (12 sc, 2 dec) x3, 5 sc BLO (56)

Round 28 :

6 sc, 2 dec, (10 sc, 2 dec) x3, 4 sc (48)

Round 29 :

5 sc, 2 dec, (8 sc, 2 dec) x3, 3 sc (40)

Round 30 :

4 sc, 2 dec, (6 sc, 2 dec) x3, 2 sc (32)

Round 31 :

3 sc, 2 dec, (4 sc, 2 dec) x3, 1 sc (24)

Info :

Stuffing

Round 32 :

2 sc, 2 dec (16)

Round 33 :

8 dec (8)

Round 34 :

4 dec (4)

Info :

Fasten off with sl st, cut and hide the strand.

β€” Body :

Info :

With 2.5 mm lime green cotton yarn.

Round 1 :

8 sc in a magic ring (8)

Round 2 :

8 inc (16)

Round 3 :

2 inc, 2 sc (24)

Round 4 :

1 sc, 2 inc, (4 sc, 2 inc) x3, 3 sc (32)

Round 5 :

2 sc, 2 inc, (6 sc, 2 inc) x3, 4 sc (40)

Round 6 :

1 sc BLO (40)

Round 7 - Round 18 :

1 sc (40)

Round 19 :

2 sc, 2 dec, (6 sc, 2 dec) x3, 4 sc BLO (32)

Round 20 :

1 sc, 2 dec, (4 sc, 2 dec) x3, 3 sc (24)

Info :

Stuffing

Round 21 :

2 sc, 2 dec (16)

Round 22 :

8 dec (8)

Round 23 :

4 dec (4)

Info :

Fasten off with sl st and leave a long strand to sew to the head.

Info :

Sew with a yarn needle joining R.19 of the body to R.29 of the head.

β€” Feet :

Info :

With 2.5 mm lime green cotton yarn.

Round 1 :

8 sc in a magic ring (8)

Round 2 :

8 inc (16)

Round 3 :

2 inc, 2 sc (24)

Round 4 :

1 sc BLO (24)

Round 5 - Round 10 :

1 sc (24)

Round 11 :

2 sc, 2 dec (16)

Info :

Stuffing

Round 12 :

8 dec (8)

Round 13 :

4 dec (4)

Info :

Fasten off with sl st and leave a long strand to sew to the body.

Info :

Join R.4 - R.6 of the feet to R.6 - R.8 of the body.

Info :

Sew two feet to the front and two feet to the back.

β€” Details :

Info :

With 2.5 mm dark green cotton yarn and a yarn needle embroidery three squares in front of each foot in R.9.

Info :

With 2.5 mm dark green cotton yarn and a yarn needle embroidery two squares in the front part of the body, one square in R.14 and another in R.16.

β€” Face :

Info :

Cut out two 2.5 cm eyes with black felt and embroidery two reflections with white cotton yarn and a yarn needle to give it a kawaii touch.

Info :

Glue the eyes between R.13 and R.17 of the head.

Info :

With black felt, cut out a mouth 4.5 cm long and 3 cm high.

Info :

Glue the mouth between R.19 and R.25 of the head.

Info :

With pink cotton yarn and a yarn needle make two blushes in R.19 on the head.

Assembly Instructions

  • Sew the head to the body by joining R.19 of the body to R.29 of the head using a yarn needle, securing with a strong whipstitch and hiding the tail.
  • Join R.4 - R.6 of each foot to R.6 - R.8 of the body; position two feet at the front and two at the back and sew securely.
  • Attach felt eyes between R.13 and R.17 of the head and glue or sew the black felt mouth between R.19 and R.25 of the head.
  • Embroider dark green squares on the feet (three squares in front of each foot in R.9) and on the body (one square in R.14 and one in R.16) using a yarn needle.
  • Make two small pink blushes on R.19 with pink cotton yarn and a yarn needle for a kawaii finish.
  • Fasten off all pieces with slip stitch, cut tails and hide strands neatly inside the amigurumi.

Important Notes

  • πŸ’‘Use a stitch marker to mark the first stitch of each round and move it up as you work to maintain accurate stitch counts.
  • πŸ’‘Stuff the parts firmly and evenly, especially around square corners, to keep the amigurumi's shape consistent and neat.
  • πŸ’‘Pin pieces in place before sewing to ensure correct positioning and symmetrical assembly.
  • πŸ’‘Leave a long yarn tail when fastening off parts that will be sewn together to make assembly easier and cleaner.

This cute Creeper amigurumi is designed to bring a touch of gaming nostalgia to your handmade collection. The pattern includes full round-by-round instructions, embroidery details, and felt placements for an adorable, kawaii finish. Make one as a gift or keep it as a cuddly desktop companion. 🧢✨

You ask,

we answer.

FAQs

What size will the finished piece be?

The finished amigurumi measures approximately 15 cm high when using 2.5 mm cotton yarn and the recommended hook size.

Can I use different yarn weights for this pattern?

Yes, you can use different yarn weights but this will affect the final size; use an appropriate hook size and expect the finished toy to be larger or smaller.

Do I need prior crochet experience for this pattern?

This pattern is rated intermediate, so basic knowledge of single crochet, increases, decreases and working in continuous rounds is recommended.

How long does this project typically take to complete?

Most crocheters complete this project in about 5-7 hours, depending on experience level, finishing details and assembly time.

Should I glue or sew the felt pieces for the face?

You can glue the felt with a hot glue gun for a quick finish or sew the felt with a needle and thread for extra durability and a neater result.